How to Transplant Giant taro?
The ideal period for relocating giant taro is from mid to late spring or mid to late autumn, since the plant flourishes under these temperate circumstances. To achieve optimal outcomes, select a site featuring soil that drains effectively, receives partial sunlight, and offers sufficient room.
Essential Preparations Before Relocating Giant Taro
Optimal Period for Giant Taro Relocation?
The best time to move giant taro is from mid-spring to late spring, or mid-fall to late fall. During these periods, moderate temperatures and consistent moisture promote root development, maximizing giant taro's growth potential.
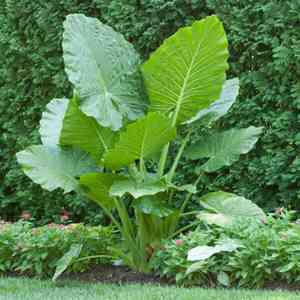
Recommended Spacing Between Giant Taro Specimens?
For proper spacing, allow giant taro ample room to expand! Aim for approximately 3-6 feet (0.9-1.8 meters) between these magnificent plants when transplanting.
Ideal Soil Blend for Giant Taro Transplantation?
Begin by preparing soil that drains well and is rich in organic material. Incorporate a base fertilizer high in potassium to supply giant taro with the necessary nutrients for vigorous growth.
Optimal New Site for Your Giant Taro?
Select a spot that receives filtered sunlight, as giant taro benefits from protection against intense afternoon sun. A location with partial shade should be suitable!
Equipment Required Before Transplanting Giant Taro?
Gardening Gloves
To safeguard your hands while handling soil and the giant taro plant.
Shovel or Spade
To assist in excavating around and extracting the giant taro from its initial position.
Wheelbarrow
For moving the giant taro and soil to its new site.
Garden Trowel
To create the planting cavity in the new location.
Watering Can or Hose
To hydrate and help settle the giant taro into its new environment.
Mulch
To cover the ground around the plant and maintain moisture.
Method for Extracting Giant Taro from the Soil?
Method for Extracting Giant Taro from the Soil?
- From Ground:First, moisten the giant taro plant to dampen the soil. Next, excavate a wide trench around the plant using a shovel or spade, ensuring the plant's root ball remains intact. Carefully maneuver the spade beneath the root ball to lift the plant from its original spot.- From Pot:Gently tap the pot's sides to loosen the root ball. While supporting the plant's base, carefully remove it from the pot by tilting it or gently pulling the plant.- From Seedling Tray:Use your fingers or a clean, blunt tool to carefully loosen the soil around the seedlings. Gently work the tool under the roots and lift the seedling from the tray.
Step-by-Step Guide for Relocating Giant Taro
Planting Schedule
Choose a time to transplant giant taro when the plant is most stable, such as early morning or late afternoon to prevent heat stress.
Excavate Hole
Use a garden trowel to dig a hole twice as wide and slightly deeper than the giant taro's root ball in your chosen spot.
Prepare the Cavity
Loosen the soil at the bottom of the hole to facilitate easy root penetration. If desired, incorporate organic matter to enhance soil structure.
Position the Plant
Gently lower the giant taro into the hole, ensuring the top of the root ball is level with the soil surface.
Backfill the Cavity
Fill the area around the root ball with the excavated soil. Gently pat down the soil to remove air pockets, but avoid compacting it.
Water
Use a watering can or hose to water giant taro at the plant's base, allowing the water to soak in and settle the soil.
Mulching
Apply a 2-3 inch layer of mulch around the plant's base, keeping it a few inches away from the stems to prevent rot.
Post-Transplantation Care for Giant Taro?
Watering
Keep the soil around the giant taro consistently moist, but not waterlogged, for the initial weeks after transplanting to aid in developing strong roots.
Monitoring
Observe the giant taro for indications of stress, such as yellowing leaves, wilting, or drooping. Address any issues promptly by providing additional water or shade as necessary.
Fertilizing
Wait one month after transplanting giant taro before applying a balanced slow-release fertilizer, adhering to the package instructions for amount and frequency.
Pruning
Remove any dead or damaged leaves on the giant taro after transplanting to encourage healthy new growth.
Resolving Common Issues with Giant Taro Transplantation.
When is the ideal time to transplant giant taro?
Transplant giant taro during mid to late spring or mid to late fall for optimal outcomes.
What spacing is recommended between giant taro plants?
Ensure a distance of 3-6 feet (0.9-1.8 meters) between giant taro plants for best growth.
What soil type is best for transplanting giant taro?
Giant taro thrives in well-draining, fertile soil with a pH level between 5.5 and 6.5.
How deep should I plant giant taro during transplantation?
Dig a hole at least twice the width and depth of giant taro's root ball for proper stability.
How should I water giant taro after transplanting?
Water giant taro thoroughly post-transplanting and then maintain moist soil conditions during the establishment phase.
What sunlight conditions does giant taro require after transplanting?
Giant taro needs partial to full sunlight, but it can also tolerate light shade.
How can I prevent transplant shock in giant taro?
Water consistently, use a root booster, and allow a 1-2 week acclimation period before transplanting giant taro.
Should I add any amendments to the soil when transplanting giant taro?
Incorporate organic matter, compost, or well-rotted manure into the soil to enhance fertility and drainage.
Can I transplant giant taro indoors before moving it outdoors?
Yes, start giant taro indoors in a pot and gradually expose it to outdoor conditions before permanent transplantation.
How long does it take for giant taro to establish itself after transplanting?
It typically takes 2-4 weeks for giant taro to become established in its new location with appropriate care.


