Boost Growth: How and When to Repot Your Millot kalanchoe Plant
1
To ensure peak development, transplant your Millot kalanchoe biannually.
2
Millot kalanchoe flourishes in soil that drains effectively, averting root decay.
3
The ideal period for repotting Millot kalanchoe is early spring or prior to the onset of new development.
Why Repot Your Millot Kalanchoe?
Encourage robust root development
Repotting your Millot kalanchoe is vital for fostering strong root growth. Over time, the plant's root system can completely fill its container, leaving no room for expansion. This can lead to roots becoming intertwined and compressed, hindering proper water and nutrient absorption. By transferring your plant to a larger pot with fresh substrate, you provide ample space for roots to spread, thereby supporting the plant's overall health and vigor.
Improve nutrient absorption
As the potting medium in your plant's container ages, its nutritional content gradually diminishes. Fresh, well-draining soil is crucial for delivering the essential nutrients your Millot kalanchoe needs to thrive. Repotting ensures your plant has access to a renewed supply of nutrient-rich soil, facilitating better uptake and utilization. This key step can significantly boost your plant's growth and flowering potential.
Prevent root constriction and overcrowding
Root binding occurs when a plant's roots grow so densely that they encircle themselves, often observed in plants left in the same pot for extended periods. This can restrict the plant and impede its development. Repotting your Millot kalanchoe prevents this by offering a larger area for root expansion. It also allows for the removal of any dead or unhealthy roots, ultimately preventing congestion and promoting healthier growth.
Optimal Repotting Period
Early spring or prior to new growth
The ideal time to repot your Millot kalanchoe is in early spring, just before its new growth cycle begins. During this period, the plant is emerging from dormancy and entering its active growth phase. Repotting at this time helps minimize plant stress and encourages faster recovery and establishment in its new setting. Winter can also be suitable for repotting if the plant is dormant and not actively growing.
Indicators signaling the need for repotting
Several signs suggest it's time to repot your Millot kalanchoe. These include roots emerging from drainage holes, stunted growth despite adequate care, and soil that dries out very quickly after watering. If your plant frequently topples over, it's another indication it has outgrown its current container. These signals point to the necessity of a new pot and fresh soil to ensure the plant's continued health and development.
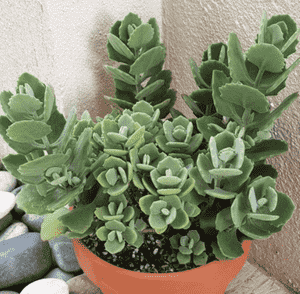
Selecting the Right Pot and Soil for Your Millot Kalanchoe
Choosing a container with proper drainage
Selecting the appropriate pot is vital for your Millot kalanchoe's well-being. A pot with sufficient drainage allows excess water to escape, preventing root rot and other moisture-related problems. Look for a container with multiple drainage holes, and avoid pots that easily deform or crack. Additionally, consider using ceramic or terracotta pots, as these materials are porous and enhance air circulation, further aiding drainage.
Utilizing well-draining soil specifically for succulents
Millot kalanchoe is a succulent, meaning it requires well-draining soil to flourish. Using a specialized succulent or cactus mix is perfect as it provides the correct texture and drainage properties. These mixes typically contain ingredients like perlite, sand, and peat moss, which help prevent water from pooling in the soil and causing root rot. Avoid using standard potting soil, which retains too much moisture and can lead to root issues.
Step-by-Step Guide to Repotting Millot Kalanchoe
Gently extract the plant from its existing container
Begin by carefully removing your Millot kalanchoe from its current pot. Gently turn the pot on its side and tap the bottom to loosen the root ball. Hold the plant at its base and carefully pull it free. If the plant is stuck, you might need to run a knife around the edges to ease it out without harming the roots.
Carefully trim dead or decaying roots
Once the plant is out of its pot, inspect the roots. Using clean, sharp scissors or pruning shears, trim away any dead, rotting, or excessively long roots. Healthy roots are typically white or light-colored, while unhealthy roots may appear brown or black and feel soft. Trimming these roots not only cleans the plant but also stimulates new growth.
Position in new pot and backfill with soil
Place a layer of well-draining succulent soil at the bottom of your new pot, then center the Millot kalanchoe. Ensure the plant is upright and fill in around it with more soil, gently pressing it down to remove air pockets. Be careful not to bury the stem too deeply, as this can cause rot. Leave some space at the top of the pot for watering.
Water adequately and place in suitable location
After repotting, water your Millot kalanchoe moderately to help the soil settle and provide the roots with necessary moisture. Avoid overwatering. Place the newly potted plant in a spot with indirect sunlight and allow it time to acclimate to its new surroundings. You can gradually return it to its usual location after a few days.
Aftercare Tips for Your Newly Repotted Millot Kalanchoe
Monitoring moisture requirements
Post-repotting, it's crucial to observe your Millot kalanchoe's water needs. While it's adapting to its new pot, the plant might require more or less water than usual. Generally, water when the top 2-3 cm (1 inch) of soil feels dry to the touch. Prevent overwatering, which can lead to root rot.
Adapting to new light conditions
Your Millot kalanchoe may also need to adjust to new lighting conditions. Monitor its response to light and make gradual changes if necessary. This succulent prefers bright but indirect sunlight. If you notice scorched or browning leaves, consider moving it to a location with less direct light.
Observing for signs of stress or development
During the initial weeks after repotting, watch for signs of stress or new growth. Some stress is normal as the plant adjusts, but prolonged wilting or yellowing might indicate underlying issues. Conversely, fresh, healthy growth signifies that the plant is content in its new environment and thriving.


