How to Prune Western red cedar?
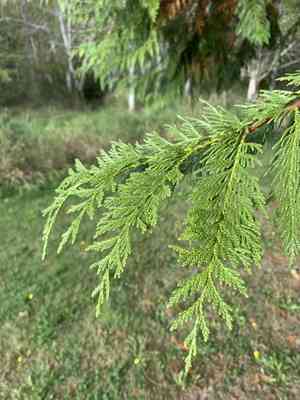
This evergreen conifer is prized for its thick greenery and impressive height. Essential trimming methods for western red cedar involve targeted thinning cuts to uphold its structure and boost airflow. The perfect time for pruning is in winter, refraining from extensive cuts to retain its inherent shape. Particular points to remember include trimming solely when essential to avert illness, with advantages such as improved development and aesthetic appeal. Pruning implements must be disinfected to ward off contamination.
What Are the Benefits of Pruning Western Red Cedar?
What Are the Benefits of Pruning Western Red Cedar?
Trimming western red cedar promotes more robust development, channeling energy to preferred growth zones and preserving its form for visual appeal and structural soundness, which is crucial for this densely foliaged plant.
What Is the Best Time for Pruning Western Red Cedar?
What Is the Best Time for Pruning Western Red Cedar?
Winter is considered the ideal period for pruning western red cedar due to several factors. During this season, the plant is in a dormant state, resulting in less stress when pruning. This dormancy minimizes sap flow, reducing the chance of bleeding and disease infection. Pruning in winter also allows for better visibility of the plant's structure since foliar growth is minimal, enabling more accurate cuts. Moreover, cutting back at this time of the year stimulates new growth in the spring, which is vital for the plant's health and vigor. Pruning outside of winter might interfere with the growth cycle and could potentially harm the plant's health or reduce natural defenses against pests and diseases.
What Tools Do I Need to Prune Western Red Cedar?
Hand Pruners
For trimming slender branches and foliage to shape western red cedar or remove small growths. They offer precision and are perfect for making clean cuts without harming the plant.
Lopping Shears
These are essential for cutting through thicker branches of western red cedar, typically those up to about 1.5 inches in diameter. Their long handles provide leverage to simplify the task.
Hedge Shears
Ideal for shaping western red cedar when aiming for a formal hedge appearance, hedge shears allow for the trimming of multiple small branches simultaneously, resulting in a neat and tidy finish.
Pruning Saw
When dealing with branches thicker than what loppers can handle, a pruning saw is indispensable. It enables the removal of larger branches from western red cedar without causing undue stress or jagged cuts.
Pole Pruner
For reaching the higher branches on western red cedar without using a ladder, pole pruners offer an extended reach and can typically cut through branches up to 1 inch in diameter.
How to Prune Western Red Cedar
Step1: Determining Optimal Pruning Season
Identify the best season to prune western red cedar, which is typically in late winter or early spring before new growth begins. Pruning during this time helps prevent disease and reduces stress on the plant.
Step2: Sterilizing Pruning Tools
Sanitize your pruning tools using a solution of 1 part bleach to 9 parts water to prevent the spread of diseases.
Step3: Removing Dead Branches
Start by removing dead wood. Locate dead branches by checking for a lack of flexibility and discoloration. Make precise cuts just above a healthy branch or bud, ensuring not to cut into the healthy tissue.
Step4: Trimming Broken Branches
Address broken branches by making a clean cut just above a lateral branch or bud. If the break is jagged, smooth the edge with a pruning saw to promote healing.
Step5: Cutting Out Diseased Plant Parts
Inspect western red cedar for diseased portions, indicated by unusual coloration, growths, or decay. Cut these areas back to healthy tissue, and dispose of the diseased material properly to prevent further infection.
Step6: Using Three-Cut Method for Large Branches
When making cuts on larger branches, use the three-cut method to prevent bark stripping: Make a small notch on the underside of the branch a few inches away from the trunk, then make a second cut above this and away from the trunk to remove the weight of the branch, finishing with a final cut just outside the branch collar at the branch's base.
Step7: Shaping Plant Post-Pruning
After removing all dead, broken, and diseased branches, evaluate western red cedar's overall shape. If further shaping is necessary for size control or aesthetics, make sure to prune sparingly, as western red cedar does not tolerate heavy pruning well.
Step8: Pruning Clean-Up
Clear away all debris and trimmings from around western red cedar to discourage pests and disease, and to maintain a tidy appearance.
Step9: Hydrating Plant After Pruning
Water western red cedar after pruning to help reduce stress on the plant and support recovery.
Step10: Monitoring Plant Health Post-Pruning
Monitor western red cedar for signs of new growth and health after pruning, providing care as needed to ensure robust growth throughout the growing season.
Post-Pruning Care for Western Red Cedar
Post-Pruning Care for Western Red Cedar
Immediately after pruning western red cedar, ensure clean, sharp cuts to aid healing. Maintain moderate moisture; overwatering can lead to root issues. Position western red cedar in dappled light, avoiding intense sun. Post-pruning, balance temperatures, avoiding extremes. Fertilize lightly with a balanced, slow-release formula to support regrowth, avoiding excess nitrogen which can stress western red cedar. Regularly inspect for discoloration or wilting as stress indicators. If signs of infection like unusual growths appear, apply appropriate fungicides or seek expert advice. This vigilant care fosters robust recovery and growth for western red cedar.
Common Pruning Mistakes with Western Red Cedar
Over-pruning reduces photosynthesis and growth
Excessive pruning is a common error that risks harming western red cedar. Removing too much foliage can prevent the plant from photosynthesizing efficiently, hindering its growth and vigor.
Avoid cutting into old wood without green shoots
Cutting into the old wood where there are no green shoots can stop western red cedar from properly regenerating as these areas don't readily produce new growth.
Use sharp and clean tools for healthy cuts
Using dull or unclean pruning tools can lead to jagged cuts that are more susceptible to disease, and can also cause unnecessary damage to western red cedar's structure and aesthetic.
Prune with clear objectives to maintain shape
Pruning without a clear objective can result in a misshapen or uneven appearance, stripping western red cedar of its natural form and density.
Remove dead or diseased branches promptly
Neglecting to remove dead, damaged, or diseased branches can lead to the spread of pests and diseases, negatively affecting the health of western red cedar.
Common Pruning Tips for Western Red Cedar
Use sharp, clean tools for efficient healing
Always use sharp, clean pruning tools to make clean cuts that western red cedar can heal from more efficiently, reducing the risk of disease.
Follow natural form when shaping plant
When shaping western red cedar, follow its natural pyramidal form, trimming lightly to maintain density and uniformity without compromising the overall aesthetic.
Thin overcrowded areas to boost health
Focus on thinning out crowded areas to enhance air circulation and light penetration, which will contribute to the overall health and vigor of western red cedar.
Cut back to healthy wood to prevent disease spread
Identify and promptly remove any dead, damaged, or diseased branches, cutting them back to a point of healthy wood to prevent any potential spread to healthy areas.
Cut above lateral branches for desired growth direction
When reducing the height or spread of western red cedar, ensure cuts are made just above a lateral branch or bud facing the direction you wish new growth to follow, promoting a desirable shape.


