How to Prune Neem tree?
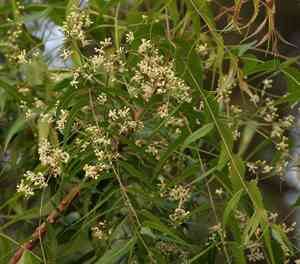
Originating from India, the neem tree is a resilient tree that tolerates dry conditions and possesses therapeutic qualities. The most effective time for trimming is from early to late spring, following the harvest. Consistently eliminate any lifeless or ailing branches, reduce crowded limbs to improve air circulation, and sculpt the canopy for symmetrical development. Trimming stimulates fresh leaf growth, boosts fruit production, and deters pest outbreaks. Avoid making extensive cuts to prevent strain. Pruning not only boosts the plant's well-being but also elevates the levels of active compounds within its leaves.
What Are the Benefits of Pruning Neem Tree?
What Are the Benefits of Pruning Neem Tree?
Trimming neem tree boosts output, stimulates growth, and maintains its form. Strategic cuts promote health, increase flowering and fruiting, curb disease, and allow gardeners to manage its size for a well-kept appearance.
What Is the Best Time for Pruning Neem Tree?
What Is the Best Time for Pruning Neem Tree?
Pruning neem tree during early to late spring aligns with the post-winter rejuvenation phase when the tree is entering a period of active growth. This timing ensures that any cuts made will heal quickly as the sap flow increases, minimizing stress on the plant and reducing the risk of disease invasion. Additionally, this period precedes the flowering and fruiting cycles, thus aiding the tree in channeling its energy towards producing healthy blooms and seeds. By avoiding pruning in the autumn or winter dormancy period, when the tree is less resilient, gardeners can ensure that neem tree has the best chance for vigorous growth and robust health throughout the season.
What Tools Do I Need to Prune Neem Tree?
Hand Pruners
Ideal for trimming small branches and leaves on neem tree, as they allow for precise cuts without causing undue stress to the plant.
Lopping Shears
Suitable for cutting through thicker branches of neem tree due to their long handles, which provide leverage and make it easier to reach higher limbs.
Pruning Saw
Necessary for removing larger limbs of neem tree, offering the capability to cut through thick branches that hand pruners and lopping shears cannot handle.
Hedge Shears
Neem tree can be shaped with hedge shears for aesthetic purposes, as they allow for trimming and shaping over a larger surface area with each cut.
Pole Pruner
For maintaining the taller specimens of neem tree, a pole pruner can be used to trim higher branches safely from the ground.
Gloves
While not a cutting tool, gloves are essential when pruning neem tree to protect hands from sap, which may be irritating to some individuals, and from any sharp edges or thorns.
Cleaning Solution
To prevent the spread of disease when pruning neem tree, it is crucial to sterilize all pruning tools before and after use with a cleaning solution or rubbing alcohol.
How to Prune Neem Tree
Step1: Timing for Pruning
Identify the right time to prune neem tree, which is typically in the late winter or early spring before the onset of new growth. This timing helps the tree recover quickly and reduces the risk of disease infection.
Step2: Tool Sterilization
Sterilize your pruning tools with a solution of 1 part bleach to 9 parts water to prevent the spread of disease. Let the tools soak for approximately 30 minutes and then rinse them with clean water before use.
Step3: Dead Wood Removal
Examine neem tree for dead wood by looking for branches that lack leaves and are dry and brittle. Use hand pruners for small branches and loppers for larger ones, cutting back to the point of live, healthy wood.
Step4: Cutting Infected Branches
Locate infected branches on neem tree by identifying any areas with discoloration, unusual growths, or signs of insect infestation. Make cuts well below the affected areas into healthy tissue to prevent the spread of disease. Disinfect your tools after each cut.
Step5: Clearance and Safety Pruning
Assess neem tree for low hanging branches that interfere with walking paths, are too close to structures, or are shading out desired vegetation below. Prune these branches to maintain a clear space, cutting just outside the branch collar without leaving stubs.
Step6: Canopy Shaping and Thinning
Shape neem tree carefully, avoiding excessive removal of foliage which can stress the tree. Moderate thinning is recommended to improve light penetration and air circulation through the canopy.
Step7: Post-Pruning Cleanup
After pruning, clean up the debris from around neem tree to discourage pests and diseases. Dispose of or destroy any diseased material to prevent reinfection.
Step8: Post-Pruning Monitoring and Care
Monitor neem tree after pruning for signs of recovery or further issues. Water the tree adequately and apply a layer of mulch around the base to maintain soil moisture and reduce temperature fluctuations.
Step9: Consulting an Arborist
If you're unsure of how to identify diseased tissue or proper cutting technique, consult with a professional arborist or horticulturist before proceeding to ensure the long-term health of neem tree.
Post-Pruning Care for Neem Tree
Post-Pruning Care for Neem Tree
Immediately after pruning neem tree, sanitize wounds with a mild solution to prevent infection. Ensure neem tree is placed in a location with adequate sunlight and protected from extreme temperatures. Maintain moderate humidity to support healing. Apply a balanced fertilizer to replenish nutrients and encourage growth. Observe the pruned areas regularly for signs of distress or disease, such as discoloration or wilt. Should any symptoms arise, promptly treat with appropriate fungicides or pest control measures.
Common Pruning Mistakes with Neem Tree
Excessive Pruning at Once
Removing too much at once, which can stress neem tree and make it vulnerable to pests and diseases.
Improper Branch Cutting Technique
Cutting branches flush to the trunk, which removes the branch collar and can harm neem tree's natural healing process.
Bark Tearing During Large Branch Removal
Tearing the bark when cutting large branches, which can lead to infections and decay in neem tree.
Pruning with Unsterilized Tools
Pruning without sterilizing tools, which can spread disease between plants.
Over-pruning of Young Plants
Over-pruning young neem tree plants, which can stunt growth and delay maturity.
Ignoring Dead or Diseased Wood
Neglecting to remove dead or diseased wood, which can host pests and impede neem tree's overall vigor.
Common Pruning Tips for Neem Tree
Clean Cuts with Sharpened Pruning Shears
Use sharp, clean pruning shears to make clean cuts on neem tree, which helps the plant heal faster and prevents the spread of diseases.
Proper Angle and Position for Pruning Cuts
Cut at a 45-degree angle about 1/4 inch above a bud facing the outside of the plant to encourage outward growth.
Maintaining Natural Shape by Thinning Branches
Prune to maintain the natural shape of neem tree, focusing on thinning out congested branches to increase air circulation and light penetration.
Prioritizing Removal of Harmful Branches
Prioritize the removal of diseased, damaged, or dead branches to improve neem tree's health and appearance.
Preventing Bark Tearing with Gradual Cuts
When removing larger branches, make a series of cuts to prevent bark tearing: a notch cut on the underside of the branch, a second cut further out to remove the bulk of the branch, and a final cut just outside the branch collar.
Preserving the Branch Collar During Pruning
Retain the branch collar when pruning larger branches, as this area contains cells that will help close the wound.


