How to Prune Giant taro?
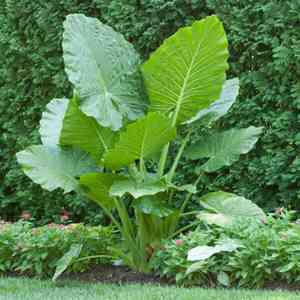
Distinguished by its expansive, arrowhead-shaped foliage, Alocasia macrorrhiza necessitates meticulous trimming to preserve its well-being and visual appeal. Detach discolored or compromised leaves at the stalk's foundation, fostering fresh development and air circulation. Perform pruning in early spring or late winter prior to the onset of vigorous growth. Guarantee the sterility of incisions to avert illness. Trimming boosts plant robustness, diminishes the likelihood of infestations, and manages its dimensions for cultivation indoors.
What Are the Benefits of Pruning Giant Taro?
What Are the Benefits of Pruning Giant Taro?
Trimming giant taro promotes vigorous new growth and helps maintain its distinctive shape. Strategic cuts enhance health and form, maximizing the aesthetic appeal of giant taro's large, lush leaves.
What Is the Best Time for Pruning Giant Taro?
What Is the Best Time for Pruning Giant Taro?
These periods are ideal because giant taro enters a dormant phase in colder months, meaning pruning will cause less stress. During late winter and early spring, giant taro is preparing for a new growth cycle, making it a perfect time to shape the plant and remove any dead or damaged foliage. This timing also helps prevent disease spread, as cuts heal faster with the onset of the plantâs active growth. Additionally, pruning before the spring growth spurt allows gardeners to direct the plant's energy towards producing healthy, robust growth rather than sustaining unnecessary or damaged leaves.
What Tools Do I Need to Prune Giant Taro?
Bypass Pruners
Perfect for making clean cuts on the thinner stems and leaves of giant taro, bypass pruners are effective for precise trimming without causing undue harm to the plant's structure.
Long-handled Loppers
Suitable for reaching into the dense foliage of giant taro to cut thicker stems that bypass pruners cannot handle. The extended handles provide leverage for easier and more accurate cutting.
Pruning Saw
Essential for cutting through the toughest and thickest stems that giant taro may develop, especially if the plant is mature and well-established.
Gardening Gloves
Crucial for protecting hands from sharp edges and potential irritants in giant taro's sap, ensuring a safe pruning process.
Disinfectant
Useful for cleaning tools before and after pruning giant taro to prevent disease transmission and maintain plant health.
How to Prune Giant Taro
Step1: Tool Preparation
Prepare the necessary tools for trimming giant taro. You will need sharp, clean scissors or pruning shears, gloves to protect your hands, and disinfectant for cleaning the tools before and after pruning to prevent disease spread.
Step2: Plant Inspection
Examine giant taro for the parts that require trimming. Carefully inspect it to identify any yellow leaves, withered leaves, and dead stems. These are common indicators that those parts of the plant need to be pruned for health and aesthetic reasons.
Step3: Pruning Yellow Leaves
Begin with the yellow leaves. Gently tug on the yellow leaves to see if they detach easily, indicating they are ready for removal. If they do not, use your scissors or shears to make a clean cut at the base of the leaf where it connects to the stem.
Step4: Trimming Withered Leaves
Proceed to the withered leaves. These can be more delicate, so handle them with care. Ensure you cut as close to the base as possible without harming the adjacent healthy tissue or the main stem.
Step5: Cutting Dead Stems
Remove dead stems next. Identify the stem's base where it emerges from the soil or main root structure. Cut the dead stem at this base, ensuring you do not damage the surrounding healthy stems or roots.
Step6: Post-Pruning Assessment
After trimming the identified parts, take a moment to check the overall health and shape of giant taro. This is an ideal time to make any additional shaping cuts to maintain its appearance, keeping in mind giant taro's natural form.
Step7: Cleanup and Disposal
Clean up the work area and properly dispose of the trimmings. Leaving organic waste can attract pests or cause fungal issues. Ensure to use proper composting methods or disposal that is appropriate for garden waste.
Step8: Tool Disinfection
Disinfect your tools once again after pruning giant taro to prevent cross-contamination between different plants or future pruning sessions with giant taro.
Step9: Post-Pruning Monitoring
Monitor giant taro after pruning to ensure it recovers well. Proper aftercare includes maintaining appropriate light conditions, watering practices, and humidity for giant taro, which prefers a warm, moist environment, not soggy soil.
Post-Pruning Care for Giant Taro
Post-Pruning Care for Giant Taro
Immediately after trimming giant taro, ensure cleanliness by removing debris to prevent disease. Optimize environmental parameters â giant taro thrives in bright, indirect light, high humidity, and warm temperatures between 65-85°F. Post-pruning, reduce fertilization for 4-6 weeks to allow recovery, then gradually reintroduce a balanced, water-soluble fertilizer. Regularly inspect the pruned areas of giant taro for signs of stress, such as discoloration or wilting, and watch for infection symptoms. If issues arise, isolate the plant and consult an expert for appropriate treatment.
Common Pruning Mistakes with Giant Taro
Avoid Pruning Close to Main Stalk
Trimming too close to the main stalk of giant taro might harm the plant. Allow a small stub to remain when removing leaves to prevent infection.
Do Not Over-Prune Foliage
Removing too many leaves at once can stress giant taro, as foliage is crucial for photosynthesis and overall health. Never prune more than one-third of the foliage at a time.
Sterilize Tools Before Pruning
Neglecting to sterilize pruning tools before cutting giant taro can introduce harmful pathogens and pests, leading to disease.
Preserve Aerial Roots
Cutting into or trimming the aerial roots of giant taro is a common error. These roots aid in stability and nutrient absorption and should be left untouched.
Limit Pruning of New Growth
Avoid excessive trimming of new or young growth, as this can hinder giant taro's development and reduce its robust nature.
Common Pruning Tips for Giant Taro
Cut Damaged Leaves Near the Base
When removing yellow or damaged leaves from giant taro, cut them at the base, near the primary stem, but avoid cutting into the stem itself to minimize harm to the plant.
Use Clean Sharp Tools for Precise Cuts
Use clean, sharp pruning tools specifically designed for cutting thick foliage to make precise cuts on giant taro and avoid tearing the plant tissue.
Apply Antifungal After Pruning
After pruning giant taro, apply a natural antifungal to the cut sites to help prevent infections that could harm the plant's health.
Monitor Plant's Health Post-Pruning
Monitor giant taro after pruning for signs of stress or disease and provide appropriate care, such as adjusting water or light, to support recovery.
Clear Debris After Pruning to Prevent Disease
Always remove any debris or fallen leaves from the base of giant taro after pruning to discourage pests and prevent fungal diseases.


