
New zealand geranium (Geranium retrorsum)
Also known as: Grassland crane's-bill
New Zealand geraniums showcase a number of features tailored to their tough habitats. Their uniquely lobed, textured leaves seem to mirror the rugged conditions they grow in. The stems, with their arching form, hint at their ability to withstand harsh environments. The plant's bright, eye-catching flowers not only add beauty but also play a crucial role in attracting pollinators, even in sparse and challenging landscapes.
In This Article
Attributes of New zealand geranium
Lifespan
Perennial
Plant Type
Herb
Plant Height
30-60 centimeters
Spread
30-60 centimeters
Leaf Color
Green
Flower Size
1-2 centimeters
Flower Color
Blue to purple
Images of New zealand geranium
Quickly Identify New zealand geranium
1
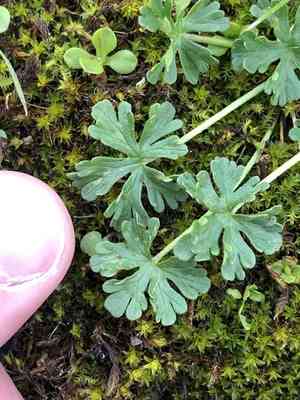
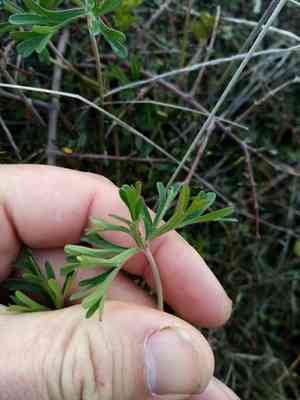
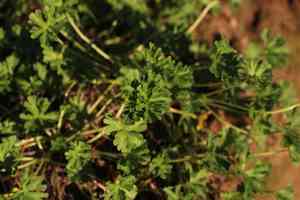
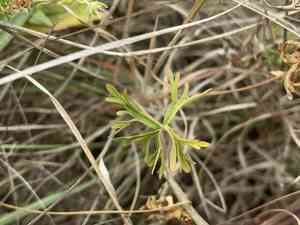
To identify Geranium retrorsum, look for its deeply divided, lobed leaves and its blue to purple flowers. The plant has a somewhat sprawling habit and often forms small clumps. Its stems are covered with fine hairs.
Scientific Classification of New zealand geranium
Phylum
Vascular plants
Class
Dicotyledons
Order
Geraniales
Family
Geranium
Genus
Geraniums
Species
New zealand geranium
Planting and Growing of New zealand geranium
Care Difficulty
Moderate
Watering Schedule
Every 8 days
Sunlight Requirements
Full sun
Sunshine Duration
6-12 hours
Ideal Temperature
60-75℉
Soil Type
Potting Mix, Peat Mix
Soil pH
6.5-7.5
Fertilizer Type
Balanced
Pruning Season
Spring, Summer
Pruning Area
Branches, Leaves
Pruning Frequency
2 times a year
Repotting Season
Spring
Pot Type
Plastic, Ceramic
 How to Water New zealand geranium?
For Geranium retrorsum, aim to thoroughly soak the soil but ensure no water stands in the pot. Use approximately 150 ml per session, keeping the soil moist but not soggy.
What are the symptoms of an underwatered New zealand geranium?
›
What should I do if my New zealand geranium is not getting enough water?
›
What are the symptoms of an overwatered New zealand geranium?
›
How to save an overwatered New zealand geranium?
›
 What Are the Sunlight Requirements for New zealand geranium?
Partial sun to full sun is ideal for Geranium retrorsum. Adequate light supports vigorous growth and profuse flowering, while preventing diseases common in shaded environments.
What is the ideal sunlight amount?
›
Solution for optimizing light exposure?
›
Benefits of ideal lighting conditions?
›
 What Is the Ideal Temperature Range for New zealand geranium?
For optimal growth, Geranium retrorsum thrives in temperatures ranging from 60°F to 75°F. This range provides the ideal conditions for photosynthesis and metabolic functions, ensuring robust growth and vibrant blooms. Temperatures within this range also help in maintaining soil moisture and preventing rapid evaporation.
 What Soil is Best for New zealand geranium?
Geranium retrorsum thrives in loamy soil enriched with organic matter. This nutrient-rich environment supports healthy growth and vibrant blooms, ensuring the plant receives essential minerals and nutrients. Proper drainage is crucial for Geranium retrorsum to prevent root rot. Well-drained soil allows excess water to escape, maintaining a balanced moisture level that helps the plant flourish without risk of over-saturation. Preferring slightly acidic to neutral pH levels between 6.5 to 7.5, Geranium retrorsum is optimal in such environments. Maintaining these pH levels ensures nutrient absorption and healthy root development.
 How to Fertilize New zealand geranium?
For Geranium retrorsum, moderate fertilization is key. Use a balanced liquid fertilizer diluted to half strength. When applying granular fertilizer, use approximately 2 to 3 tablespoons per square foot to avoid overfeeding and promote steady growth.
 How to Prune New zealand geranium?
Before you start pruning Geranium retrorsum, ensure you have a pair of sharp, clean pruning shears. Clean tools help prevent disease spread. Wearing gloves is also recommended to protect your hands from scratches. Look for any dead, diseased, or damaged stems. These should be removed first to allow the plant to focus its energy on healthier growth. Additionally, cut any crossing or overcrowded branches to improve air circulation. When cutting, aim to make clean cuts just above a leaf node or bud. This encourages new growth and helps the plant recover quickly. Remember to cut at a slight angle to prevent water from settling on the cut surface. For shaping, step back occasionally to view the overall symmetry of the plant. Trim back overgrown parts uniformly to achieve a balanced, pleasing shape. This not only enhances appearance but also supports even light exposure.
More About Pruning Techniques→
 How to Propagate New zealand geranium plant?
1
Collect seeds from mature Geranium retrorsum plants. Clean off any surrounding pulp and allow them to dry. This prevents mold growth and ensures better germination rates.
2
Select a healthy stem from the parent plant. Make a clean cut just below a node and remove the lower leaves. Dip in rooting hormone to enhance root development.
3
Carefully dig up a mature plant and separate the clumps by hand. Ensure each division has sufficient roots and replant them promptly to avoid stress.
 How to Repot New zealand geranium plant?
1
Repot Geranium retrorsum when you notice slowed growth, roots protruding from drainage holes, or if the soil dries out too quickly. These are signs that the plant is becoming root-bound and ready for a roomier home. Ideally, repot in spring or autumn when the plant is not in its peak flowering phase.
2
Select a pot that is one size larger than the current one, ensuring it has adequate drainage holes. This will provide the roots with more space to grow, preventing them from becoming overcrowded. A terracotta pot is excellent as it helps in air circulation and moisture regulation.
3
Opt for a well-draining potting mix that retains some moisture but doesn't become waterlogged. A mix of sand, peat, and perlite works well. This ensures that the roots receive plenty of air while still having enough moisture to keep the plant healthy.
Learn More About New zealand geranium Diseases
Anthracnose
Bacterial Leaf Spot
Bacterial Soft Rot
Bacterial Wilt
Black Spot
Chemical Injury
Crown Gall
Cyst Nematode
Damping-off
Downy Mildew
Drought Stress
Fusarium Wilt
Gray Mold
Leaf Curl
Leaf Spot
Mosaic
Nutrient Deficiency
Nutrient Toxicity
Powdery Mildew
Root Rot
Root-knot Nematode
Rusts
Sooty Mold
Spider Mites
Temperature Stress
Thrips Damage
White Mold


