
Mexican croton (Croton ciliatoglandulifer)
Also known as: Glandular Croton, Glandular Spurge, Croton glandulosus
Croton ciliatoglandulifer, commonly referred to as bush croton or Mexican croton, belongs to the Croton genus.
In This Article
Attributes of Mexican croton
Lifespan
Perennial
Plant Type
Shrub
Plant Height
0.5 - 1.5 meters
Spread
0.5 - 1 meters
Leaf Color
Green
Flower Size
0.2 - 0.5 centimeters
Flower Color
Yellow-green
Images of Mexican croton
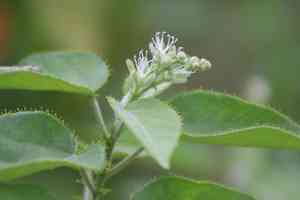
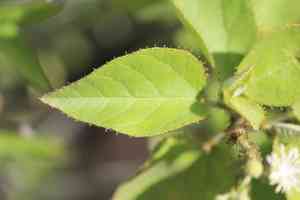
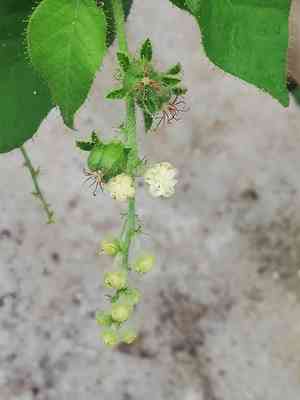
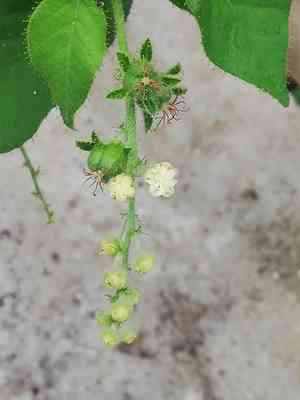
Quickly Identify Mexican croton
1
This plant can be identified by its glandular hairs, which are present on the stem and leaves. The leaves are typically ovate to lanceolate with serrated edges. The flowers are small and inconspicuous, usually yellow-green in color.
Scientific Classification of Mexican croton
Phylum
Vascular plants
Class
Dicotyledons
Order
Malpighiales
Family
Spurge
Genus
Rushfoils
Species
Mexican croton
Planting and Growing of Mexican croton
Care Difficulty
Hard
Watering Schedule
Every 2 days
Sunlight Requirements
Partial sun
Sunshine Duration
6-10 hours
Ideal Temperature
70-85℉
Soil Type
Potting Mix, Peat Mix
Soil pH
6.5-7.5
Fertilizer Type
Balanced
Pruning Season
Spring, Summer
Pruning Area
Branches, Leaves
Pruning Frequency
2 times a year
Repotting Season
Spring
Pot Type
Plastic, Ceramic
 How to Water Mexican croton?
For the Croton ciliatoglandulifer, each watering session should deliver approximately 250 ml of water. This amount is generally adequate to ensure the soil is moist but not waterlogged. The soil should be sufficiently damp to the touch just beneath the surface layer. This helps maintain the plant's hydration while preventing the roots from sitting in excess water, which could lead to rot.
What are the symptoms of an underwatered Mexican croton?
›
What should I do if my Mexican croton is not getting enough water?
›
What are the symptoms of an overwatered Mexican croton?
›
How to save an overwatered Mexican croton?
›
 What Are the Sunlight Requirements for Mexican croton?
Partial sun is ideal for this plant. Beneficial light conditions involve receiving organic sunlight moderately each day, which supports robust growth and enhances foliage with vivid streaks of colors while reducing potential stress from excessive or direct exposure.
What amount of sunlight is ideal for Croton ciliatoglandulifer?
›
What solutions are available to achieve ideal lighting?
›
What benefits does Croton receive with ideal lighting?
›
 What Is the Ideal Temperature Range for Mexican croton?
The ideal temperature range for cultivating Croton ciliatoglandulifer lies between 70°F and 85°F. This temperature range provides a comfortable climate for optimal growth and vitality. Croton plants thrive in warm conditions that mimic their natural tropical habitat. Keeping the temperature within this range ensures that the plant's metabolic processes function efficiently and that its vivid foliage maintains its vibrant colors.
 What Soil is Best for Mexican croton?
Croton ciliatoglandulifer thrives in nutrient-rich soil that supports its vibrant foliage. This type of soil provides essential minerals and organic matter, enhancing the plant's growth and overall health. The plant demands well-draining soil to prevent root rot. Adequate drainage allows excess water to escape, maintaining the optimal moisture level for healthy root development. A soil that retains moderate moisture helps the plant access water through long dry spells without becoming waterlogged. This balance supports the lush growth typical of this species.
 How to Fertilize Mexican croton?
Croton ciliatoglandulifer benefits from a balanced fertilizer regimen where liquid fertilizers are applied at a dilution ratio of 1:4 with water. Ensure the soil is moist before application to enhance nutrient uptake and avoid root burn. Solid, slow-release fertilizers should be applied sparingly, with a focus on even distribution across the plant's root zone to maintain nutrient consistency over time.
 How to Prune Mexican croton?
Begin pruning Croton ciliatoglandulifer by identifying overgrown and leggy branches. Use sharp, sterilized shears to make clean cuts just above a leaf node. This encourages bushier growth. Remove any dead or diseased leaves to improve the plant's overall health. Ensure even shaping by stepping back frequently to assess your work. Pruning not only maintains the plant's appearance but also promotes new growth and increases airflow, reducing the risk of pest infestations.
More About Pruning Techniques→
 How to Propagate Mexican croton plant?
1
Identify a robust and disease-free plant as the source for seeds or cuttings. This ensures that the propagated plant inherits the parent's strong traits for successful growth.
2
Using sterilized shears, cut a healthy stem section, ideally with a couple of nodes, to use as your cutting material. Treat the cut end with rooting hormone for improved success rates.
3
Place the cutting into a pot filled with a suitable rooting medium, such as a mix of perlite and peat, and maintain consistent moisture without waterlogging to encourage rooting.
 How to Repot Mexican croton plant?
1
Repotting Croton ciliatoglandulifer is necessary when roots emerge from drainage holes, potting soil drains poorly, or plant growth slows. Spring and summer are ideal, as the plant enters active growth, which helps quickly establish in new soil.
2
Select a slightly larger pot, a couple of inches wider than the current one. Ensure it has decent drainage holes to prevent waterlogging. A larger pot provides ample space for root expansion, promoting robust growth and reducing repotting frequency.
3
Use a well-draining potting mix, ideally incorporating peat, perlite, and some coarse sand. This mixture provides balanced moisture retention and aeration, preventing root rot caused by soggy soil and supporting healthy root development.
Toxicity
Ingestion, Skin contact
WARNING
The judgment on toxicity and danger is for reference only. We DO NOT GUARANTEE any accuracy of such judgment. Therefore, you SHALL NOT rely on such judgment. It is IMPORTANT TO SEEK PROFESSIONAL ADVICE in advance when necessary.
Learn More About Mexican croton Diseases
Anthracnose
Bacterial Leaf Spot
Black Spot
Chemical Injury
Crown Gall
Damping-off
Downy Mildew
Drought Stress
Fusarium Wilt
Gray Mold
Leaf Curl
Leaf Spot
Mosaic
Nutrient Deficiency
Nutrient Toxicity
Powdery Mildew
Root Rot
Root-knot Nematode
Rusts
Sooty Mold
Spider Mites
Temperature Stress
Thrips Damage
White Mold



