
Japanese angelica tree (Aralia elata)
Also known as: Japanese Angelica Tree, Korean Angelica Tree, Chinese Aralia
The Japanese angelica tree, introduced to America in 1830 as an ornamental plant, is now classified as an invasive species. Its aggressive growth and ability to spread through suckers and self-seeding allow it to form dense thickets, which can overwhelm and displace native plant communities. Due to these ecological threats, it has been banned in New York state.
In This Article
Attributes of Japanese angelica tree
Lifespan
Perennial
Plant Type
Tree
Plant Height
10 m
Spread
1.8 m to 3 m
Leaf Color
Green Yellow Orange
Flower Size
1 cm to 1.5 cm
Flower Color
White Cream Green
Images of Japanese angelica tree
Quickly Identify Japanese angelica tree
1
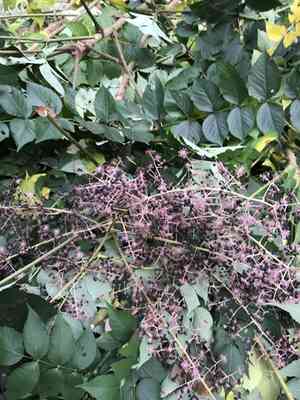
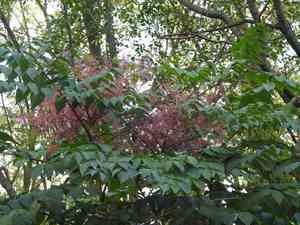
Large panicles of white to cream flowers in dense clusters.
2
Small spherical drupes transitioning from purple to black.
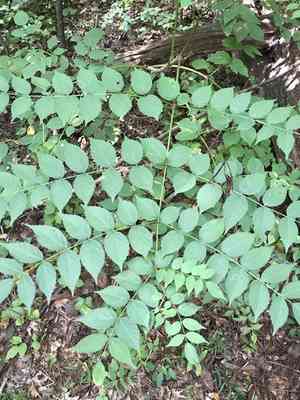
3
Tripinnately compound leaves with vibrant fall colors.
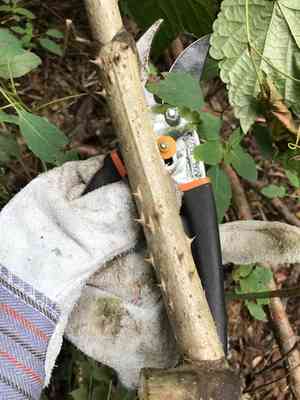
4
Thick stem with sharp spines growing up to 1 inch.
5
Grey trunk with prominent thorns and rough bark.
Scientific Classification of Japanese angelica tree
Phylum
Vascular plants
Class
Dicotyledons
Order
Carrots, ivies and allies
Family
Ivy
Genus
Spikenards
Species
Japanese angelica tree
Planting and Growing of Japanese angelica tree
Care Difficulty
Moderate
Watering Schedule
Every 3 days
Sunlight Requirements
Partial sun
Sunshine Duration
4-8 hours
Ideal Temperature
60-75℉
Soil Type
Potting Mix, Peat Mix
Soil pH
6.5-7.5
Fertilizer Type
Balanced
Pruning Season
Spring, Summer
Pruning Area
Branches, Leaves
Pruning Frequency
2 times a year
Repotting Season
Spring
Pot Type
Plastic, Ceramic
 How to Water Japanese angelica tree?
Water Aralia elata thoroughly by ensuring the top 2 inches of soil are moist. Depending on soil and pot size, approximately 1000 ml should suffice to reach the roots without causing waterlogging.
What are the symptoms of an underwatered Japanese angelica tree?
›
What should I do if my Japanese angelica tree is not getting enough water?
›
What are the symptoms of an overwatered Japanese angelica tree?
›
How to save an overwatered Japanese angelica tree?
›
 What Are the Sunlight Requirements for Japanese angelica tree?
Aralia elata enjoys dappled sunlight resembling a woodland environment. Ideal light optimizes its physiological processes, enhancing leaf color vibrancy and vigor.
More About Sunlight Requirements Techniques→
What is the ideal lighting condition for Aralia elata?
›
How can I ensure Aralia elata gets ideal lighting?
›
What are the benefits of ideal lighting for Aralia elata?
›
 What Is the Ideal Temperature Range for Japanese angelica tree?
For Aralia elata, maintaining a temperature range between 60°F to 75°F is essential for its optimal growth. This temperature range provides the necessary warmth and stability, facilitating nutrient uptake and ensuring healthy foliage development. It is crucial to keep the temperatures stable within this range to prevent stress and encourage vigorous growth.
 What Soil is Best for Japanese angelica tree?
Aralia elata thrives in well-draining soil as it prevents waterlogging, which can lead to root rot. Good drainage ensures that the roots have access to oxygen, promoting healthy growth. A nutrient-rich soil supports the robust growth of Aralia elata by providing essential minerals and organic matter. This assists in establishing strong roots and vibrant foliage. A moderate level of moisture retention in the soil is beneficial for Aralia elata as it ensures consistent hydration without the risks of overwatering, maintaining the plant's overall health.
 How to Fertilize Japanese angelica tree?
For Aralia elata, the recommended fertilization involves a balanced mixture of nitrogen, phosphorus, and potassium. It's important to apply a light dose, approximately a quarter strength of a standard liquid fertilizer during the growing season. For slow-release granules, use according to package directions for shrubs of similar size, but spread sparingly around the base of the plant.
 How to Prune Japanese angelica tree?
Begin by inspecting the plant and identifying branches that are dead, diseased, or crossing others. Pay special attention to the interior of the plant to ensure sunlight reaches all parts. Prune away any branches that hinder light penetration. Use sharp pruning shears or loppers for thicker branches. Make clean cuts at an angle just above a bud or branch intersection. Remove no more than one-third of the plant in a single session to avoid stressing it.
More About Pruning Techniques→
 How to Propagate Japanese angelica tree plant?
1
Harvest seeds from mature Aralia elata plants in late summer when the seed heads turn brown. Ensure seeds are fully ripe for improved germination rates.
2
Select healthy stems and make clean cuts below a node; dip in rooting hormone. Choose stems that are not flowering to enhance rooting potential.
3
Divide the plant during early spring when it's still dormant. Carefully separate roots and ensure each section has a viable root system for optimal growth.
 How to Repot Japanese angelica tree plant?
1
Aralia elata shows signs of needing repotting when roots start circling the pot or protruding from the drainage holes. Another signal is if the soil does not retain moisture well, indicating compaction or exhaustion of nutrients. Optimal repotting times are early spring or autumn when the plant's growth is stable, minimizing stress.
2
Select a pot that is 1-2 inches larger in diameter than the current one, ensuring it has adequate drainage holes to prevent waterlogging. A pot that's too large may retain excess moisture, leading to root rot. Ensure the pot complements the plant aesthetically and fits well in its intended location.
3
Opt for well-draining loamy soil enriched with organic matter. This type of soil provides the necessary drainage to prevent root rot while retaining enough moisture and nutrients to support growth. Inclusion of perlite or sand can enhance aeration and prevent soil compaction.


