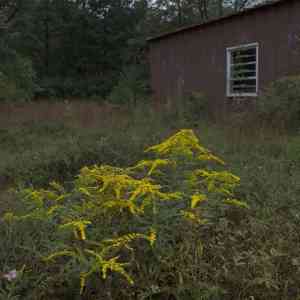
How to Transplant Wrinkleleaf goldenrod?
The ideal period for transplanting wrinkleleaf goldenrod is at the onset of spring, providing moderate temperatures and ample precipitation. Select a location that receives full sun to partial shade and possesses good drainage; if necessary, amend the area with compost to accommodate this resilient indigenous species.
What Preparations are Needed Before Transplanting Wrinkleleaf Goldenrod?
What is the Ideal Time for Transplanting Wrinkleleaf Goldenrod?
Choose early to mid-spring for relocating wrinkleleaf goldenrod. This period, as nature revives, offers milder temperatures and ample rainfall, aiding wrinkleleaf goldenrod's adjustment to its new environment. This strategic timing allows wrinkleleaf goldenrod's roots to establish and strengthen before summer's heat, ensuring a robust growth season. Transplanting during this renewal phase also benefits from natural soil moisture, promoting root development and reducing stress on wrinkleleaf goldenrod. Embrace this growth season to give wrinkleleaf goldenrod a strong start in its new spot.
How Much Space Should You Leave Between Wrinkleleaf Goldenrod Plants?
Welcome! When you begin, ensure each wrinkleleaf goldenrod has a generous 1-2 feet (approximately 30-60 cm) of space. This spacing allows each plant to thrive and guarantees sufficient room for their roots and foliage to spread comfortably.
What is the Best Soil Mix for Wrinkleleaf Goldenrod Transplanting?
Begin by preparing the perfect soil blend for your wrinkleleaf goldenrod! They prefer moist, well-draining soils. A standard all-purpose garden soil will suffice. You can enhance this by incorporating a balanced (10-10-10), slow-release granular fertilizer to provide an optimal nutrient foundation for transplanting.
Where Should You Relocate Your Wrinkleleaf Goldenrod?
When selecting a site for your wrinkleleaf goldenrod, remember they thrive with abundant sunlight. A location with full sun to partial shade would be perfect. So, scout out a sunny spot in your yard and prepare to transform it into a new home for your wrinkleleaf goldenrod!
What Equipments Should You Prepare Before Transplantation Wrinkleleaf Goldenrod?
Gardening Trowel
Used for digging and scooping earth when preparing the new planting hole.
Shovel
To assist in excavating the wrinkleleaf goldenrod from its original spot without harming the root ball.
Gardening Fork
Helpful for loosening compacted soil and improving soil structure prior to transplanting.
Gardening Gloves
To safeguard your hands during the operation.
Watering Can
Required to hydrate the wrinkleleaf goldenrod before and after its relocation.
Garden Hose
If the planting area is distant from a water source, this could be useful.
Pruning Shears
To trim any damaged or superfluous parts of the plant.
Wheelbarrow
For transportation if the plant is large or far from its new location.
Mulch
Protects the transplanted plant from extreme temperatures and retains moisture around the root zone.
How Do You Remove Wrinkleleaf Goldenrod from the Soil?
How Do You Remove Wrinkleleaf Goldenrod from the Soil?
From Ground: Hydrate the wrinkleleaf goldenrod plant until the surrounding soil is damp. This will facilitate easier removal. Use the shovel to dig a trench around the plant, ensuring the root ball remains intact. Carefully lift the wrinkleleaf goldenrod plant with the shovel beneath the root ball.From Pot: Water the plant and gently tip the pot sideways. Tap it lightly to loosen the soil and carefully pull the wrinkleleaf goldenrod plant by holding the stem's base. If it's too snug, run a knife along the pot's interior to free it.From Seedling Tray: Water the seedlings and use a spoon or gardening trowel to extract each wrinkleleaf goldenrod plant, ensuring the roots are undisturbed during the process.
Step-by-Step Guide for Transplanting Wrinkleleaf Goldenrod
Preparation
Prepare the new planting hole using a gardening trowel. The hole should be twice as wide and deep as the wrinkleleaf goldenrod plant's root ball.
Transplanting
Carefully lower the wrinkleleaf goldenrod plant into the hole. Ensure the plant is at the same level as it was in its original spot to avoid burying the stem too deeply or leaving roots exposed.
Backfilling
Gently refill the hole with soil, pressing lightly around the wrinkleleaf goldenrod plant's base to eliminate air pockets.
Watering
Water the wrinkleleaf goldenrod gently but thoroughly to settle the soil around its roots.
Mulching
Finally, spread a layer of mulch around the wrinkleleaf goldenrod plant's base. This prevents weed growth and helps maintain soil moisture.
How Do You Care For Wrinkleleaf Goldenrod After Transplanting?
Watering
Keep the soil around the wrinkleleaf goldenrod consistently moist but not waterlogged. Using a watering can is a safe and simple method for new gardeners.
Pruning
Trim off any dead or yellowing leaves using pruning shears. This helps the wrinkleleaf goldenrod direct its energy towards new growth.
Weed Control
Regularly inspect the area for weed growth. If any appear, remove them without disturbing the wrinkleleaf goldenrod's roots.
Container Plants
If the wrinkleleaf goldenrod was moved into a pot, ensure it has drainage holes to prevent waterlogging.
Monitoring
Check on the wrinkleleaf goldenrod plant periodically to ensure it's growing healthily. Any sudden changes in leaf color or overall health may indicate poor care or disease.
Troubleshooting Common Issues with Wrinkleleaf Goldenrod Transplantation.
When is the best time to transplant wrinkleleaf goldenrod?
The ideal period to move wrinkleleaf goldenrod is during spring-to-early-summer (S1-S2). This provides the plant ample time to establish itself before colder weather arrives.
How much space should be left between planted wrinkleleaf goldenrod?
For healthy growth and to prevent overcrowding, wrinkleleaf goldenrod should be spaced approximately 1 to 2 feet apart, which is about 30.5 to 61 centimeters.
How should I prepare the soil for the wrinkleleaf goldenrod transplant?
Begin by breaking up the soil, ensuring it is loose and drains well. Wrinkleleaf goldenrod prefers nutrient-rich soil, so incorporating some organic compost would be beneficial.
How deep should I plant wrinkleleaf goldenrod when transplanting?
Plant wrinkleleaf goldenrod at the same depth it was growing in its original location. Typically, this means the top of the root ball should be level with the surrounding soil.
What is the best way to water wrinkleleaf goldenrod after transplanting?
Provide wrinkleleaf goldenrod with a thorough watering immediately after transplanting. Subsequent watering should occur when the top inch (2.5 cm) of soil feels dry.
How long does it take for wrinkleleaf goldenrod to establish after transplanting?
Wrinkleleaf goldenrod generally takes a few weeks to a couple of months to establish, depending on conditions. Regularly monitoring its growth and health is good practice.
What should I do if wrinkleleaf goldenrod looks wilting after transplantation?
Wilting is a common reaction to transplant stress. Keep the plant well-watered, but avoid over-saturating. Move it to a partially shaded area until it recovers.
What care is needed for wrinkleleaf goldenrod for the first few weeks after transplanting?
Ensure wrinkleleaf goldenrod receives adequate water and frequently check soil moisture. Protection from full sun and strong winds is also beneficial in the initial stages.
Can wrinkleleaf goldenrod be transplanted in a pot?
Absolutely, wrinkleleaf goldenrod can be transplanted into a pot. Just ensure the pot is sufficiently large to accommodate growth and has good drainage.
Why are the leaves of my transplanted wrinkleleaf goldenrod turning yellow?
Yellow leaves can indicate water stress or a lack of nutrients. Review your watering routine and consider a balanced, slow-release fertilizer to improve plant health.


