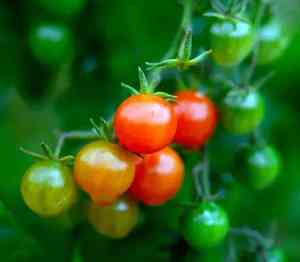
How to Transplant Currant tomato?
Currant tomato flourishes when relocated in mid-spring, benefiting from moderate temperatures. Select a bright location with soil that drains effectively. Guarantee steady hydration and prevent transplant stress for optimal outcomes.
What Preparations are Needed Before Transplanting Currant Tomato?
What is the Ideal Time for Transplanting Currant Tomato?
For currant tomato, the best period for relocation is from early to mid-spring. During this time, ground temperatures are rising, and moisture levels remain high, creating an optimal setting for root development. Moving them then minimizes transplant shock and allows currant tomato ample time to mature before summer's heat. Early spring transplanting promotes vigorous growth and improved fruit yield.
How Much Space Should You Leave Between Currant Tomato Plants?
When relocating currant tomato, maintain a distance of 24-36 inches (60-90 cm) between each plant. This ensures they have sufficient room to develop and flourish without competing for resources.
What is the Best Soil Mix for Currant Tomato Transplanting?
For currant tomato, prepare well-draining soil enriched with compost or a balanced granular plant food. Ensure the soil is loose and fertile, ideally loamy, to aid rapid root establishment.
Where Should You Relocate Your Currant Tomato?
Select a sunny spot for transplanting currant tomato. It requires full sunlight for at least 6-8 hours daily to produce healthy growth and abundant fruit.
What Equipments Should You Prepare Before Transplantation Currant Tomato?
Gardening Gloves
To safeguard your hands while handling soil and plants.
Trowel or Small Shovel
For excavating holes and carefully extracting the plant.
Watering Can or Hose
To hydrate the plant before and after its relocation.
Garden Spade
Useful for digging a larger hole if necessary.
Mulch
To help retain soil moisture post-transplanting.
Stakes or Tomato Cages
To offer support for the plant as it grows.
Pruning Shears
For trimming any damaged or excess foliage.
How Do You Remove Currant Tomato from the Soil?
How Do You Remove Currant Tomato from the Soil?
From Ground: First, hydrate the currant tomato plant to moisten the soil. Then, excavate a wide trench around the plant using a shovel or spade, ensuring the plant's root ball stays intact. Carefully work the spade beneath the root ball to lift the plant from its original spot.From Pot: Ensure the soil is damp before extracting the currant tomato plant from its container. Gently squeeze the pot's sides to loosen the soil. Invert the pot and tap its base while supporting the plant with your other hand to slide it out.From Seedling Tray: Water the seedlings thoroughly before removal. Use a pencil or similar tool to gently lift the currant tomato seedlings from the tray, being careful to keep as much soil around the roots as possible.
Step-by-Step Guide for Transplanting Currant Tomato
Prepare the Site
Dig a hole twice as wide and deep as the currant tomato plant's root ball in your chosen location.
Amend the Soil
If necessary, mix compost or organic material into the soil to enhance fertility and drainage.
Place the Plant
Carefully position the currant tomato plant in the hole, ensuring the top of the root ball is level with the surrounding ground.
Backfill the Hole
Fill the hole with soil, gently firming it around the root ball to eliminate air pockets.
Water Thoroughly
Water the plant deeply immediately after transplanting to help settle the soil and reduce transplant shock.
Mulch Around the Plant
Apply a layer of mulch around the base of the currant tomato plant to help retain moisture and control weeds.
Provide Support
If needed, use stakes or tomato cages to support the currant tomato plant as it grows and produces fruit.
How Do You Care For Currant Tomato After Transplanting?
Watering
Keep the soil around the currant tomato consistently moist, but not waterlogged, for the first few weeks after transplanting to help establish strong roots.
Monitoring
Regularly check the currant tomato plant for signs of stress, such as wilting or yellowing leaves, and address any issues promptly.
Fertilizing
Start a light fertilization routine after a few weeks to encourage healthy growth, following any specific recommendations for currant tomato.
Weeding
Keep the area around the currant tomato plant free of weeds to reduce competition for water and nutrients.
Pest Control
Inspect the currant tomato plant regularly for pests and take appropriate action if needed, using organic methods when possible.
Troubleshooting Common Issues with Currant Tomato Transplantation.
When is the best time to transplant currant tomato?
The best time to transplant currant tomato is from early spring to mid-spring.
How should I prepare the soil for currant tomato?
Prepare well-draining soil rich in organic matter to ensure healthy growth for currant tomato.
What's the ideal spacing for transplanting currant tomato?
Space currant tomato plants 24-36 inches (60-90 cm) apart for optimal growth.
How deep should I plant currant tomato seedlings?
Plant currant tomato seedlings deep enough to cover their root ball, about 2-3 inches (5-7.5 cm).
How do I acclimate currant tomato seedlings before transplanting?
Gradually expose currant tomato seedlings to outdoor conditions over 7-10 days for better adaptation.
What should I do if currant tomato seedlings wilt after transplanting?
Ensure adequate watering and partial shade to help currant tomato seedlings recover from transplant shock.
Which fertilizers are best for currant tomato transplants?
Use a balanced, slow-release fertilizer to support consistent growth of currant tomato plants.
How much water do currant tomato transplants need?
Water currant tomato regularly, keeping the soil moist but not waterlogged, especially in the first weeks.
Should I mulch around currant tomato transplants?
Yes, apply a 2-3 inch (5-7.5 cm) mulch layer to conserve moisture and regulate temperature.
What should I do about pests on currant tomato transplants?
Inspect currant tomato regularly and use organic insecticides or natural predators to manage pest problems.


