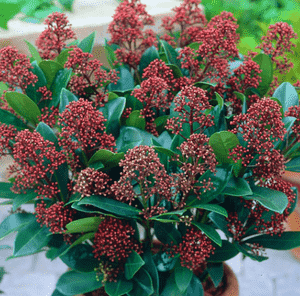
How to Transplant Japanese skimmia?
The ideal period for relocating japanese skimmia is from late spring to early summer, allowing for excellent root development prior to the colder months. Select a location with partial shade and soil that drains effectively, and be sure to provide steady hydration during the plant's initial establishment.
What Preparations are Needed Before Transplanting Japanese Skimmia?
What is the Ideal Time for Transplanting Japanese Skimmia?
The optimal period for relocating japanese skimmia is when temperatures rise but before summer's peak, typically from late spring to early summer. Placing japanese skimmia in its new spot during this window promotes maximum root establishment due to the warmth, easing its transition into warmer days. This timing allows japanese skimmia to recover from the shock of transplanting before the hot season's demands, ensuring a strong start in its new home. A helpful tip: selecting this opportune moment for transplanting japanese skimmia can boost its vitality, leading to a splendid display in subsequent seasons.
How Much Space Should You Leave Between Japanese Skimmia Plants?
When considering where to position japanese skimmia in your garden, choose locations approximately 3-4 feet (90-120 cm) apart. This will provide your plant with the ample room it requires for healthy growth!
What is the Best Soil Mix for Japanese Skimmia Transplanting?
Japanese skimmia thrives in rich, well-drained soil. Before you begin, incorporate some organic compost into your garden soil to create a nutrient-dense foundation. Additionally, a light application of slow-release fertilizer would be beneficial. It serves as ideal nourishment for japanese skimmia.
Where Should You Relocate Your Japanese Skimmia?
Now, let's find the perfect spot for japanese skimmia. It flourishes best in an area that receives partial to full shade. Therefore, a location beneath a larger plant or next to a shaded wall would be just right!
What Equipments Should You Prepare Before Transplantation Japanese Skimmia?
Gardening Gloves
To safeguard your hands while handling soil and japanese skimmia.
Trowel
This tool is crucial for carefully digging around japanese skimmia.
Spade or Shovel
Useful for excavating the new planting hole and loosening the soil around japanese skimmia at its original site.
Garden Hose or Watering Can
For hydrating the plant before and after its relocation.
Wheelbarrow
To move japanese skimmia from one place to another, if necessary.
Gardening Shears
To trim and remove any damaged or dead branches during the transplanting process.
Mulch
To aid in moisture retention following transplantation.
How Do You Remove Japanese Skimmia from the Soil?
How Do You Remove Japanese Skimmia from the Soil?
From Ground: First, hydrate the japanese skimmia plant to moisten the soil. Next, excavate a wide trench around the plant using a spade or shovel, ensuring the plant's root ball remains intact. Carefully work the spade beneath the root ball to lift the plant from its initial position.From Pot: Water the japanese skimmia and allow it to soak for several hours. Then, tilt the pot sideways and gently tap its sides, extracting the plant by holding its base near the soil line. Avoid pulling the stem or trunk to prevent damage.From Seedling Tray: Wait until japanese skimmia has more than two sets of true leaves. Gently water the tray to loosen the soil. Use a small spatula or butter knife to lift the root ball out, handling it by the leaves or the root ball, not the stem.
Step-by-Step Guide for Transplanting Japanese Skimmia
Preparation
Thoroughly water your japanese skimmia several hours before you plan to transplant it. This will facilitate the removal process and reduce stress on the plant.
Respective Hole
At the chosen site, dig a hole twice as wide and equally as deep as the root ball of japanese skimmia.
Placement
Position the plant in the hole, making sure the top of the root ball is level with the surrounding soil. If it's too low, add more soil to the hole.
Backfilling
Refill the hole with the excavated soil. Ensure there are no air pockets by firming the soil around the root ball.
Watering
Generously water the plant immediately after planting. This helps the plant settle into its new location.
Mulching
Apply a layer of mulch around japanese skimmia, leaving a clear space around the plant's base. This aids in retaining moisture and regulating soil temperature.
How Do You Care For Japanese Skimmia After Transplanting?
Water Requirement
Japanese skimmia prefers consistently moist soil, so ensure regular watering, especially during dry spells. Insufficient water can hinder growth.
Pruning
Remove any dead or damaged wood in late winter to early spring. This encourages new growth and maintains the health of your japanese skimmia plant.
Disease Watch
Monitor for any indications of diseases or pests. If you observe anything unusual, a visit to your local nursery or consultation with a gardening expert will help you find a remedy.
Patience
Remember, plants need time to establish in a new environment. If your japanese skimmia shows minimal growth in the first year, don't be concerned! Continue to care for it, and it should reward you with growth the following year.
Troubleshooting Common Issues with Japanese Skimmia Transplantation.
When is the best time to transplant japanese skimmia?
The ideal periods are from late summer to early fall (S3-S4). This allows japanese skimmia time to establish before winter.
How much space should I leave between japanese skimmia plants when transplanting?
Provide each japanese skimmia plant with ample room to flourish. A spacing of 3-4 feet or 0.9-1.2 meters between each plant is recommended.
Does japanese skimmia require particular soil conditions for successful transplanting?
Japanese skimmia thrives in well-drained soil with an acidic to neutral pH. Check the soil pH and amend it if necessary for successful transplantation.
What is the ideal way to remove japanese skimmia from its original location for transplantation?
Gently loosen the soil around japanese skimmia roots with a gardening fork to minimize damage. Then lift with care, keeping the root ball intact.
How deep should I transplant japanese skimmia?
Dig a hole deep enough to comfortably accommodate japanese skimmia's root ball. It's crucial not to plant japanese skimmia too deeply as this can lead to rotting.
Should I water japanese skimmia immediately after transplanting?
Absolutely! Water japanese skimmia thoroughly after transplanting. This helps to settle the soil and eliminate air pockets around the plant's root system.
How do I handle japanese skimmia if it shows transplant shock?
Keep japanese skimmia well-hydrated but not waterlogged and shield it from intense sunlight. Trim back any damaged foliage to reduce stress on the plant.
What should be the aftercare for japanese skimmia post-transplantation?
Remember to monitor soil moisture levels and provide sufficient water. Also, keep japanese skimmia protected from strong winds and frost after transplantation.
What kind of fertilizer should be used after transplanting japanese skimmia?
A slow-release fertilizer rich in Phosphorus will aid root development. But always remember, excessive fertilizer can 'burn' japanese skimmia; less is often more.
Do I prune japanese skimmia after transplanting?
Not necessarily. Allow japanese skimmia to settle into its new location before performing significant pruning. However, removing damaged or diseased branches is acceptable.


