How to Transplant Selaginella tamariscina?
As spring's warmth returns, it's the ideal time to relocate selaginella tamariscina, guaranteeing successful revitalization. Select a shaded, damp spot to replicate selaginella tamariscina's native environment. A delicate approach is crucial, safeguarding fragile root systems.
What Preparations are Needed Before Transplanting Selaginella Tamariscina?
What is the Ideal Time for Transplanting Selaginella Tamariscina?
The best time for moving selaginella tamariscina is during the spring, when mild weather aids root development. Relocating at this point promotes strong growth and adaptation, ensuring selaginella tamariscina's success.
How Much Space Should You Leave Between Selaginella Tamariscina Plants?
Start by preparing your garden, making sure there's adequate room for each selaginella tamariscina plant. Optimal spacing is about 1-2 feet (30-60 cm) apart. This gives selaginella tamariscina sufficient space to grow and flourish without competing for resources.
What is the Best Soil Mix for Selaginella Tamariscina Transplanting?
When preparing soil for selaginella tamariscina, a well-draining type is ideal. Mix in organic material, such as composted leaves or aged manure, to supply vital nutrients. Also, using a slow-release granular fertilizer greatly supports sturdy growth.
Where Should You Relocate Your Selaginella Tamariscina?
Select a spot with moderate sunlight for your selaginella tamariscina. While it tolerates various light conditions, shaded to partially shady areas help it retain moisture and stay healthy. Remember, even minimal sun exposure significantly benefits selaginella tamariscina!
What Equipments Should You Prepare Before Transplantation Selaginella Tamariscina?
Gardening Trowel
This hand tool is crucial for digging small holes and shifting small amounts of soil. You'll need it to lift selaginella tamariscina from its original spot and to dig a suitable hole for it in the new location.
Garden Spade
Larger than a trowel, this might be needed to dig a bigger hole if selaginella tamariscina has grown quite large. It can also be useful if the soil is hard or compacted.
Gardening Gloves
To safeguard your hands while working with soil and plants. Transplanting can be messy, and gloves will not only keep your hands clean but also prevent cuts or scrapes.
Watering Can/Hose
You'll need this to thoroughly water selaginella tamariscina after planting it in its new location. A hose is perfect for larger plants, while a watering can is ideal for smaller ones.
Wheelbarrow
If you are moving a large selaginella tamariscina a considerable distance, a wheelbarrow could be helpful. It lessens strain on your wrists and back, and helps prevent damage to the plant.
How Do You Remove Selaginella Tamariscina from the Soil?
How Do You Remove Selaginella Tamariscina from the Soil?
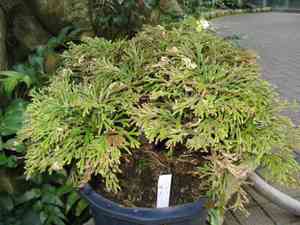
From Ground: Begin by dampening the soil around the selaginella tamariscina with a gentle stream of water; this makes it easier to remove the root ball without harm. Use a garden spade to dig a circle around the plant, leaving about 10-12 inches from the stem to avoid damaging roots. Slowly deepen your circle and try to get under the plant's rootball, then carefully lift it from the ground.From Pot: Water the selaginella tamariscina about an hour before you plan to transplant. Using your hands or the trowel, tilt the pot sideways and slide the plant out. Remember not to pull on the plant's stem. If it's stuck, tap the sides of the pot to loosen it.From Seedling Tray: Once the selaginella tamariscina seedlings have a few true leaves, they are ready for transplanting. To remove a seedling, use a small, narrow tool like a popsicle stick to gently loosen the soil around the roots. Then, carefully lift the seedling by its leaves (not the stem).
Step-by-Step Guide for Transplanting Selaginella Tamariscina
Preparation
Start by digging a hole at the new site. It should be as deep as the selaginella tamariscina's current rootball and twice as wide. This allows roots to spread and grow easily. Fill the hole with water and let it drain.
Transplanting
Place selaginella tamariscina in the hole, carefully centering it. The top of its root ball should be slightly above the surrounding soil to allow for settling.
Backfilling
Fill the hole around selaginella tamariscina with soil, gently firming as you go to remove air pockets and ensure stability. Remember to leave some space on top for watering.
Watering
Water the selaginella tamariscina thoroughly after planting, soaking the surrounding soil to help the roots become established.
How Do You Care For Selaginella Tamariscina After Transplanting?
Frequent Watering
Selaginella tamariscina needs thorough watering after transplanting, as its roots are vulnerable and require assistance to establish. In the following weeks, keep the soil around selaginella tamariscina moist but not waterlogged.
Checking Health
Observe selaginella tamariscina closely in the days and weeks following transplanting. If you notice wilting, yellowing, or leaf loss, these may indicate your plant is not establishing well and that intervention might be necessary.
Position Adjustment
Depending on the plant's reaction post-transplant, you might need to slightly adjust its location. This could involve moving it closer to or further from a shade source, relocating it from a windy area, or positioning it among other plants.
Troubleshooting Common Issues with Selaginella Tamariscina Transplantation.
What's the best time of the year to transplant selaginella tamariscina?
Selaginella tamariscina thrives best when transplanted during seasons S1-S3. This timing promotes healthy growth and minimizes transplant shock.
What should the spacing be when planting selaginella tamariscina?
Maintain a gap of 1-2 feet (approximately 30-60 cm) when positioning selaginella tamariscina. This provides ample room for growth and aids in root expansion.
What conditions are suitable for transplanting selaginella tamariscina?
Choose a cool, cloudy day to transplant selaginella tamariscina as it reduces stress on the plant. The soil should be moist, but not waterlogged.
In what depth should selaginella tamariscina be planted?
Plant selaginella tamariscina in alignment with its initial growing condition. The top of the root ball should be level with the soil surface.
Is it necessary to prune selaginella tamariscina before transplanting?
Pruning is not particularly needed, but you can lightly trim selaginella tamariscina to maintain its shape after transplanting.
What should I do if selaginella tamariscina wilts after transplanting?
Don't panic! Plants often wilt immediately after transplanting. Help selaginella tamariscina recover by watering it sufficiently and providing some shaded conditions.
How often should I water selaginella tamariscina after transplanting?
Water selaginella tamariscina regularly for the first few weeks following transplantation until it's well-established. Avoid overwatering as it can damage the roots.
How can I ensure the healthy growth of selaginella tamariscina post-transplant?
Aside from regular watering, apply a balanced slow-release fertilizer after transplanting selaginella tamariscina. This will support new growth and root development.
What to do if selaginella tamariscina shows yellow or brown leaves after transplanting?
It may indicate transplant shock. Cease fertilizing, provide enough water, and ensure selaginella tamariscina is not exposed to extreme temperatures.
What is the best soil type for transplanting selaginella tamariscina?
Selaginella tamariscina prefers well-draining soil rich in organic matter. An evenly moist soil will ensure the healthiest growth for this plant.


