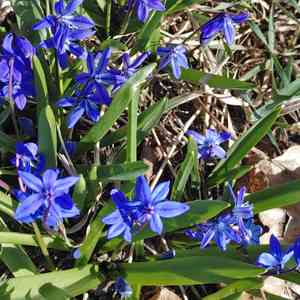
How to Transplant Siberian squill?
Relocate siberian squill from early to mid-spring or late autumn through mid-winter, since these periods provide damp earth and lower temperatures, facilitating ideal root development. Select a site featuring adequately draining soil and exposure to partial or full sunlight. Carefully untangle roots during transplantation to enhance successful integration.
What Preparations are Needed Before Transplanting Siberian Squill?
What is the Ideal Time for Transplanting Siberian Squill?
The optimal period to move siberian squill is from early to mid-spring, or from late autumn through mid-winter. Relocating during this time aids in developing a robust root system prior to summer's heat. It's a rewarding step towards seeing your siberian squill flourish beautifully!
How Much Space Should You Leave Between Siberian Squill Plants?
When relocating your siberian squill, allow these beauties ample room to expand! Position your plants approximately 4-6 inches (10-15 cm) apart, which is the perfect distance to encourage healthy development and vibrant blooms.
What is the Best Soil Mix for Siberian Squill Transplanting?
To ensure your siberian squill thrives, utilize well-drained, humus-rich soil with a slightly acidic pH. Incorporate plenty of organic material like compost, and add some slow-release granular fertilizer as a base to nourish the plants over time.
Where Should You Relocate Your Siberian Squill?
Location is crucial for your siberian squill. Select a spot with partial shade or filtered sunlight, as it prefers some shade to shield it from intense afternoon sun. This will help guarantee happy plants with an abundance of stunning flowers!
What Equipments Should You Prepare Before Transplantation Siberian Squill?
Gardening Gloves
To safeguard your hands while handling soil and plants.
Shovel or Spade
To excavate the planting hole and extract the plant from its original spot.
Trowel
To refine the planting cavity and incorporate soil amendments.
Watering Can or Hose
To hydrate the siberian squill plant before and after relocation.
Compost or Organic Matter
To enrich the soil and foster vigorous growth.
Mulch
To assist in retaining soil moisture and inhibiting weed growth.
How Do You Remove Siberian Squill from the Soil?
How Do You Remove Siberian Squill from the Soil?
From Ground: First, irrigate the siberian squill plant to moisten the earth. Then, excavate a broad trench around the plant using a shovel or spade, ensuring the plant's root ball remains intact. Carefully work the spade beneath the root ball to lift the plant from its initial position.From Pot or Seedling Tray: Water the siberian squill plant to dampen the soil. Gently tilt the pot or tray while supporting the plant's base with your hand. Slowly slide the root ball out of the container, taking care not to harm the roots or stems.
Step-by-Step Guide for Transplanting Siberian Squill
Digging the Hole
Excavate a hole twice the width of the siberian squill plant's root ball and slightly deeper than its height. Loosen the soil at the bottom of the hole with a trowel to encourage root development.
Preparing the Soil
Mix some compost or organic material into the excavated soil to enhance nutrient content and drainage.
Placing the Plant
Gently position the siberian squill plant into the hole, ensuring the top of the root ball is level with the surrounding soil surface. Spread the roots out evenly within the hole.
Backfilling
Refill the hole with the amended soil, pressing gently around the root ball to eliminate any air pockets. Ensure the siberian squill plant is upright and correctly situated.
Watering
Thoroughly water the relocated siberian squill plant to settle the soil and aid in initial root establishment.
Mulching
Apply a layer of mulch around the base of the plant to help retain moisture and suppress weeds. Leave a small gap around the stem to prevent rot.
How Do You Care For Siberian Squill After Transplanting?
Watering
Keep the soil around the siberian squill consistently moist, but not waterlogged, for the initial few weeks post-transplant to help establish strong roots.
Monitoring
Observe the siberian squill plant for any indications of stress or disease, and address issues promptly.
Pruning
Remove any faded flowers or damaged foliage to encourage healthy growth.
Fertilizing
Apply a slow-release fertilizer or additional compost in the subsequent growing season to support continued development.
Troubleshooting Common Issues with Siberian Squill Transplantation.
What is the best time to transplant siberian squill plants?
The absolute perfect timing to relocate siberian squill would be from the stretch of early to mid-spring, or late autumn through middle winter.
How should I space siberian squill when transplanting?
Ensure each siberian squill has its breathing space by leaving a gap of about 4-6 inches (10-15 cm) between each plant when relocating.
Do I need to adjust the soil before transplanting siberian squill?
Yes, siberian squill prefer rich, well-drained soil. Add organic matter to enhance its fertility and drainage capabilities prior to planting.
How deep should I plant siberian squill when transplanting?
When planting siberian squill, excavate a hole that is approximately twice the size of the plantâs root ball. This ensures ample space for root growth.
Should I water siberian squill immediately after transplanting?
Definitely, watering immediately after relocating helps siberian squill to settle in the new environment and assists in overcoming the transplant shock.
Do I need to mulch siberian squill after transplanting?
Mulching is not mandatory for siberian squill, but it can help retain soil moisture and prevent weed growth. Just be careful not to over-mulch.
How much sun does a transplanted siberian squill need?
Siberian squill are quite versatile, they thrive in full sun to light shade. Ensure they receive at least a few hours of sunlight daily.
Should I fertilize siberian squill after transplanting?
After relocating, give siberian squill a boost with a slow-release, balanced fertilizer. Repeat this every spring to help supply necessary nutrients.
Can I transplant siberian squill next to other plants?
Sure, as long as each siberian squill has sufficient room to grow. A spacing of about 4-6 inches (10-15 cm) should be maintained with other plants.
How do I know if siberian squill is suffering from transplant shock?
Siberian squill suffering from transplant shock may exhibit signs such as wilting, yellowing, or dropping leaves. Gentle care and patience can usually help them recover.


