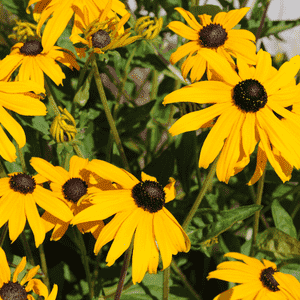
How to Transplant Black-eyed susan?
For Rudbeckia hirta, the most favorable period for relocation is between mid-spring and early summer, as moderate temperatures facilitate robust root development. Optimal settings involve a sun-drenched spot with soil that drains effectively. Carefully separate the roots during transplantation to stimulate growth and alleviate strain on the plant.
What Preparations are Needed Before Transplanting Black-eyed Susan?
What is the Ideal Time for Transplanting Black-eyed Susan?
For black-eyed susan, the optimal period for relocation is from mid-spring through early summer. This timeframe promotes robust development, vibrant blooms, and strong root establishment. Try it for a thriving garden!
How Much Space Should You Leave Between Black-eyed Susan Plants?
For black-eyed susan, it's best to position plants approximately 1-2 feet (30-60 cm) apart. This provides ample room for growth and ensures sufficient air circulation and light exposure.
What is the Best Soil Mix for Black-eyed Susan Transplanting?
Prepare the soil using well-draining, loamy earth. Incorporate compost or organic matter to enhance nutrient levels. Add a slow-release, balanced fertilizer (e.g., 10-10-10) to supply essential nutrients for your black-eyed susan.
Where Should You Relocate Your Black-eyed Susan?
Select a sunny location for transplanting black-eyed susan. They flourish in spots receiving at least 6 hours of daily sunlight. If possible, choose an area with some afternoon shade to shield them from intense heat.
What Equipments Should You Prepare Before Transplantation Black-eyed Susan?
Gardening Gloves
To safeguard your hands while handling soil and plants.
Shovel or Spade
For excavating the planting hole and extracting the plant from its original spot.
Trowel
Used for precise digging and planting in confined spaces.
Garden Fork
To aerate and break up the soil in the designated transplant area.
Garden Hose or Watering Can
For hydrating the plant post-transplant and providing ongoing moisture.
Organic Compost
To enrich the soil and improve its drainage capabilities.
Mulch
To aid in moisture retention and regulate the soil temperature around the plant.
How Do You Remove Black-eyed Susan from the Soil?
How Do You Remove Black-eyed Susan from the Soil?
- From Ground:First, irrigate the black-eyed susan plant to moisten the soil. Next, excavate a broad trench around the plant with a shovel or spade, ensuring the plant's root ball remains intact. Carefully work the spade beneath the root ball to lift the plant from its initial position.- From Pot:Thoroughly water the black-eyed susan plant to dampen the soil. Turn the container sideways and gently tap the bottom and sides to dislodge the plant. Carefully slide the plant out of the pot, keeping the root ball undisturbed.- From Seedling Tray:Lightly water the black-eyed susan seedlings in the tray. Use a trowel or your fingers to carefully separate each black-eyed susan seedling, taking care not to harm the roots. Hold each seedling by its leaves, not the stem, during transplantation.
Step-by-Step Guide for Transplanting Black-eyed Susan
Preparation
Select a site with adequate sunlight and room for your black-eyed susan plant to reach its full size. Ensure the soil drains well and has been amended with organic compost if necessary.
Dig the hole
Using a shovel or spade, excavate a hole slightly deeper and wider than the black-eyed susan plant's root ball.
Soil Preparation
Gently loosen the soil at the base and sides of the hole with a garden fork to facilitate easier root penetration.
Transplant
Carefully position the black-eyed susan plant's root ball into the hole, making sure the top of the root ball is level with the surrounding soil surface.
Backfill
Refill the hole around the root ball with the soil you previously removed, pressing gently to eliminate any air pockets.
Water
Thoroughly water the black-eyed susan plant to help settle the soil and establish good root contact.
Mulch
Apply a layer of mulch around the plant's base to help retain moisture and regulate soil temperature.
How Do You Care For Black-eyed Susan After Transplanting?
Watering
Keep the soil around the black-eyed susan consistently moist, but not waterlogged, for the initial weeks post-transplant to aid in strong root development.
Pruning
Regularly remove faded flowers to encourage continuous blooming and maintain a neat appearance.
Feeding
Apply a slow-release or organic fertilizer according to product directions to support healthy growth and flowering.
Pest Control
Periodically inspect the black-eyed susan plant for indications of pests or diseases and treat promptly if necessary.
Winterizing
If your black-eyed susan plant is a perennial, cut back the foliage after the first hard frost and add a layer of mulch to protect the plant during winter. For annual varieties, remove the plant at the close of the growing season.
Troubleshooting Common Issues with Black-eyed Susan Transplantation.
When is the best time to transplant black-eyed susan?
Mid-spring to early summer is the optimal period to relocate black-eyed susan for best growth and flowering.
What is the recommended spacing between black-eyed susan plants?
Position black-eyed susan plants approximately 1-2 feet (30-60 cm) apart to provide them ample room to grow and flourish.
How deep should I plant black-eyed susan in the ground?
Plant black-eyed susan at the same depth they were growing in their original containers, ensuring the root ball is covered.
How should I prepare the soil for black-eyed susan transplanting?
Loosen and amend the soil with compost or well-rotted manure to enhance drainage and supply nutrients.
Do I need to water black-eyed susan immediately after transplanting?
Yes, water black-eyed susan generously right after transplanting to settle the soil and aid in root establishment.
How much sunlight does black-eyed susan need after transplanting?
Black-eyed susan prefers full sun, but can tolerate partial shade. Ensure they receive at least 6 hours of daily sunlight.
How do I prevent transplant shock in black-eyed susan?
Transplant black-eyed susan on an overcast day or in the evening, and water consistently to help minimize transplant shock.
When do I start fertilizing black-eyed susan after transplanting?
Wait 2-3 weeks after relocating black-eyed susan before applying a balanced, slow-release fertilizer around the plant's base.
How do I properly remove black-eyed susan from its nursery container?
Gently squeeze the container sides or tap the bottom to loosen the soil; avoid pulling or tugging on stems.
Should I prune black-eyed susan after transplanting?
Pruning is not necessary immediately after transplanting; allow black-eyed susan to establish itself and prune dead or damaged leaves later.


