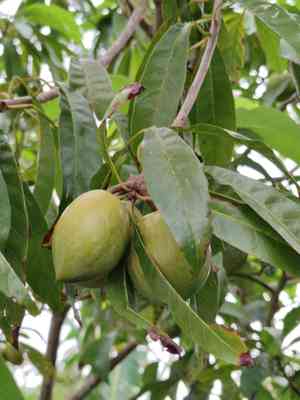
How to Transplant Canistel?
For canistel, the period from late spring to early summer presents a perfect window for relocation, capitalizing on favorable temperatures and minimizing transplant stress. Select bright, well-drained locations, enhancing the soil with compost to encourage vigorous development. Careful manipulation increases the likelihood of success.
What Preparations are Needed Before Transplanting Canistel?
What is the Ideal Time for Transplanting Canistel?
The best time to move canistel is during the gentle transition from late spring to early summer. This period offers warm soil conditions, which are perfect for root development, ensuring canistel gets an excellent start in its new spot. Relocating canistel during this window of consistent warmth and increasing daylight encourages strong growth, as mild temperatures support robust root formation without the stress of intense summer heat. By selecting this optimal transplanting time, you provide canistel with an ideal environment to flourish and thrive.
How Much Space Should You Leave Between Canistel Plants?
Begin by marking positions for canistel approximately 8-10 feet (2.4-3 meters) apart. This spacing will provide ample room for each plant to expand and develop. Also, ensure sufficient space for easy access between plants for maintenance and harvesting.
What is the Best Soil Mix for Canistel Transplanting?
Prepare the soil for canistel by incorporating a balanced base fertilizer, such as a 10-10-10 blend. Canistel thrives in well-drained soil, so adding compost or coco peat to your soil mixture will enhance drainage and supply essential nutrients.
Where Should You Relocate Your Canistel?
Select a site where canistel can receive at least 6 hours of full sunlight daily. If this isn't feasible, a location with filtered sunlight will also suffice. This is vital as sunlight is crucial for canistel's growth and fruit production.
What Equipments Should You Prepare Before Transplantation Canistel?
Gardening Gloves
To safeguard your hands while handling the plant and soil.
Spade or Trowel
For excavating the hole and extracting the plant from its original spot.
Pruning Shears
To trim any dead or damaged root structures.
Watering Can
To hydrate the plant before and after its relocation.
Gardening Bucket
To transport the plant from its initial location to the new one.
Wheelbarrow
To move the soil and organic matter.
Compost
To enrich the new planting site with vital nutrients for your canistel.
How Do You Remove Canistel from the Soil?
How Do You Remove Canistel from the Soil?
From Ground: First, moisten the canistel plant's surrounding soil to loosen it. Then, use a spade to dig around the plant, making sure to extract a substantial root ball. Carefully lift the plant from its original position to prevent root damage.From Pot: Water the plant, then invert the pot while supporting the topsoil with your hand. The canistel should slide out along with its soil. Gently remove any excess compacted soil from around the roots.From Seedling Tray: Water the tray, then softly press the base of the cell to release the canistel seedling. Be careful not to harm the delicate roots.
Step-by-Step Guide for Transplanting Canistel
Digging Hole
Excavate a hole in the ground that is twice the width of the canistel's root ball and of equal depth. Loosen the bottom and sides of the hole to facilitate root expansion.
Preparing Plant
Carefully trim any dead, broken, or injured roots using pruning shears. This encourages healthier development.
Placing Plant
Position the canistel in the center of the hole, ensuring the top of the root ball is level with the surrounding ground.
Filling Hole
Backfill the hole with the soil and compost mixture, gently firming around the plant's base. Avoid excessive compaction.
Watering
Water generously to settle the soil around the roots. Do not over-saturate the plant.
How Do You Care For Canistel After Transplanting?
Watering
Maintain moderately moist soil. Water the canistel whenever the topsoil feels dry to the touch. Prevent over-watering.
Adjusting
If canistel exhibits signs of sunburn or wilting, consider moving its location to a more shaded area.
Trimming
If any leaves turn yellow or wilt, remove them promptly. This helps canistel direct its energy towards new growth.
Observing
Monitor your canistel closely, especially during the initial weeks. If you detect any disease symptoms, take immediate action to prevent its spread.
Troubleshooting Common Issues with Canistel Transplantation.
When's the best time to transplant canistel?
The optimal period for transplanting canistel is late summer to early fall (S3-S4). This allows it to establish itself before winter arrives.
How much room should be given to canistel while transplanting?
It's advisable to provide a spacing of approximately 8-10 feet (2.4-3 meters). This enables the plant to grow without restriction and develop a robust root system.
What type of soil should I use when transplanting canistel?
Canistel prefers soil that drains well. Enriching the transplant site with organic matter can improve soil structure and supply nutrients.
How deeply should I plant canistel during transplantation?
Always plant canistel at the same depth it was in its previous container. This helps prevent root and stem diseases.
What's the proper watering practice just after transplanting canistel?
Water canistel thoroughly immediately after transplantation. This aids in establishing new connections with the soil. Be careful to avoid waterlogging.
Do I need to prune canistel at the time of transplantation?
Pruning is not essential during transplantation. However, removing damaged or diseased branches can encourage healthy growth and prevent disease spread.
What is the ideal location for transplanting canistel?
Canistel thrives in a sunny location. Partial shade is tolerable, but sunnier spots promote better growth and fruit production.
How can I prevent transplant shock in canistel?
Ensure the root ball remains undamaged during transplantation. Keep the plant adequately watered and consider using a product designed to prevent transplant shock.
When should I start fertilizing canistel after transplantation?
Wait until new growth appears before fertilizing canistel. Fertilizing too soon can burn the roots and hinder establishment in its new location.
Should I stake canistel after transplantation?
If canistel experiences stability issues after transplantation, staking can be beneficial. Be cautious not to harm the root system when inserting stakes.


