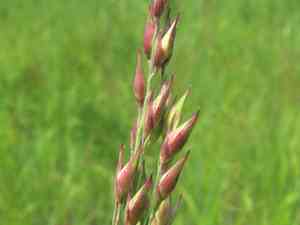
How to Transplant Switchgrass?
The optimal period for relocating switchgrass is from the beginning of spring to early summer, or from mid-fall to the start of winter. The perfect spot for transplantation features good drainage and ample sunlight. Since switchgrass thrives with steady soil hydration, contemplate incorporating organic material to enhance moisture retention when required.
What Preparations are Needed Before Transplanting Switchgrass?
What is the Ideal Time for Transplanting Switchgrass?
The optimal period for relocating switchgrass spans from early spring to the start of summer, or from mid-autumn to the edge of winter. During these seasons, weather conditions are typically mild, providing a stable environment for switchgrass to acclimate. Transplanting at these times is beneficial, primarily because it avoids extreme hot or cold temperatures that can stress the plant. Remember, a successful switchgrass transplant begins with precise timing!
How Much Space Should You Leave Between Switchgrass Plants?
For optimal development, plant switchgrass with a separation of 18-24 inches (45-61 cm) between each specimen. This provides ample room for each plant to establish robust root systems and expand comfortably.
What is the Best Soil Mix for Switchgrass Transplanting?
Prior to transplanting switchgrass, prepare soil that drains effectively, ideally a loamy or sandy type. Enhance the soil with compost or aged manure to supply essential nutrients for vigorous growth. Incorporating a slow-release, balanced fertilizer can also provide switchgrass with a nutritional boost.
Where Should You Relocate Your Switchgrass?
Select a site with full sun exposure to ensure switchgrass receives at least 6-8 hours of sunlight daily. This will help your plants flourish and produce an attractive display throughout the growing season.
What Equipments Should You Prepare Before Transplantation Switchgrass?
Gardening Gloves
To safeguard your hands while handling soil and plants.
Shovel or Spade
For excavating holes and extracting the plant from its original spot.
Trowel
For smaller, precise digging to prevent damage to the switchgrass plant's roots.
Gardening Fork
To loosen the soil around the switchgrass plant before removal and at the new planting location.
Watering Can or Hose
To moisten the soil before and after planting.
Mulch
To help retain soil moisture and inhibit weed growth post-transplanting.
Wheelbarrow (optional)
For transporting larger switchgrass plants or multiple plants at once.
How Do You Remove Switchgrass from the Soil?
How Do You Remove Switchgrass from the Soil?
From Ground: First, hydrate the switchgrass plant to dampen the soil surrounding its base. Use a gardening fork to loosen the soil around it, then carefully work a spade or shovel beneath the root ball to lift the plant. Ensure you dig sufficiently deep to keep as many roots intact as possible.From Pot: Water the switchgrass plant in its container to moisten the soil and facilitate removal. Tilt the pot sideways and gently ease the plant out, preserving as much of the root ball as you can.From Seedling Tray: Ensure the switchgrass seedlings are adequately watered before extraction. Gently push the base of the cell or use a soft tool like a spoon to lift the seedling out, taking care not to harm the delicate roots.
Step-by-Step Guide for Transplanting Switchgrass
Prep New Site
Prepare the new planting location. The excavation should be approximately twice the size of the switchgrass's root ball to allow ample space for roots to spread and establish. Loosen the soil within the hole using a garden fork.
Moving
Carefully move the switchgrass to avoid root damage. Be especially gentle with seedlings or young plants. Position it into the hole, ensuring it sits at the same depth as it was previously.
Back-fill
Back-fill, gently firming the soil around the root ball to eliminate any air pockets. It's crucial not to plant the switchgrass too deeply, as this can lead to stem rot.
Water
Thoroughly water the plant after planting. The soil should be moist but not waterlogged.
Mulch
Conclude with a layer of organic mulch around the plant to help conserve water, suppress weeds, and regulate soil temperature.
How Do You Care For Switchgrass After Transplanting?
Watering
Ensure the switchgrass receives sufficient water, especially during the initial weeks when its roots are still shallow. Avoid over-watering as switchgrass does not tolerate waterlogging.
Weed Control
Keep the area surrounding the switchgrass free of weeds to reduce competition for nutrients and water.
Pruning
Lightly prune the switchgrass during its first few seasons to encourage denser growth. Be careful not to prune them too aggressively during their first year of growth, as this could harm the plant.
Maintenance
Monitor for pests and diseases. Healthy switchgrass plants are typically resistant to most pests and diseases, but stressed plants may be more vulnerable.
Troubleshooting Common Issues with Switchgrass Transplantation.
When's the best time to transplant switchgrass?
The ideal periods for relocating switchgrass are either from the start of spring to early summer or from mid-autumn to the beginning of winter. The milder temperatures during these seasons support effective growth.
How much space should I give when I'm transplanting switchgrass?
Ensure you provide 18-24 inches (45-60cm) of space between each plant. This allows switchgrass ample room to spread and grow optimally.
Why are the leaves of my switchgrass plant turning yellow after transplanting?
Yellowing foliage could indicate that switchgrass is overwatered or requires more nutrients. Review your watering schedule and ensure you're not saturating the soil. Also, consider a balanced fertilizer to boost nutrient levels.
What's the proper depth for planting switchgrass?
The root ball of switchgrass should be level with the soil surface. Dig a hole deep enough to accommodate the root structure, typically around 10 inches (25 cm).
My switchgrass is not growing well after transplantation, what might be wrong?
Several factors could be impacting its growth – inadequate watering, insufficient sunlight, pests, or disease. Examine these aspects and adjust conditions accordingly for improved growth.
Should I prune switchgrass after transplanting?
You do not need to prune switchgrass immediately after transplanting. However, in subsequent seasons, trimming it down to 6-8 inches (15-20cm) in late winter or early spring can promote healthier growth.
Why is my transplanted switchgrass wilting?
Wilting could be a symptom of transplant shock. Keep the plant adequately watered but avoid waterlogging, and maintain optimal sunlight exposure. It should eventually adapt to its new location.
What type of soil is best for transplanting switchgrass?
Switchgrass is adaptable to various soil types, but it prefers well-draining loamy or sandy soils. It also tolerates infertile and acidic soils.
Does switchgrass require any specific care immediately after transplanting?
After transplanting switchgrass, water thoroughly, and continue to do so regularly until the plant is well-established. Avoid excessive fertilizing as switchgrass is quite tolerant of low nutrient levels.
Is switchgrass susceptible to any diseases or pests after transplant?
Generally, switchgrass is resilient to most pests and diseases. However, watch out for occasional issues like leaf spots and rust. Maintaining proper watering and air circulation can prevent most problems.


