How to Transplant Sapodilla?
Transplanting sapodilla flourishes in the mild warmth from late spring to early summer, a time offering ideal development circumstances. Select a bright location with soil that drains effectively. To ensure successful adaptation, reduce root disruption and sustain sufficient soil hydration.
What Preparations are Needed Before Transplanting Sapodilla?
What is the Ideal Time for Transplanting Sapodilla?
The optimal period for relocating sapodilla is from the peak of spring to the beginning of summer, leveraging the mild weather for root development. This timeframe offers a smooth transition for sapodilla, fostering its growth with an ideal mix of warmth and precipitation. This timing is vital, as it allows sapodilla ample opportunity to strengthen before the intense heat of mid-summer or potential winter challenges.
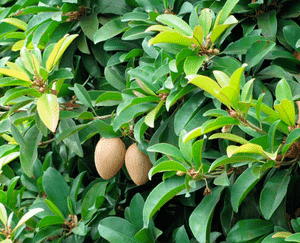
How Much Space Should You Leave Between Sapodilla Plants?
When transplanting sapodilla, maintain a separation of approximately 25-30 feet (7.6-9.1 meters) between each specimen. This guarantees sufficient room for robust development. Proper spacing is crucial, remember that!
What is the Best Soil Mix for Sapodilla Transplanting?
The perfect soil for sapodilla is well-draining, either loamy or sandy. Before transplanting, mix an organic compost base fertilizer into the soil. This helps boost nutrient levels and ensures healthy growth.
Where Should You Relocate Your Sapodilla?
Sapodilla thrives in sunlight, so select a location where it receives full sun exposure, ideally 6-8 hours daily. However, partial shade would also be acceptable. Keep in mind, the more sunlight it gets, the better it flourishes!
What Equipments Should You Prepare Before Transplantation Sapodilla?
Gardening Gloves
To safeguard your hands while handling soil and sapodilla.
Shovel
For excavating the planting hole and extracting the sapodilla plant from its initial spot.
Pruning Shears
To trim any impaired roots or branches.
Trowel
To incorporate compost or soil and make adjustments within the planting hole.
Watering Can
To irrigate the sapodilla plant following its relocation.
Mulch
To cover the ground after transplanting, aiding in moisture retention and weed suppression.
Compost
To enrich the earth where the sapodilla plant will be replanted.
How Do You Remove Sapodilla from the Soil?
How Do You Remove Sapodilla from the Soil?
From Ground: Begin by using the shovel to dig a wide trench around the sapodilla plant, ensuring the root ball remains intact. Gently work the shovel beneath the root ball and carefully lift the plant from its original position. Remember to handle the plant with care, as rough handling can cause the plant stress.From Pot: Water the sapodilla plant, then tilt the pot sideways. Gently tap the pot's rim against a firm surface until the plant and its root ball slide out. Avoid pulling the plant by its stem to prevent root damage.From Seedling Tray: Water the tray to moisten the soil, which facilitates easier removal of the sapodilla. Use a blunt knife or a transplanting spoon to carefully lift the plant by its root ball, not by its stem.
Step-by-Step Guide for Transplanting Sapodilla
Identify Location
Determine the placement for your sapodilla, keeping in mind it requires space to develop to its mature size.
Digging Hole
Excavate a hole with your shovel approximately twice the width and depth of the plant's root ball.
Prepare the Plant
If the sapodilla's roots are densely packed, gently loosen them with your fingers. Remove any damaged or diseased roots using pruning shears.
Placing the Plant
Position the plant in the hole. The top of the root ball should be level with or slightly above the surrounding soil to allow for settling. Adjust the hole's depth if necessary using your trowel.
Backfilling
Refill the hole with soil, pressing gently to eliminate air pockets.
Watering
Water thoroughly with your watering can after planting to help the soil settle.
Mulching
Apply a layer of mulch around the base of the sapodilla, leaving a few inches clearance from the stem to prevent rot.
How Do You Care For Sapodilla After Transplanting?
Regular Watering
Water your sapodilla plant consistently, ensuring the soil stays moist but never waterlogged. Excessive watering can lead to root rot.
Pruning
It's common for the sapodilla plant to shed some leaves after transplanting due to stress. Use your pruning shears to remove these leaves.
Monitoring
Observe your plant closely in the weeks following the transplant. Changes in leaf color or leaf loss can indicate water stress or disease.
Feeding
Wait at least one month after transplanting the sapodilla before applying any additional nutrients to allow the plant to recover from the stress of relocation.
Moving
If you notice the plant is not thriving in its new spot and shows signs of more severe stress, consider a secondary relocation to a different area.
Troubleshooting Common Issues with Sapodilla Transplantation.
When is the best time to transplant sapodilla?
The most opportune time to transplant sapodilla is between seasons 2 and 4, typically late spring through early autumn. This provides the tree with the most favorable conditions for growth.
What is the appropriate space to leave between sapodilla?
Space sapodilla trees approximately 25-30 feet (about 7.62-9.14 meters) apart. This ensures they have ample room to grow without interference from other plants.
Why is my transplanted sapodilla drooping?
Transplant shock could be the reason. Shield the tree from intense sunlight, keep the soil moist, and ensure it receives adequate nutrients. Also, check if you've planted it too deeply.
How do I prepare the ground for sapodilla transplantation?
Begin by loosening the soil to about twice the size of the root ball. Amend the soil, if necessary, with compost to boost fertility. Place sapodilla in the hole, backfilling gently.
How do I water sapodilla after transplanting?
Initially, water sapodilla deeply and frequently to aid in root system establishment. Afterward, water it weekly, allowing the water to penetrate 6 inches (15 cm) to 10 inches (25 cm) deep.
Why does my newly transplanted sapodilla tree have yellow leaves?
Yellowing could signal overwatering, underwatering, or a nutrient deficiency. Adjust the watering schedule and consider using a balanced fertilizer to meet the plant's nutritional needs.
What should I do if the transplanted sapodilla doesn't show new growth?
Be patient. Sapodilla might take time to exhibit new growth as it adapts to its new surroundings. Ensure it is well-watered, receives proper sunlight, and nutrients.
Why is the sapodilla losing leaves after transplantation?
Environmental shock or insufficient watering can cause this. Ensure the plant receives suitable sunlight, proper watering, and consider using a root stimulator to encourage new root growth.
Should I prune sapodilla after transplanting?
Avoid pruning immediately after transplanting. Wait for the sapodilla to settle into its new environment and show new growth. Then, prune selectively to shape the tree or remove damaged branches.
What can cause the transplanted sapodilla's growth to stunt?
Inappropriate planting depth, insufficient spacing, inadequate watering, lack of nutrients, or pest infestation could hinder your sapodilla's growth. Verify these aspects and correct them if necessary.


