How to Transplant Japanese privet?
To successfully relocate japanese privet, select the optimal period from late spring through mid-summer, when temperatures are elevated and vegetation is flourishing. Opt for a site featuring adequately draining earth and exposure to partial or full sunlight. Ensure consistent watering after transplantation to foster robust development.
What Preparations are Needed Before Transplanting Japanese Privet?
What is the Ideal Time for Transplanting Japanese Privet?
The optimal period to relocate japanese privet is during the pleasant, sunny days from late spring through midsummer. This timing encourages vigorous development, robust roots, and a thriving, healthy specimen.
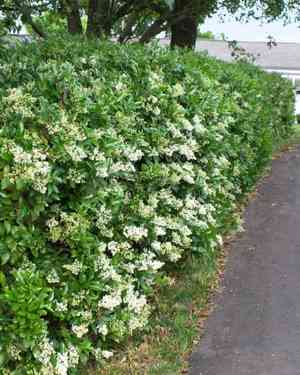
How Much Space Should You Leave Between Japanese Privet Plants?
For best development, you should position japanese privet plants 6-12 feet (1.8-3.7 meters) apart. This provides ample room for them to flourish while still allowing for a thick, continuous hedge if desired.
What is the Best Soil Mix for Japanese Privet Transplanting?
Japanese privet plants prefer well-draining soil enriched with organic material. Begin by incorporating compost or aged manure into the soil. Afterward, apply a general-purpose, slow-release granular fertilizer to aid your japanese privet in becoming established.
Where Should You Relocate Your Japanese Privet?
Select a site for japanese privet that offers full to partial sun exposure. Ideally, your plant should receive a minimum of 4-6 hours of sunlight daily. This will ensure vigorous growth and a strong, appealing appearance.
What Equipments Should You Prepare Before Transplantation Japanese Privet?
Gardening Gloves
To safeguard your hands while handling soil and plants.
Shovel or Spade
For excavating the transplant hole and extracting the plant from its original spot.
Pruning Shears
To trim any compromised or lifeless roots and branches prior to relocation.
Measuring Tape
To guarantee correct spacing between individual plants.
Watering Can or Hose
For hydrating the japanese privet both before and after its transfer.
Organic Compost or Fertilizer
To enrich the planting site and stimulate healthy root growth.
How Do You Remove Japanese Privet from the Soil?
How Do You Remove Japanese Privet from the Soil?
- From Ground:First, moisten the japanese privet plant to dampen the earth. Next, dig a wide trench around the plant using a shovel or spade, ensuring the plant's root ball remains intact. Carefully work the spade beneath the root ball to lift the plant from its initial position.- From Pot:Water the potted japanese privet. Place your hand over the soil surface, with the plant stem between your fingers, and gently invert the container. Lightly tap the sides and bottom of the pot to release the plant and root ball.- From Seedling Tray:Water the japanese privet seedlings. Use a small trowel or your fingers to carefully loosen the soil around each seedling. Gently lift the seedling from the tray, holding it by the leaves, not the stem.
Step-by-Step Guide for Transplanting Japanese Privet
Preparation
Thoroughly water the japanese privet before commencing the transplanting process.
Digging
Utilize a shovel or spade to excavate a hole twice as wide and as deep as the japanese privet's root ball.
Enriching Soil
Incorporate organic compost or fertilizer into the excavated soil to enhance its fertility.
Preparing Plant
Employ pruning shears to remove any damaged or dead roots and branches from the japanese privet.
Placing Plant
Position the japanese privet into the hole, at its original depth, and spread out its roots.
Filling Hole
Backfill the hole with the amended soil, gently pressing it around the plant's root ball to eliminate air pockets.
Watering
Water the japanese privet thoroughly after planting, ensuring the soil settles around the root ball.
Spacing
If relocating multiple japanese privet plants, allow adequate space between them based on their mature size, using a measuring tape for accuracy.
How Do You Care For Japanese Privet After Transplanting?
Watering
Maintain consistent moisture in the soil around the japanese privet, avoiding saturation, for the initial weeks post-transplant to encourage strong root development.
Pruning
Regularly trim the japanese privet to maintain its desired form and dimensions, promoting denser foliage growth.
Mulching
Apply a 5 cm toUNIT_CONVERT_START_3 inches_UNIT_CONVERT_STARTlayer of organic mulch around the base of the japanese privet to aid in moisture retention and weed suppression.
Fertilizing
Administer a balanced, slow-release fertilizer to the japanese privet according to product directions, typically in early spring and/or late summer.
Monitoring
Watch for pests and diseases, and address any issues promptly to maintain a healthy japanese privet.
Troubleshooting Common Issues with Japanese Privet Transplantation.
What's the ideal season for transplanting japanese privet?
The optimal period to relocate japanese privet is late spring to mid-summer, when the plant's growth is most active.
What's the proper spacing for transplanting japanese privet?
Keep japanese privet plants 6-12 feet (1.8-3.7 meters) apart, allowing sufficient room for optimal growth and air circulation.
Should I amend the soil before transplanting japanese privet?
Yes, enrich the soil with organic matter such as compost or aged manure to enhance drainage and fertility.
How deep and wide should the hole be for transplanting japanese privet?
Excavate a hole twice as wide and just as deep as the root ball, ensuring ample space for root expansion.
How do I make sure the japanese privet plant adapts well after transplant?
Water the japanese privet thoroughly after transplanting and keep the soil consistently moist until new growth appears.
What is an ideal location for transplanting japanese privet?
Japanese privet thrive in full sun to partial shade. Ideally, select a spot with at least 4-6 hours of daily sun.
How can I avoid transplant shock with my japanese privet?
Minimize root disturbance during transplanting, and reduce sunlight exposure for the initial few days.
My japanese privet leaves are wilting after transplant, is that normal?
Some wilting is normal; maintain consistent moisture levels to help your japanese privet recover and establish quickly.
When should I start fertilizing my transplanted japanese privet?
Wait until you observe new growth on your japanese privet before fertilizing. Use a balanced, slow-release fertilizer.
Do I need to prune my japanese privet after transplanting?
Perform only light pruning after transplanting, removing any dead or damaged branches. Extensive pruning is not necessary.


