How to Transplant Shasta daisy?
For successful establishment of shasta daisy, relocate them during the most favorable period: as fresh shoots emerge in early spring. Select a site that offers good drainage and receives ample sunlight. Should it be required, incorporate compost or other organic materials to enhance the soil's richness. Enjoy your transplanting!
Essential Preparations Before Relocating Shasta Daisy
Optimal Timing for Shasta Daisy Relocation?
Early spring presents the best opportunity to move shasta daisy. This timing allows the plant sufficient time to establish its root system prior to summer. Complete preliminary tasks, such as soil preparation, before this period for optimal outcomes.
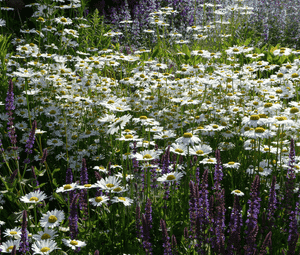
Recommended Spacing Between Shasta Daisy Plants?
For shasta daisy, it's wise to provide ample room for development. Position plants approximately 18-24 inches (45-60 cm) apart to ensure they flourish without overcrowding.
Ideal Soil Blend for Shasta Daisy Transplanting?
For peak performance with shasta daisy, prepare a well-draining soil enriched with compost or aged manure. Incorporate some slow-release granular or organic fertilizer to supply essential nutrients.
Where to Replant Your Shasta Daisy?
Select a site for shasta daisy that receives at least 6 hours of daily sunlight. Ideally, a location with full sun to partial shade will keep them content and blooming beautifully.
Equipment to Prepare Before Transplanting Shasta Daisy
Gardening Gloves
To safeguard your hands while handling soil and shasta daisy.
Trowel
To assist in excavating the shasta daisy without harming its roots.
Watering Can
To hydrate the shasta daisy both prior to and following transplantation.
Compost
To enrich the transplant site with nutrient-dense organic matter, supporting shasta daisy growth.
Plant Marker
To identify the new spot where the shasta daisy has been moved.
Garden Spade
To dig the hole for transplanting.
Method for Removing Shasta Daisy from Soil
Method for Removing Shasta Daisy from Soil?
From Ground: Begin by watering the shasta daisy plant to moisten the soil. Next, carefully dig a wide trench around the shasta daisy using a garden spade or trowel, taking care to protect the plant's root ball. When ready, gently work the spade or trowel beneath the root ball and steadily lift the plant from its original position.From Pot: If the shasta daisy is currently in a container, water it, then tilt the pot sideways while gently extracting the plant. Try to support the base of the shasta daisy so the plant emerges with its root ball and soil intact.From Seedling Tray: Fill a pot with compost and create a hole large enough for the shasta daisy. Then, carefully remove the seedling from the tray, ensuring not to damage the delicate roots or stem during the process.
Step-by-Step Guide for Shasta Daisy Transplantation
Preparation
Identify the new transplant location. Mark it with a plant marker.
Digging
Using the garden spade, excavate a hole twice as wide and deep as the root ball of your shasta daisy.
Placing
Position the shasta daisy into the hole, ensuring the top of the root ball is level with the surrounding soil.
Backfilling
Gently refill the hole with soil, firming it around the roots to eliminate any air pockets.
Watering
Thoroughly water the shasta daisy, allowing the soil to settle around the roots.
Tagging
Label the transplanted shasta daisy with a plant marker to keep track of its new spot.
Post-Transplant Care for Shasta Daisy
Mulching
Applying up to 2 inches of mulch around the base of the shasta daisy, but not touching the stem, can aid in moisture retention.
Monitoring
Regularly observe your shasta daisy for any indications of stress or illness. Early detection of issues often leads to straightforward solutions.
Pruning
If any leaves or stems turn brown or wilt, trim them off. This allows the shasta daisy to focus energy on new growth.
Watering
Continue to water consistently but avoid over-watering, which can cause root rot. Adjust irrigation based on season and weather conditions.
Addressing Common Shasta Daisy Transplantation Issues.
When is the best time to transplant my shasta daisy?
You should aim to transplant your shasta daisy at the beginning of spring.
What distance should be maintained between two shasta daisy plants?
Ideally, maintain a minimum spacing of 18-24 inches (45.72-60.96 cm) between individual shasta daisy for healthy development.
What precautions should be taken when removing the shasta daisy from its original spot?
Ensure you carefully dig up the shasta daisy without harming its roots. Aim to retain a large soil ball around the roots during the process.
How deep should I plant the shasta daisy in its new location?
Avoid planting the shasta daisy too deeply. The hole should be spacious enough to comfortably accommodate the root system.
What care is needed after transplanting the shasta daisy?
Water the shasta daisy immediately after transplanting. Subsequently, regular and thorough watering is essential. Do not allow the plant to dry out.
Can transplanting shasta daisy be detrimental to the plant?
Yes, if not performed with care. Improper handling can induce shock in the plant, potentially leading to wilting or even plant demise.
Why are my transplanted shasta daisy wilting?
Wilting after transplanting could be due to transplant shock. Ensure proper spacing, adequate watering, and protect the plant from harsh weather.
What type of soil does shasta daisy prefer for transplanting?
The shasta daisy thrives in well-drained, fertile soil. If needed, you can improve your soil with compost or other organic matter.
Should I prune my shasta daisy before transplanting?
Pruning is not necessary before transplanting. However, you can remove any damaged or diseased parts to encourage healthier growth post-transplant.
Why aren't my transplanted shasta daisy blooming effectively?
Insufficient sunlight or excessive nitrogen in the soil might be the cause. Ensure a balanced nutrient supply and ample sunlight for abundant blooms.


