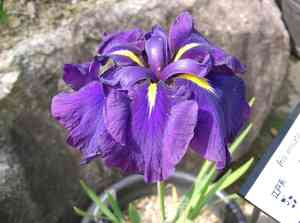
How to Transplant Japanese Iris?
The most favorable period for relocating Japanese Iris is after the final frosts have passed, generally from mid to late spring, which encourages vigorous development. Select a site that receives ample sunlight to some shade and possesses damp earth. Careful management of the root system during the relocation process is crucial for a smooth adaptation.
What Preparations are Needed Before Transplanting Japanese Iris?
What is the Ideal Time for Transplanting Japanese Iris?
The optimal time for moving japanese Iris is during the peak of mid to late spring. This period is ideal as japanese Iris awakens from dormancy, ready to establish new roots. This timing allows japanese Iris to settle firmly in warming soil, benefiting from the entire upcoming growing season. Taking these careful steps during the gentle embrace of the season ensures japanese Iris thrives with resilience and elegance.
How Much Space Should You Leave Between Japanese Iris Plants?
When relocating japanese Iris, ensure each plant has ample room to expand. Aim for a spacing of approximately 1-2 feet (30-60 cm) between each specimen. This guarantees they have sufficient area to grow and flourish without competing for resources.
What is the Best Soil Mix for Japanese Iris Transplanting?
Prior to transplanting japanese Iris, enrich the soil with a blend of organic material and a foundational fertilizer. This plant type prefers slightly acidic soil, with a pH ranging from 6.0-7.0. This will aid in root establishment and effective nutrient absorption.
Where Should You Relocate Your Japanese Iris?
The perfect spot to transplant japanese Iris would be an area with either full sun exposure or dappled shade. Excessive shade might impede their development, but too much sun could potentially dehydrate them. Find a balance suited to your specific garden conditions.
What Equipments Should You Prepare Before Transplantation Japanese Iris?
Gardening Gloves
These will keep your hands clean and protected from any sharp or abrasive elements in the soil while you are working with the plant.
Shovel or Spade
You'll require a robust digging tool to move the japanese Iris from its original spot to the new one.
Hand Trowel
This is useful for excavating smaller holes, especially if you're moving plants from a pot or seedling tray.
Garden Hose or Watering Can
It's crucial to water the japanese Iris both before and after the transplanting process to alleviate plant stress and ensure it is adequately hydrated.
Mulch
A layer of mulch applied after transplanting can help to safeguard the japanese Iris and retain soil moisture.
Stake and Ties (optional)
If the japanese Iris is particularly tall or delicate, you might need a stake and ties to offer support and prevent it from falling over.
How Do You Remove Japanese Iris from the Soil?
How Do You Remove Japanese Iris from the Soil?
From Ground: First, water the japanese Iris plant to soften the soil surrounding its roots. Then, using a shovel or spade, dig a wide circle around the plant to expose the entire root system. Carefully work your shovel beneath the root ball and lift it from the ground, taking care not to harm the root system.From Pot: If the japanese Iris is being moved from a pot, water the plant first to moisten the soil. Then, gently tilt the pot sideways and ease the plant and its root ball out. If the plant is stuck, you may need to run a knife along the inside edge of the pot to loosen it.From Seedling Tray: If you're transplanting japanese Iris seedlings, ensure they are well-watered before beginning. Gently remove the seedling from the tray by supporting its root ball and be careful not to damage the young roots.
Step-by-Step Guide for Transplanting Japanese Iris
Digging the New Hole
In your chosen location, excavate a hole that is twice as wide and equally deep as the root system of the japanese Iris. Ensure the sides of the hole are loose to allow the roots to spread easily.
Placing the Plant
Position the japanese Iris carefully in the center of the hole. It's vital that the top of the root ball is level with the surrounding soil to prevent water from accumulating at the stem, which could lead to rot.
Backfilling
Gently refill the hole with soil, taking care to cover the entire root system but avoid burying the stem.
Watering
Water the japanese Iris thoroughly after planting to settle the soil and reduce the plant's stress.
Mulching
Apply a layer of mulch over the soil surface to help conserve moisture and suppress weeds. Ensure the mulch does not touch the stem of the japanese Iris as this can encourage rot and disease.
How Do You Care For Japanese Iris After Transplanting?
Watering
Water the japanese Iris well after transplanting, then continue to water it regularly, especially during dry spells. However, avoid overwatering as this can lead to root rot.
Weeding
Keep the area around the japanese Iris free of weeds to prevent competition for nutrients and water.
Checking For Pests
Regularly inspect the japanese Iris for pests and diseases. Detecting any issues early can often help you manage them before they cause significant damage.
Staking (if needed)
If the japanese Iris is tall or its stems appear weak, it might require support from a stake. Tying your plant to a stake can help prevent damage from wind or the weight of mature blooms.
Troubleshooting Common Issues with Japanese Iris Transplantation.
When is the best time to transplant japanese Iris?
The optimal season to relocate japanese Iris is between late spring and early summer (S2-S3). Transplanting during this period promotes their growth and blooms.
How much space should I leave between japanese Iris plants when transplanting?
To ensure each japanese Iris has ample room to grow, leave a distance of approximately 1-2 feet (30-60 cm) between plants.
How deep should I plant japanese Iris during transplantation?
Make sure to plant japanese Iris around 5 inches (12.5 cm) deep. This encourages robust root development.
What kind of soil is ideal for transplanting japanese Iris?
Japanese Iris prefer rich, well-draining soil that is acidic to neutral. Incorporate organic matter to benefit its growth.
How often should I water japanese Iris post-transplant?
Japanese Iris love moisture. Water them thoroughly at the time of transplanting and keep the soil moderately moist until they establish.
Is it necessary to add fertilizer while transplanting japanese Iris?
Yes, adding a balanced fertilizer at the time of transplanting japanese Iris can support healthy growth and stronger roots.
How can I prevent transplant shock in japanese Iris?
Avoid transplanting on excessively hot or cold days, keep the soil moist, and avoid disturbing the roots to prevent transplant shock.
Can japanese Iris survive if transplanted during flowering season?
Transplanting japanese Iris during flowering might stress the plant. It's better to transplant in late spring or early summer (S2-S3) for best results.
What should I do if the transplanted japanese Iris shows signs of wilting?
If japanese Iris wilts after transplantation, it could be a sign of transplant shock. Ensure it gets sufficient water and mulch around the plant to retain moisture.
Do japanese Iris need sun or shade after transplanting?
Japanese Iris needs a location with full sun to partial shade post-transplantation. Avoid overly shady spots for robust growth and blooming.


