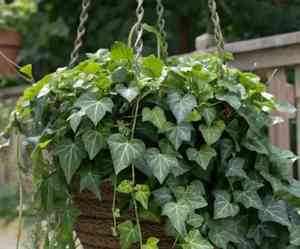
How to Transplant English ivy?
The optimal period for relocating English Ivy is from mid-spring to late spring or throughout autumn, as these times offer perfect temperatures and humidity for root development. Select a site with good drainage that receives partial to complete shade. Carefully loosen the root mass during the transplanting process to encourage robust growth.
What Preparations are Needed Before Transplanting English Ivy?
What is the Ideal Time for Transplanting English Ivy?
The optimal period to relocate english ivy is from mid to late spring, or mid to late autumn. During these times, english ivy establishes its root system most readily, allowing it to strengthen before extreme heat or cold.
How Much Space Should You Leave Between English Ivy Plants?
When relocating english ivy, ensure adequate spacing between each plant, ideally 2-3 feet (60-90 cm) apart. This provides ample room for growth and expansion without overcrowding.
What is the Best Soil Mix for English Ivy Transplanting?
For english ivy, prepare the soil by incorporating organic matter, such as mature compost or well-rotted manure, to enhance drainage and fertility. You may also add a slow-release granular fertilizer to give your plant an initial growth boost.
Where Should You Relocate Your English Ivy?
To ensure your english ivy receives appropriate sunlight, select a location with partial to full shade. While it can endure various light levels, it flourishes better in these conditions and will maintain its vibrant green hue.
What Equipments Should You Prepare Before Transplantation English Ivy?
Gardening Gloves
To safeguard your hands while handling soil and the english ivy plant.
Shovel or Spade
For excavating a hole for relocation and removing the plant from its original spot.
Trowel
For more precise digging around the plant's root structure.
Pruner or Garden Shears
To trim any damaged or excess foliage and roots.
Watering Can or Hose
To hydrate the plant during and after relocation.
Wheelbarrow or Container
To move the plant from its initial position to the new planting site.
Soil Amendment or Compost
To enhance the soil quality at the transplanting location.
Mulch
To retain moisture and inhibit weed growth around the english ivy.
How Do You Remove English Ivy from the Soil?
How Do You Remove English Ivy from the Soil?
- From Ground:First, moisten the english ivy plant's soil. Then, excavate a wide trench around the plant using a shovel or spade, ensuring the plant's root ball remains intact. Carefully work the spade beneath the root ball to lift the plant from its original spot.- From Pot:Water the pot containing the english ivy plant, then gently lay it on its side. Apply pressure to the pot's sides to loosen the root ball, then slowly slide the plant out of the pot, keeping the root ball intact.- From Seedling Tray:Water the seedling tray to dampen the soil. Gently squeeze the cell holding the english ivy seedling to loosen the root ball without significantly disturbing the seedling. Carefully extract the seedling by grasping the stem's base and pulling it out.
Step-by-Step Guide for Transplanting English Ivy
Preparation
Ensure the planting area is free of weeds and other debris that might compete with the english ivy for nutrients and water. Amend the soil with compost if needed to create a fertile environment for the english ivy to thrive.
Digging a Hole
Excavate a hole in the new planting location that is slightly larger than the english ivy's root ball. This allows the plant's roots to spread easily once placed in the ground.
Placing the Plant
Gently position the english ivy into the hole, placing its root ball at a depth roughly equivalent to its previous growing depth. Confirm the plant is upright and not leaning.
Filling the Hole
Backfill the hole, pressing the soil firmly around the root ball to eliminate any air pockets. Ensure the soil level around the english ivy is even with the surrounding ground.
Watering
Thoroughly water the english ivy immediately after transplanting, ensuring the soil is adequately moist but not waterlogged. This aids in settling the soil around the roots and mitigating transplant shock.
Mulching
Apply a 2-3 inch layer of mulch around the base of the english ivy, keeping the mulch a few inches away from the stem to prevent rot or fungal issues.
How Do You Care For English Ivy After Transplanting?
Watering Frequency
Water the english ivy consistently during the initial weeks post-transplant to encourage robust root growth and minimize transplant shock. Gradually decrease frequency as the plant establishes itself.
Pruning
Trim any damaged or yellowing leaves and stems after transplanting to redirect energy towards new growth. Regularly inspect the english ivy for signs of stress or disease, and prune as needed.
Fertilizing
Wait a few weeks after transplanting before applying any fertilizer to the english ivy to avoid harming its delicate roots. Use a balanced, slow-release fertilizer according to package directions, ensuring it's not overly concentrated.
Monitoring
Observe the english ivy for any indications of stress, such as wilting, yellowing, or browning leaves. These may signal a need for more frequent watering or adjustments to its care routine. Also, monitor for pests or diseases and address them promptly to safeguard your english ivy.
Troubleshooting Common Issues with English Ivy Transplantation.
What's the best time to transplant english ivy?
Optimal seasons for relocating english ivy are mid-to-late spring and mid-to-late fall, ensuring a successful transition.
How much space should be maintained between english ivy plants?
Maintain a healthy spacing of 2-3 feet (60-90 cm) between english ivy plants to promote proper growth and air circulation.
When transplanting english ivy, should I prepare the soil in any specific way?
Yes, enrich the soil with compost and ensure adequate drainage to create a supportive environment for english ivy.
How deep should I dig the hole when transplanting english ivy?
Excavate a hole twice the size of the root ball, allowing ample room for the roots to spread comfortably.
What are the ideal light and temperature conditions for transplanting english ivy?
English ivy thrives in partial to full shade and in temperatures between 50-70°F (10-21°C) during the relocation process.
How often should I water english ivy after transplanting?
Water english ivy thoroughly after transplanting, then keep the soil consistently moist for the initial few weeks.
Should I prune english ivy prior to transplanting?
Lightly prune english ivy before transplanting to remove dead or damaged foliage and encourage new growth.
What should I do if english ivy shows signs of transplant shock?
To alleviate transplant shock, keep english ivy well-hydrated, maintain proper soil conditions, and avoid temperature extremes.
Can I use a rooting hormone when transplanting english ivy?
Yes, employing a rooting hormone can help stimulate root growth and enhance english ivy's chances of successful transplanting.
How can I prevent root rot in english ivy after transplanting?
Ensure proper soil drainage, avoid over-watering, and provide sufficient spacing to prevent root rot in english ivy.


