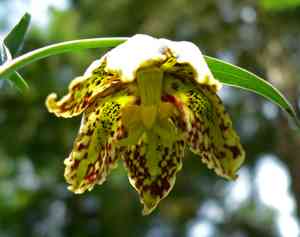
How to Transplant Chocolate Lily?
The ideal period for relocating chocolate Lily is between mid-spring and early summer, allowing them to properly settle in temperate weather. Select a location offering partial shade and soil that drains effectively. Verify that the new site replicates chocolate Lily's native forest environment to encourage robust development.
What Preparations are Needed Before Transplanting Chocolate Lily?
What is the Ideal Time for Transplanting Chocolate Lily?
The optimal period for relocating chocolate Lily is during the transition from mid to late spring or the beginning of early summer. This timeframe offers an ideal balance of warming ground and moderate temperatures, promoting root establishment before the full intensity of summer heat. By selecting this favorable window, you provide chocolate Lily the opportunity to flourish in their new spot, boost their development with spring's abundant moisture, and settle in well before winter. Follow this helpful advice for gardening success â chocolate Lily will surely reward you with vigorous growth!
How Much Space Should You Leave Between Chocolate Lily Plants?
When planting your chocolate Lily, ensure ample distance between each specimen. Ideally, position them 1-2 feet (30-60 cm) apart. This allows the plant to develop freely without competing for resources.
What is the Best Soil Mix for Chocolate Lily Transplanting?
Preparing the correct soil foundation is vital for chocolate Lily. They prefer well-draining, loamy soil enriched with organic compost, which acts as a natural, nourishing base fertilizer.
Where Should You Relocate Your Chocolate Lily?
You should position your chocolate Lily in a spot where it will receive partial sun exposure, as excessive direct sunlight can cause scorching. They thrive under dappled light or in shaded areas of your garden.
What Equipments Should You Prepare Before Transplantation Chocolate Lily?
Transplanting Shovel
A smaller spade specifically designed for transplanting that will enable you to dig without harming the chocolate Lily's roots.
Gardening Gloves
To safeguard your hands while handling soil and plants.
Pruning Shears
To trim any damaged roots or stems on the chocolate Lily during the relocation process.
Garden Fork
Useful for loosening the ground at the new planting location.
Garden Hose or Watering Can
This will be necessary to hydrate the plant at both its original and new sites.
Organic Mulch
To retain moisture and insulate the plant after transplanting.
How Do You Remove Chocolate Lily from the Soil?
How Do You Remove Chocolate Lily from the Soil?
From Ground: Before attempting to extract the chocolate Lily from the ground, thoroughly water the plant. This will help maintain the root system's integrity during removal. Once the soil is sufficiently softened, use your transplanting shovel to dig a wide circle around the plant, keeping a safe distance from the stem to avoid root damage. After digging deep enough to get beneath the root ball, carefully lift the plant from the ground.From Pot: Water the chocolate Lily in its container, then gently invert the pot, carefully guiding the plant and root ball out. If the plant resists, you may need to tap the sides and bottom of the pot to loosen it.From Seedling Tray: Moisten the soil within the tray, then gently move the seedling from its compartment with a small, blunt tool like a spoon, ensuring to lift it by the leaves and not the stem to prevent injury.
Step-by-Step Guide for Transplanting Chocolate Lily
Preparation
Begin by preparing the new location. Use your garden fork to loosen the soil, ensuring ample space to accommodate the chocolate Lily's root ball. Water the site to moisten the soil, facilitating root establishment.
Placement
Position the chocolate Lily into the hole. The top of the root ball should be level with the surrounding soil to prevent burying the stem.
Backfilling
Carefully refill the hole with the loosened soil, gently firming it around the base of the chocolate Lily to secure it in place.
Watering
Water the chocolate Lily thoroughly after transplantation. Ensure the water penetrates deeply enough to reach the lower roots.
Mulching
Finally, apply a layer of organic mulch around the chocolate Lily, keeping it a few inches from the stem. This will help retain moisture and regulate soil temperature.
How Do You Care For Chocolate Lily After Transplanting?
Watering
Keep the soil consistently moist, but avoid overwatering as chocolate Lily dislikes waterlogged conditions. Monitor the plant and adjust your irrigation schedule as needed.
Pruning
If the chocolate Lily exhibits signs of stress or damage post-transplantation, do not hesitate to trim back affected leaves or stems. This will redirect energy to the root system to encourage recovery and new growth.
Observation
Closely observe your chocolate Lily for the first few weeks following transplant. Pay attention to its development and any potential indicators of stress such as drooping or yellowing foliage. If you notice anything concerning, research possible causes and solutions, or seek advice from a local nursery or garden center.
Troubleshooting Common Issues with Chocolate Lily Transplantation.
What's the perfect season to transplant chocolate Lily?
The ideal time for transplanting chocolate Lily is during seasons 2 to 4. Temperatures during this period support optimal growth.
How much space does chocolate Lily need when transplanting?
Chocolate Lily requires a spacing of 1-2 feet (30-60 cm) between each plant to ensure it can grow and spread comfortably.
What do I do if chocolate Lily wilts after transplanting?
As a first step, check if chocolate Lily receives sufficient water without becoming waterlogged. Also, it's safer to provide some shade for a couple of days after transplanting.
How do I ensure the optimal growth of chocolate Lily post-transplant?
To ensure optimal growth, incorporate nutrient-rich organic compost into the soil during transplanting and adequately water the plant.
Why isn't my transplanted chocolate Lily blooming?
Ensure that chocolate Lily receives ample sunlight after transplant. If not, try moving it to a sunnier location. Also, maintain the appropriate soil pH.
What should be the soil condition while transplanting chocolate Lily?
The soil should be well-drained and rich in organic matter to promote the growth of chocolate Lily. Adding compost can enhance soil fertility.
Why are the leaves of my chocolate Lily turning yellow after transplanting?
Yellowing leaves typically indicate overwatering. Reduce the frequency of watering and ensure the soil drains well to rectify this.
How to manage pests or diseases after transplanting chocolate Lily?
Regularly inspect your chocolate Lily for signs of pests and diseases. Use organic insecticides or fungicides if necessary. Proper spacing can also help prevent disease spread.
Is it necessary to stake chocolate Lily after transplanting?
Staking may not be required for chocolate Lily unless it is situated in a windy area. It's preferable to allow the plant to develop naturally.
What precautions should I take while transplanting chocolate Lily?
Minimize root disturbance when transplanting chocolate Lily. Water the plant thoroughly before removing it from its previous spot. Ensure to plant at the same depth as in the original container.


