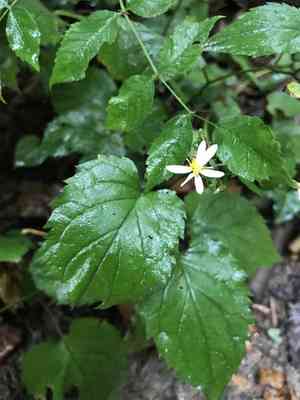
How to Transplant White wood aster?
The most favorable period for relocating white wood aster is amidst the peak of summer's heat, which guarantees successful establishment. Select a spot with partial shade and soil that drains effectively to replicate their native habitat, fostering robust development after transplantation.
What Preparations are Needed Before Transplanting White Wood Aster?
What is the Ideal Time for Transplanting White Wood Aster?
The best time to move white wood aster is when warm weather begins, typically in early to mid-summer. Moving it at this point, as temperatures become mild and stable, promotes strong root growth, ensuring white wood aster establishes itself well before winter. This period takes advantage of the season's consistent moisture and longer days, giving your white wood aster the best conditions for a smooth move and vigorous development. By choosing this perfect moment, you'll provide white wood aster with an excellent start in its new spot, benefiting from summer's nurturing warmth and energy.
How Much Space Should You Leave Between White Wood Aster Plants?
When relocating white wood aster, ensure a generous spacing of approximately 2-3 feet (0.6-0.9 meters). This provides ample room for growth and prevents competition for nutrients or water. It's truly the optimal approach for nurturing your new garden additions!
What is the Best Soil Mix for White Wood Aster Transplanting?
For white wood aster, a well-draining soil enriched with organic compost forms an excellent foundation. This aids in nutrient uptake. A small tip: apply a balanced, slow-release fertilizer for an extra boost. Don't fret if it's not perfect initially; gardening is a continuous learning process!
Where Should You Relocate Your White Wood Aster?
Select a spot with partial to full shade. White wood aster thrives with less direct sun! This helps your garden beauties avoid sunburn and remain healthy. Don't worry if you can't find the exact sun ratio right away; gardening involves experimentation!
What Equipments Should You Prepare Before Transplantation White Wood Aster?
Gardening Gloves
To prevent scrapes and keep your hands clean while working with soil and plants.
Shovel/Spade
For digging a hole for white wood aster and also for extracting white wood aster from its original spot.
Compost
To supply essential nutrients to white wood aster during the relocation process.
Watering Can
For hydrating white wood aster before and after its transfer.
Mulch
To maintain soil moisture and coolness around white wood aster.
How Do You Remove White Wood Aster from the Soil?
How Do You Remove White Wood Aster from the Soil?
From Ground: First, water the white wood aster plant to moisten the earth. Then, carefully dig a wide circle around the plant with a shovel, keeping the root ball intact. Gently lift the spade beneath the root ball to carefully extract the plant from its initial location.From Pot: Start by watering the pot to loosen the soil. Turn the pot on its side, hold it gently, and tap the bottom to slide the white wood aster plant out. If necessary, run a dull knife around the pot's interior to free the soil and roots.From Seedling Tray: Water the white wood aster seedlings thoroughly before removal. Use a spoon or small tool to lift the seedlings by digging under their roots, being careful not to harm the root system as you lift them.
Step-by-Step Guide for Transplanting White Wood Aster
Plant Removal
Carefully take out the white wood aster plant from its initial spot following the removal instructions. Be gentle to prevent root damage.
Prepare the Hole
Using a spade, dig a hole that is deep and wide enough to comfortably fit the white wood aster's root ball.
Compost Addition
Add compost or decomposed organic material to the hole and mix it thoroughly with the existing soil.
Plant Placement
Now, gently position white wood aster in the hole, ensuring it is planted at the same depth as it was originally.
Soil Backfilling
Carefully refill the hole with soil, gently firming it around the roots. Avoid pressing the soil down too hard as this can compact it and hinder root growth.
Watering
Once you have finished backfilling, water the white wood aster generously using a watering can.
How Do You Care For White Wood Aster After Transplanting?
Mulching
After relocating white wood aster, apply a layer of mulch around the plant, but keep it away from the stem. This will help maintain soil moisture and temperature.
Watering
Water white wood aster regularly, but avoid over-watering. The soil should remain consistently moist, not waterlogged.
Monitor
Regularly observe the white wood aster plant for any signs of transplant shock, such as wilting, yellowing, or leaf drop. If these symptoms appear, ensure its watering and lighting conditions are optimal.
Fertilizer
Wait approximately 4-6 weeks before applying fertilizers. This allows white wood aster time to recover from the stress of transplantation.
Troubleshooting Common Issues with White Wood Aster Transplantation.
When is the best time to transplant white wood aster?
The optimal period for relocating white wood aster is from late fall to early winter (S4-S5). This minimizes stress and promotes quicker growth.
How much space is required between each white wood aster plant?
Ensure sufficient room for vigorous growth. The ideal spacing is about 2-3 feet (60-91 cm) between each white wood aster.
What care should be taken while uprooting white wood aster for transplanting?
Handle roots delicately to prevent harm, keeping a good portion of the surrounding soil intact to facilitate a smooth transition for white wood aster.
How deep should the hole be for transplanting white wood aster?
The hole should be twice as wide and the same depth as the root ball. This allows white wood aster's roots to spread comfortably.
What is the right method to plant white wood aster in the new hole?
Position white wood aster in the hole at the same depth it was previously growing. Backfill with soil, press gently, and water thoroughly.
Should I water white wood aster immediately after transplanting?
Yes, watering is essential. It provides immediate hydration and helps the soil settle around white wood aster's root system.
What if the white wood aster sags or droops after transplanting?
Don't worry! Initial wilting is normal. Maintain consistent watering. However, if it persists, check for root damage or incorrect planting depth.
How is the health of white wood aster maintained post-transplant?
Ensure white wood aster receives adequate sunlight and water. Avoid excessive fertilization as it might stress the plant. Regularly check for pests and diseases.
Does white wood aster require mulching after transplant?
Absolutely, mulching benefits white wood aster. It helps retain soil moisture, deter weeds, and maintain temperature around the newly transplanted plant.
Why is my transplanted white wood aster not blooming?
White wood aster may not flower immediately after transplant due to shock. Continue care and allow it time to adapt to its new environment.


