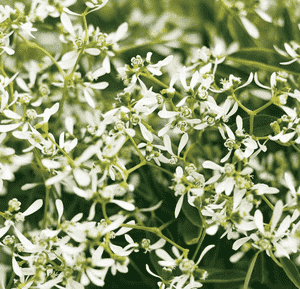
How to Transplant Graceful spurge?
For Euphorbia gracilis, the ideal period for relocation is when spring revitalizes the earth. This timeframe ensures vigorous development. Select a brightly lit location with soil that drains effectively, and if you're worried about transplant shock, a small amount of root growth enhancer can be highly beneficial.
What Preparations are Needed Before Transplanting Graceful Spurge?
What is the Ideal Time for Transplanting Graceful Spurge?
The optimal period to move graceful spurge is during the spring awakening, typically from early to mid-spring. The milder temperatures and increased moisture during this time create an ideal setting for establishment and root development. Relocating graceful spurge then maximizes its potential, allowing for a longer growth period to build resilience before summer's heat. Embrace this season to ensure your graceful spurge flourishes!
How Much Space Should You Leave Between Graceful Spurge Plants?
When planning to relocate graceful spurge, ensure each plant has ample room to grow. Ideally, they should be positioned approximately 1-2 feet (30-60cm) apart. This spacing promotes proper air circulation and prevents overcrowding, fostering healthier development.
What is the Best Soil Mix for Graceful Spurge Transplanting?
Graceful spurge thrives in well-draining soil that does not retain water for extended periods. Before transplanting, enrich your soil with a foundational fertilizer abundant in organic matter. This will provide nutrients to the plant and support its growth following the transplanting process.
Where Should You Relocate Your Graceful Spurge?
Graceful spurge requires a significant amount of sunlight for optimal growth. Choose a location that receives at least six hours of direct sunlight daily. Partial shade is also suitable if your region experiences intense heat. Remember, appropriate light exposure is crucial for graceful spurge's development.
What Equipments Should You Prepare Before Transplantation Graceful Spurge?
Gardening Gloves
To safeguard your hands while handling the plant and soil.
Trowel
This small hand tool is vital for excavating small holes and loosening the soil around the graceful spurge.
Spade
You will need this for digging the new planting site where you will place the graceful spurge.
Watering Can or Hose
This is crucial for ensuring your graceful spurge remains adequately hydrated before, during, and after the transplant.
Transplanting Fertilizer
This aids in minimizing transplant shock for the graceful spurge.
How Do You Remove Graceful Spurge from the Soil?
How Do You Remove Graceful Spurge from the Soil?
From Ground: Before extracting the graceful spurge, moisten the soil with water. This facilitates easier digging while keeping the root ball intact. Using a trowel or shovel, create a wide circle around the plant, ensuring the tool penetrates deep enough to encompass most of the roots. Gently lift the plant and carefully remove any excess soil from the roots.From Pot: If your graceful spurge is in a container, watering it beforehand will also be beneficial. Turn the pot sideways and gently tap it; this should help release the plant. If the plant remains stuck, gently squeeze or rotate the pot to loosen it further.From Seedling Tray: If you are starting from a seedling tray, be sure to water the graceful spurge first. A spoon can be helpful in carefully extracting the seedlings; gently lift from the leaf to avoid damaging the stem or roots.
Step-by-Step Guide for Transplanting Graceful Spurge
Preparation
Water your graceful spurge thoroughly several hours prior to transplanting.
Digging
Use a spade to excavate a hole twice as wide and nearly as deep as the root ball of your graceful spurge in its new location.
Placement
Position the graceful spurge in the center of the hole, ensuring it is planted at the same depth as it was in its original spot.
Backfilling
Refill the hole with soil, gently firming it around the root ball of the graceful spurge. Be careful not to plant too deeply, as this could lead to root rot.
Fertilization
Apply transplanting fertilizer according to the package directions to help graceful spurge establish in its new home.
Watering
Thoroughly water the graceful spurge after planting.
How Do You Care For Graceful Spurge After Transplanting?
Watering
Keep the soil moist but not waterlogged. Water regularly, especially during the initial weeks while the graceful spurge is establishing.
Pruning
To encourage denser growth, pinch back the tips of the graceful spurge a few days after transplanting.
Monitoring
Observe your graceful spurge for any indications of transplant shock, such as wilting or yellowing. If you notice any, reduce sun exposure and ensure it receives adequate water.
Protection
If pests or wildlife are present in your area, consider safeguarding your young graceful spurge with a barrier or an organic pest deterrent.
Troubleshooting Common Issues with Graceful Spurge Transplantation.
When is the perfect season to transplant the graceful spurge?
The optimal time to relocate your graceful spurge is between early spring (S1) and late summer (S2). This allows the plant sufficient time to establish before the colder months.
What is the recommended spacing for graceful spurge plants during transplantation?
For healthy growth of graceful spurge, ensure a distance of approximately 1-2 feet (30-60 cm) between plants during transplantation. This provides ample room for development.
What are the signs that my graceful spurge plant is ready to be transplanted?
Your graceful spurge is prepared for transplant when it is vigorous with healthy leaves and roots. It is best relocated when it outgrows its current container or becomes root-bound.
How should I water my graceful spurge after transplanting?
After transplanting, water the graceful spurge thoroughly until the soil is saturated but not soggy. Maintain consistent watering until the plant has fully established.
What kind of soil is suitable for transplanting graceful spurge?
Graceful spurge prefers well-draining soil. A mixture of sandy, loamy, or rocky soil is ideal. Remember that excellent soil quality will enhance your plant's survival rate after transplantation.
What is the ideal depth for transplanting graceful spurge?
When transplanting your graceful spurge, ensure you plant it at a depth similar to its previous location. Planting too deep can cause root rot, and too shallow can lead to dried-out roots.
My graceful spurge withers after transplantation, what might be wrong?
Withering can be a result of transplant shock, which can be minimized by transplanting in the ideal season and ensuring sufficient watering. If it persists, consider consulting a horticulturist.
Can graceful spurge be transplanted as a mature plant?
Yes, mature graceful spurge can be transplanted, but it carries a higher risk. Younger plants adapt better to relocation. If transplanting mature graceful spurge, take extra care not to damage its extensive root system.
Do I need to prune the graceful spurge before transplanting?
Trimming is not strictly necessary for transplanting graceful spurge. However, cutting back any dead or excessively long stems can help the plant direct energy towards root development after the move.
How long does it take for graceful spurge to fully establish after transplanting?
It depends on the health and size of the graceful spurge, and the conditions of the transplantation. Generally, most plants will be well established within a 2 to 6 weeks' period.


