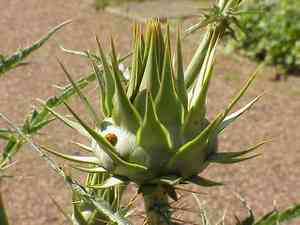
How to Transplant Cardoon?
The most favorable period for relocating cardoon is from early to mid-spring, which guarantees vigorous development. Choose locations that receive ample sunlight and have good drainage. Careful manipulation is crucial to prevent damage to the root system, thereby fostering successful integration.
Essential Preparations Before Relocating Cardoon?
Optimal Period for Cardoon Relocation?
The best time to move cardoon is during early to mid-spring. This timeframe allows for strong root development due to mild temperatures and ample soil moisture, creating ideal conditions for cardoon to flourish. Transplanting cardoon then aligns with its natural growth cycle, ensuring a robust start in its new environment. This season provides the perfect nurturing setting for vigorous cardoon growth.
Required Spacing Between Cardoon Plants?
When moving cardoon, ensure adequate spacing between each plant for healthy development. A distance of 2-3 feet (60 to 90 cm) is generally sufficient. This prevents plants from competing for vital resources.
Ideal Soil Blend for Cardoon Transplanting?
Cardoon thrives best in soil that drains well and is rich in organic matter. Before transplanting, enrich your garden soil with compost or a phosphorus-rich base fertilizer to encourage strong root growth.
Optimal Location for Your Cardoon?
Cardoon prefers full sun exposure. Select a garden spot that receives at least 6 hours of direct sunlight daily. This will ensure your cardoon grows robustly and healthily.
Equipment to Prepare Before Transplanting Cardoon?
Gardening Gloves
These are vital for protecting your hands when handling soil and cardoon.
Shovel or Trowel
One of these tools will be used to dig the planting hole for cardoon and to extract the plant from its original spot.
Watering Can
This will be used to moisten the ground before and after the transplant, aiding cardoon in establishing new roots.
Organic Compost
This will supply cardoon with the necessary nutrients for growth in its new location.
Mulch
Mulch is important for retaining soil moisture and regulating temperature around cardoon, especially right after transplanting.
Wheelbarrow
For transporting the cardoon and the compost.
Stakes and Strings
If cardoon requires additional support post-transplant.
How to Extract Cardoon from the Soil?
How to Extract Cardoon from the Soil?
From Ground: First, hydrate the cardoon plant to moisten the soil. Watering facilitates easier, less stressful extraction for the plant. Next, use a shovel to dig a wide trench around the cardoon, ensuring the root ball remains intact. Carefully work the spade beneath the root ball to lift the cardoon from its initial position. From Pot: If cardoon is in a pot, watering it before transplanting is crucial. Turn the pot sideways, hold the cardoon near the soil line, and gently tap the pot's rim on a firm surface. This should loosen the cardoon, allowing it to slide out with its soil and roots intact. From Seedling Tray: If the cardoon is in a seedling tray, invert it onto your hand (with fingers spread to allow the cardoon to pass through), then gently press the bottom of the cell until the cardoon emerges.
Step-by-Step Guide for Relocating Cardoon
Preparation
Incorporate a generous amount of organic compost into the hole dug for cardoon to enrich the soil and encourage growth. The hole should match the depth of the cardoon's root ball.
Placement
Carefully position the cardoon into the hole. Be cautious not to harm the roots during this step.
Backfilling the Hole
Refill the hole with the previously removed soil, ensuring cardoon is stable and level with the ground.
Watering
Water generously around the base of the cardoon, making sure no air pockets remain in the soil.
Applying Mulch
Spread a layer of mulch around the cardoon, keeping it away from the stem, to help retain moisture and control weeds.
Staking
If your cardoon is tall and unstable, stake it for support until it becomes established.
Post-Transplant Care for Cardoon?
Watering
It's crucial to keep the soil moist after moving cardoon. Check the soil frequently and water when the top inch feels dry. Avoid over-saturating the soil to prevent root rot.
Mulching
Regularly replenish the mulch layer around your cardoon as it decomposes to help maintain soil moisture and temperature.
Disease and Pest Inspection
Always check cardoon for signs of diseases and pests. Early detection simplifies treatment and prevents spread to other plants.
Pruning
Do not trim or prune cardoon immediately after transplanting. Allow it to establish first. Once cardoon is settled and shows new growth, dead or damaged parts can be removed.
Feeding
One month after transplanting, begin feeding cardoon with a balanced plant food to promote overall plant health and vigorous growth.
Resolving Common Cardoon Transplantation Issues.
When is the optimal time to transplant cardoon?
The best time to move cardoon is between /S1-S2/, when the weather starts to warm but before the peak summer heat.
What is the recommended spacing for cardoon seedlings during transplantation?
Maintain approximately 2-3 feet (60-90 cm) of space between cardoon seedlings. This provides ample room for growth without resource competition.
Why is cardoon struggling after transplanting?
Cardoon may not thrive if the transplanting process was too harsh, or if it lacks sufficient light, water, or nutrients. Review these factors and make necessary adjustments.
How can I minimize transplant shock in cardoon?
Reduce transplant shock in cardoon by watering thoroughly before and after transplanting, and by disturbing the roots as little as possible during the process.
Can cardoon tolerate frost and cold temperatures after transplant?
Cardoon is more cold-hardy than some plants but can still be damaged by frost. Consider covering the plant during frost warnings for protection.
How to prepare the soil for transplanting cardoon?
For cardoon, prepare a deep, rich soil by adding compost or well-rotted manure. Ensure the soil drains effectively to prevent waterlogging.
How deep should the holes be for transplanting cardoon?
The planting hole for cardoon should be deep and wide enough to comfortably accommodate the root system, typically about 10 inches (25 cm) deep.
What do yellowing leaves after transplanting cardoon indicate?
Yellowing leaves on cardoon could suggest water stress, nutrient deficiency, or transplant shock. Review your care routine, especially watering, and consider if any changes are needed.
Why is my transplanted cardoon becoming leggy?
If cardoon appears leggy after transplanting, it's likely not receiving enough light. Evaluate its location and determine if a sunnier spot is required.
How soon should I water cardoon post-transplant?
Water cardoon immediately after transplanting to help the plant settle and recover from any root damage incurred during the process.


