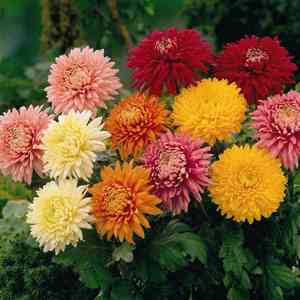
How to Transplant Garden mum?
The optimal period for relocating garden mum is between late summer and early autumn, as cooler temperatures and moderate sunlight foster ideal circumstances for root growth. Select a site with good drainage and ample sun for garden mum, and during the transplanting process, carefully untangle any matted roots to facilitate improved settling. Enjoy your planting!
Preparations for Transplanting Garden Mum
Optimal Transplanting Period for Garden Mum
Moving garden mum during the shift from late summer's warmth to early autumn's coolness allows it to develop strong roots before winter. This precise timing gives garden mum the best chance for abundant blooms in spring, transforming your garden. Timing is key for garden mum, and your efforts will be rewarded with stunning flowers. It's about giving garden mum a head start. Enjoy the process and happy gardening!
Spacing Requirements for Garden Mum Plants
When relocating garden mum, aim for a spacing of approximately 18-24 inches (45-60 cm) between plants. This provides ample room for growth and prevents overcrowding.
Ideal Soil Mixture for Garden Mum Transplanting
Before moving garden mum, prepare the soil with a well-draining, loamy mix rich in organic matter. Incorporating a balanced fertilizer, such as a 10-10-10 or slow-release type, will supply essential nutrients.
Choosing a New Location for Your Garden Mum
For optimal results, transplant garden mum to a location receiving 5-6 hours of direct sunlight daily. This ensures sufficient light for vibrant blooms and lush foliage.
Equipment Needed for Garden Mum Transplantation
Gardening Gloves
To safeguard your hands from potential harm when handling the plant and soil.
Garden Trowel
Useful for digging small holes when extracting garden mum from its current spot or planting it elsewhere.
Spade/Shovel
For excavating a larger garden mum plant, or preparing a bigger area for planting.
Watering Can
To provide moisture to garden mum both before and after its relocation.
Bucket
To hold and transport the garden mum plant during the transplanting process.
Garden Pruner
For removing any dead, yellow, or broken stems and leaves from garden mum.
How to Extract Garden Mum from the Soil
How to Extract Garden Mum from the Soil
From Ground: Start by thoroughly watering the garden mum plant the day before transplanting to minimize root shock. Use your shovel to draw a circle around the plant, being careful not to cut major roots, then gently lift the plant from the ground, ensuring the root ball remains as intact as possible.From Pot: If the garden mum plant is in a pot, water it well and let it sit for a few minutes. Turn the pot sideways, hold the plant gently by its stem, tap the bottom of the pot, and give a gentle pull to release the plant.From Seedling Tray: Use a spoon or a dibber to separate the garden mum plant from adjacent seedlings without harming the root ball. Carefully lift the seedling from the tray while supporting its roots.
Step-by-Step Guide for Transplanting Garden Mum
Hole Preparation
Dig a hole twice as wide and equal in depth to the garden mum plant's root ball. Ensure the hole is at least 10-12 inches deep.
Plant Positioning
Place the garden mum plant in the hole and loosely backfill with soil. The plant's crown should be level with or slightly below the ground surface.
Backfilling
Refill the hole with dirt, and gently pat the soil around the plant's base to eliminate any air pockets.
Watering
After planting, thoroughly water the garden mum plant and ensure the soil settles properly.
Post-Transplant Care for Garden Mum
Mulching
Apply a layer of mulch around garden mum to help retain moisture and regulate soil temperature. Avoid direct contact between mulch and the stem to prevent rot.
Pruning
Remove any dead, yellow, or broken stems and leaves to aid in recovery.
Frequent light watering
For the first two weeks, provide light watering frequently instead of less frequent heavy watering. After two weeks, water garden mum deeply enough to reach its root zone.
Disease and Pest Monitoring
Watch for signs of disease or pests, and take appropriate action if necessary.
Patience
Remember, garden mum will need time to establish itself in its new environment. Be patient and provide care as needed.
Addressing Common Issues with Garden Mum Transplantation.
When is the best time to transplant garden mum?
The ideal period for relocating garden mum is from late summer through early fall.
What spacing is needed between each garden mum plant during transplantation?
Allow each garden mum ample space, approximately 18 to 24 inches (45.72 to 60.96 cm) apart.
How deep should the hole be for transplanting garden mum?
The hole should be wide and deep enough to comfortably accommodate the entire root system of garden mum.
How should I prepare the soil for transplanting garden mum?
Ensure the soil is well-drained, rich in organic matter, and slightly acidic to neutral for healthy garden mum growth.
Should I water garden mum immediately after transplanting and how often thereafter?
It's best to water garden mum thoroughly right after transplantation, and then frequently to keep the soil moist but not waterlogged.
How crucial is sunlight for freshly transplanted garden mum?
Garden mum thrives in sunlight, so ensure your new spot offers a good balance of shade and direct sun to promote plant growth.
Should I add any fertilizers when transplanting garden mum?
You can incorporate a balanced, slow-release fertilizer during transplantation to give garden mum a nutrient-rich start in its new location.
Are there specific signs of shock in garden mum after transplanting?
If garden mum exhibits wilting, yellowing, or leaf loss, it may be experiencing transplant shock. Ensure it's adequately watered and receives proper sunlight.
What's the correct way to lift garden mum for transplantation?
Gently hold the plant at its base, and use a fork or your hands to carefully loosen the soil before lifting garden mum for relocation.
How frequently should I monitor garden mum after transplantation?
For the first few weeks, check garden mum daily. Look for any signs of stress and adjust watering and sunlight exposure as necessary.


