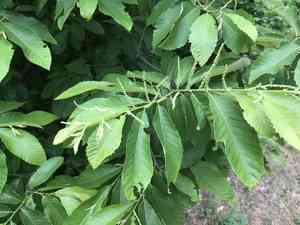
How to Transplant Dwarf Chestnut?
Relocate dwarf Chestnut from the end of winter's chill to the mild temperatures of late spring for best rooting. Select a bright location with soil that drains effectively, and ample room for expansion, ensuring minimal root disturbance during the transfer.
What Preparations are Needed Before Transplanting Dwarf Chestnut?
What is the Ideal Time for Transplanting Dwarf Chestnut?
The optimal window for relocating your dwarf Chestnut spans from early spring's awakening until its full bloom. Moving dwarf Chestnut during this timeframe promotes robust root growth before summer, ensuring a strong, flourishing plant. By transplanting within this period, you're giving dwarf Chestnut a head start to establish itself while conditions are mild and conducive to growth. It's a gentle encouragement that aligns with nature's rhythm, boosting dwarf Chestnut's chances of success.
How Much Space Should You Leave Between Dwarf Chestnut Plants?
When moving your dwarf Chestnut, ensure each has ample room to flourish by maintaining approximately 15-20 feet (4.5-6 meters) of separation. This spacing will allow their root systems to expand and canopies to develop without crowding.
What is the Best Soil Mix for Dwarf Chestnut Transplanting?
For your dwarf Chestnut, prepare the soil by ensuring it drains well and has a pH ranging from slightly acidic to neutral. Mixing in compost or a balanced, slow-release fertilizer can provide your dwarf Chestnut with an excellent start.
Where Should You Relocate Your Dwarf Chestnut?
Select a sunny location for your dwarf Chestnut as they thrive in full sunlight. This means a spot where they can receive at least 6-8 hours of direct sun exposure daily to support healthy development.
What Equipments Should You Prepare Before Transplantation Dwarf Chestnut?
Gardening Gloves
To safeguard your hands while handling soil and the plant.
Shovel or Spade
For excavating around and beneath the dwarf Chestnut's root ball.
Watering Can or Hose
To hydrate the dwarf Chestnut prior to and following transplantation.
Wheelbarrow or Garden Cart
To move the dwarf Chestnut from one spot to another.
Pruning Shears
To trim any damaged roots or branches.
Measuring Tape
To determine appropriate spacing and planting depth.
Mulch
To help maintain soil moisture and temperature around the dwarf Chestnut after planting.
Rooting Hormone (optional)
To stimulate root development if transplanting cuttings.
Stakes or supports (if necessary)
To provide stability for young dwarf Chestnut in their new environment.
How Do You Remove Dwarf Chestnut from the Soil?
How Do You Remove Dwarf Chestnut from the Soil?
From Ground: First, water the dwarf Chestnut to moisten the soil. Then, dig a wide circle around the plant using a shovel or spade, ensuring the plant's root ball remains intact. Carefully work the spade beneath the root ball to lift the plant from its original position.From Pot: Water the dwarf Chestnut thoroughly before the transplant. Turn the pot on its side, hold the plant by its base, and gently tap the bottom of the pot to loosen it. Slide the dwarf Chestnut out with its root ball intact, taking care not to pull on the stem.From Seedling Tray: Water the seedling tray to make the soil damp. Use a small tool or stick to gently ease the dwarf Chestnut seedling out of its compartment, retaining as much of the root soil as possible.
Step-by-Step Guide for Transplanting Dwarf Chestnut
Preparation
Gather all the tools and materials listed above in your work area.
Removal
Follow the instructions provided earlier for removing dwarf Chestnut from its initial location, whether it's from the ground, a pot, or a seedling tray.
Transportation
If the dwarf Chestnut is large, carefully place it in a wheelbarrow or garden cart to move it to the new site without disturbing the root ball.
Hole Digging
Excavate a hole in the prepared space that is twice the width of the dwarf Chestnut's root ball and equally deep, allowing the dwarf Chestnut to sit at the same level it was growing previously.
Planting
Position the dwarf Chestnut in the center of the hole. Backfill around the root ball with soil, gently firming it down without excessive compaction.
Watering
Water the dwarf Chestnut thoroughly after planting to settle the soil and eliminate air pockets. This will also aid the roots in beginning to establish themselves in the new location.
Supporting
If the dwarf Chestnut appears unstable, or if you are transplanting a larger dwarf Chestnut, stake it carefully to provide additional support.
Mulching
Apply mulch around the base of the dwarf Chestnut, keeping it away from the stem to prevent rot and maintain soil moisture.
How Do You Care For Dwarf Chestnut After Transplanting?
Monitoring
Closely observe the dwarf Chestnut for the first few weeks, looking for signs of stress, such as wilting leaves, which may indicate a need for more water or shade.
Watering
Regularly irrigate the dwarf Chestnut, especially during dry periods, to maintain consistent soil moisture. The frequency will depend on local climate and recent weather, but the goal is to keep the soil moist, not waterlogged.
Pruning
Remove any damaged or dead branches to direct the dwarf Chestnut's energy towards establishing its roots and new growth.
Staking
Check any stakes or supports you've installed to ensure they are effective and not causing harm or undue stress to the dwarf Chestnut.
Mulching
Inspect the mulch layer to confirm it's effectively preserving moisture and suppressing weeds without suffocating the roots.
Troubleshooting Common Issues with Dwarf Chestnut Transplantation.
Why is my dwarf Chestnut not thriving after transplantation?
Ensure it was transplanted during the optimal period from early to late spring, and with proper spacing of 15-20 feet (4.5-6 meters) apart. Verify adequate watering, soil compatibility, and absence of root damage during transplanting.
What is the best time to transplant dwarf Chestnut?
The ideal period for relocating dwarf Chestnut is during early to late spring when the plant is dormant and the soil is workable.
How much space should dwarf Chestnut have when transplanted?
Aim for ample spacing, ideally 15-20 feet (4.5-6 meters) between each dwarf Chestnut, to ensure sufficient growth room.
How deep should the hole be when transplanting dwarf Chestnut?
Dig a hole twice as wide and the same depth as the root ball of dwarf Chestnut to encourage root expansion.
How do I ensure dwarf Chestnut roots well after transplanting?
Keep the soil moist but not waterlogged. A consistent watering schedule aids root establishment for dwarf Chestnut.
What should I consider when choosing a transplanting site for dwarf Chestnut?
Select a site with good drainage, full to partial sunlight, and enough space to accommodate its mature size. Soil pH should match dwarf Chestnut preferences.
Can I transplant dwarf Chestnut on a hot day?
Transplanting dwarf Chestnut on a cool, overcast day is best to reduce stress and prevent dehydration.
My dwarf Chestnut looks wilted post-transplant, what should I do?
Temporary wilting is common; ensure it has adequate water and shade from harsh sun until established. Assess for root damage.
Should I fertilize dwarf Chestnut right after transplanting?
Wait to fertilize dwarf Chestnut until new growth is observed to prevent root burn and encourage natural root development.
Why are my dwarf Chestnut leaves turning yellow after transplanting?
Yellowing may indicate transplant shock. Maintain soil moisture and protect from strong winds. Check for signs of pests or diseases.


