How to Transplant Natal plum?
The optimal period for relocating natal plum is from mid-spring through early summer, or from late autumn into late winter. This timing enables the plant to develop a robust root system in mild conditions, thereby preventing heat-related damage. Natal plum flourishes in soil that drains effectively and in areas exposed to ample sunlight. Exercise caution when manipulating its root structure to guarantee a successful transfer.
Essential Preparations Before Relocating Natal Plum
Optimal Period for Moving Natal Plum
Relocating natal plum between mid-spring and early summer, or late autumn and late winter, is ideal, aligning with natural cycles. The mild weather lessens transplant stress for natal plum. By moving natal plum during these periods, you allow ample recovery time before the harsh conditions of summer or winter. Proper timing can give your natal plum a strong start and robust roots for maturation. This establishes a foundation for a thriving natal plum, ensuring it's prepared to flourish when the main growing seasons arrive.
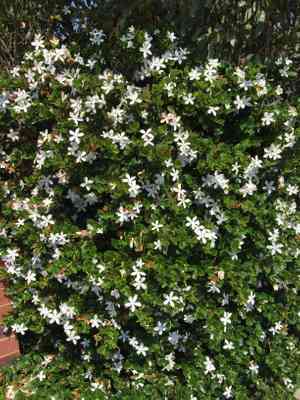
Required Spacing Between Natal Plum Specimens
When relocating natal plum, provide sufficient room for healthy development! Aim for a separation of 6-8 inches (15-20 cm) between plants, which will promote their growth and prevent overcrowding.
Ideal Soil Blend for Natal Plum Relocation
Preparing the soil for natal plum is straightforward! Simply select a well-draining soil with a loose texture, and incorporate a generous quantity of compost or organic material as a foundational fertilizer to nourish these young plants.
Choosing a New Location for Your Natal Plum
For the perfect site to relocate your natal plum, select an area where they can receive full sun to partial shade. They will appreciate at least 6 hours of sunlight daily for optimal development!
Equipment Needed Before Transplanting Natal Plum
Gardening Gloves
To safeguard your hands from scratches caused by the thorny Natal plum branches and from dirt.
Spade or Trowel
For excavating an appropriately sized hole for your natal plum plant in its new spot.
Watering Can
To moisten the natal plum's soil both before and after relocation.
Pruning Shears
To trim any unhealthy or excessively vigorous growth from your natal plum plant prior to transplanting.
Method for Extracting Natal Plum from the Ground
Method for Extracting Natal Plum from the Ground
From Ground: Initially, always hydrate your natal plum plant to soften the soil, facilitating its removal. Create a gap of approximately 1-2 feet from the plant and carefully dig in a circular motion around your natal plum, ensuring not to harm its roots. Gradually work the spade beneath the root ball and gently lift the plant from the ground.From Pot: First, water your potted natal plum. Invert the container and gently tap its base. The natal plum plant should slide out. If it doesn't, you can use a knife to loosen the edges.From Seedling Tray: Utilize a small implement like a spoon or fork handle to carefully dislodge the natal plum seedling. Be cautious to hold it by its root ball and not its stem to prevent damage.
Step-by-Step Guide for Relocating Natal Plum
Preparation
Choose a suitable planting location considering the sun exposure and spatial requirements of natal plum. The planting hole should be 2-3 times the width of the root ball and of the same depth.
Transplanting
Position the natal plum plant into the hole. Ensure the top of the roots is level with the ground surface. Carefully backfill the hole, gently compacting the soil as you proceed.
Watering
Thoroughly water the plant after planting, making sure moisture penetrates deeply into the root zone.
Post-Transplant Care for Natal Plum
Pruning
Lightly prune your natal plum immediately after transplanting to help the plant conserve energy. A light pruning involves removing 1/3 of the plant's total growth, focusing on dead or dying branches.
Maintenance
Regularly observe your natal plum plant for indications of stress, such as wilting or yellowing leaves, which could suggest overwatering or exposure to extreme weather conditions.
Watering
Irrigate the relocated natal plum plant as necessary to maintain consistent moisture around the roots. Avoid excessive watering, which can lead to root rot.
Fertilizing
After 4-6 weeks, apply a slow-release granular fertilizer to support new growth and plant establishment.
Resolving Common Issues with Natal Plum Relocation.
When is the best time to move natal plum?
The optimal period to relocate natal plum is either mid-spring to early summer or late fall to the onset of winter, when the plant experiences less stress.
What is the recommended spacing between natal plum when transplanting?
Natal plum requires room to expand! When relocating, allow approximately 6-8 inches (15-20 cm) between each plant for optimal outcomes.
Do the roots of natal plum need trimming during relocation?
Yes, it's ideal to prune the roots of natal plum before transplanting. Removing circling roots and reducing the root ball can encourage better growth.
I've moved natal plum but it's not thriving. Any advice?
Ensure it's planted in well-draining soil. Excessive moisture can cause root rot. Also, natal plum prefers partial shade to full sun, so confirm adequate exposure.
Do I need to add any specialized fertilizer when relocating natal plum?
Natal plum does not require any specialized fertilizer. Compost or organic matter mixed with the soil effectively enhances the plant's health.
What is the correct depth for relocating natal plum?
The transplant hole should be twice as wide but no deeper than the root ball. The top of the root ball should be level with the soil surface.
Do I need to water natal plum immediately after relocation?
Absolutely! Initial watering helps settle the soil around the roots, reducing transplant shock. However, be cautious, overwatering can harm this perennial plant.
Is there a precaution to prevent transplant shock in natal plum?
Avoid relocating in extreme temperatures, as it can induce shock. Also, prune the plant and water it sufficiently. This aids natal plum in recovering after being moved.
Can I relocate natal plum in rainy weather?
Light rain can be beneficial as it assists in settling the soil. However, avoid relocation during heavy rains or in waterlogged soil, as this might harm the plant.
What type of soil does natal plum prefer during relocation?
Natal plum thrives in a broad range of soils. However, for optimal growth, choose well-draining soil with a good amount of organic matter.


