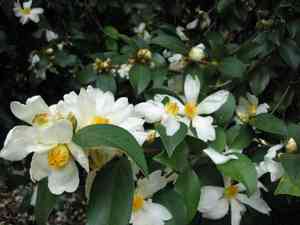
How to Transplant Tea-oil camellia?
For optimal results, tea-oil camellia should be relocated from mid-spring to early summer, a period conducive to robust root development. Select a site offering adequate drainage and dappled sunlight. Exercise caution with the root system to lessen shock and enhance establishment.
What Preparations are Needed Before Transplanting Tea-oil Camellia?
What is the Ideal Time for Transplanting Tea-oil Camellia?
For tea-oil camellia, the optimal period to relocate it is from the heart of spring to the beginning of summer. This timing ensures the plant has ample opportunity to establish itself in its new location before winter, promoting immediate growth and development post-move. By choosing this window, you provide tea-oil camellia with the essential head start it needs to thrive vibrantly. No other moment offers such revitalizing energy for tea-oil camellia.
How Much Space Should You Leave Between Tea-oil Camellia Plants?
For tea-oil camellia, allow sufficient room for growth by spacing plants 8-12 ft (2.4-3.7 m) apart. This enables robust root system development and ensures adequate air circulation.
What is the Best Soil Mix for Tea-oil Camellia Transplanting?
Prepare the soil for tea-oil camellia using well-draining loamy soil, rich in organic matter. Incorporate compost or aged manure to enrich the soil. Add a slow-release, balanced fertilizer (e.g., 10-10-10) to provide plants with a nutrient boost.
Where Should You Relocate Your Tea-oil Camellia?
Select an ideal spot for tea-oil camellia that receives full sun to partial shade. These plants prefer a location with 4-6 hours of daily sunlight. However, ensure protection from intense afternoon sun to prevent leaf burn.
What Equipments Should You Prepare Before Transplantation Tea-oil Camellia?
Garden Trowel
For excavating and moving small quantities of soil during the transplanting process.
Gardening Gloves
To safeguard your hands from dirt and sharp objects while handling the plant and soil.
Watering Can
To irrigate the tea-oil camellia plant as needed, ensuring its health throughout the transplanting procedure.
Spade or Shovel
For digging larger holes in the ground where the plant will be moved to.
Organic Mulch
To aid in retaining soil moisture and regulating temperature around the plant's base after transplanting.
A wheelbarrow or plant dolly
To assist in moving the tea-oil camellia from its original spot to the new planting site, especially if it is large or heavy.
Pruning Shears
For trimming any damaged or dead roots or branches.
How Do You Remove Tea-oil Camellia from the Soil?
How Do You Remove Tea-oil Camellia from the Soil?
From Ground: Begin by using your garden trowel to dig a shallow trench around the tea-oil camellia to loosen the soil. Then, deepen and widen the excavation with a shovel or spade, always ensuring you do not harm the root ball. Once the plant is unearthed with its root ball intact, carefully lift it from the ground, avoiding any sudden movements that could cause the root ball to disintegrate.From Pot: Start by thoroughly watering the tea-oil camellia to facilitate easier removal of the root ball. Turn the pot on its side, steady the plant, and tap the pot's rim against a firm surface to slide it out. Be cautious not to pull the plant out forcefully to prevent root damage.From Seedling Tray: Water the tea-oil camellia seedlings and use a small implement, such as a spoon or stick, to gently lift them from their tray compartments. Hold the seedlings by their leaves, not the stem, to avoid causing damage.
Step-by-Step Guide for Transplanting Tea-oil Camellia
Preparation
Prepare the transplanting site by digging a hole that is twice as wide and the same depth as the tea-oil camelliaâs root ball using your shovel or spade.
Planting
Position the tea-oil camellia into the hole. The top of the root ball should be level with the ground surface. Backfill the hole with the excavated soil, gently firming it around the plant's base.
Watering
Thoroughly water the newly transplanted tea-oil camellia. Ensure the entire root ball and surrounding soil are moistened.
Mulching
Apply a layer of organic mulch around the plant's base to help the soil retain moisture and inhibit weed growth.
How Do You Care For Tea-oil Camellia After Transplanting?
Monitoring Health
Closely observe your tea-oil camellia for the initial few weeks. Transplanting can induce shock in a plant, potentially manifesting as wilting or yellowing leaves. If this occurs, confirm it receives adequate water and protection from harsh weather.
Pruning
Trim any dead or broken branches to direct energy towards new growth. However, avoid extensive pruning immediately after transplanting as this can further stress the plant.
Pest & Disease Control
Since tea-oil camellia is more susceptible after transplanting, regularly check for signs of pests or disease. Employ organic or chemical pest control methods if necessary.
Troubleshooting Common Issues with Tea-oil Camellia Transplantation.
When is the perfect time to transplant my tea-oil camellia plant?
For best results, transplant your tea-oil camellia from mid-spring to early summer. This allows the plant ample time to establish before winter.
How much room does tea-oil camellia need for proper growth?
Tea-oil camellia requires a significant amount of space to thrive. A spacing of 8-12 ft (2.4-3.7 meters) between each plant is optimal.
Why is my newly transplanted tea-oil camellia wilting?
Wilting may be due to transplant shock. Keep the plant well-hydrated and use a root stimulator to reduce stress and encourage root development.
How deep should I plant tea-oil camellia during transplantation?
The hole should be twice as wide and slightly shallower than the root ball. Ensure the top of the root ball is flush with the ground.
After transplanting, how do I care for my tea-oil camellia?
Water your tea-oil camellia thoroughly and consistently to maintain soil moisture. Apply mulch to retain moisture and deter weeds. Fertilize with a balanced feed.
Can I transplant tea-oil camellia in the fall?
Transplanting tea-oil camellia in autumn is not ideal as the plant may lack sufficient time to establish before winter. Mid-Spring through early Summer is the prime period.
What's the remedy for Yellowing leaves on my transplanted tea-oil camellia plant?
Yellowing might indicate overwatering or a nutrient deficiency. Try reducing irrigation, check drainage, and if needed, supplement with a trace element fertilizer.
Why isn't my transplanted tea-oil camellia flowering?
Several factors can affect tea-oil camellia's bloom - it might require more sun exposure or could be over-fertilized with nitrogen. Adjust conditions accordingly.
Do I need to prune my tea-oil camellia after transplanting?
Pruning is not essential but can be beneficial; removing dead or damaged branches promotes rapid recovery and vigorous growth post-transplantation.
Can the tea-oil camellia tolerate transplanting?
Generally, tea-oil camellia handles transplanting well, especially when performed during the ideal season with appropriate care and gentle handling.


