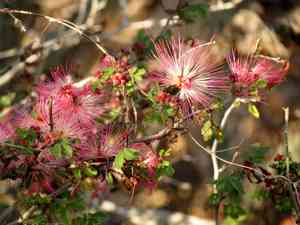
How to Transplant Fairy Duster?
Relocate fairy Duster during the peak of spring transitioning into summer, as elevated temperatures foster root establishment. Select a bright, adequately draining location. Should fairy Duster appear stressed, gradually acclimate it by providing temporary shade.
Essential Preparations Before Relocating Fairy Duster
Optimal Period for Moving Fairy Duster?
The ideal window for relocating fairy Duster spans from late spring to early summer. Moderate temperatures and extended daylight hours offer prime growth conditions for fairy Duster, aiding root establishment before intense summer heat. Moving fairy Duster at this point allows it to benefit from warm soil and the start of the growing season, leading to a healthier, more vigorous plant. A bit of care during this season ensures fairy Duster flourishes in its new spot, exhibiting vibrant growth.
Required Spacing Between Fairy Duster Plants?
When relocating fairy Duster, ensure ample room for expansion. Position plants approximately 3-4 feet (0.9-1.2 meters) apart. This prevents overcrowding, fostering better plant health and promoting optimal development.
Ideal Soil Mixture for Fairy Duster Relocation?
For fairy Duster, opt for a well-draining soil blend, as it thrives in drier conditions. Incorporating organic matter, such as compost or peat moss, can enhance drainage. Apply a foundational fertilizer, like a slow-release granular type, to enrich nutrient content before transplanting.
Choosing a New Location for Your Fairy Duster?
Site selection is crucial when moving your fairy Duster. Choose a garden spot that receives full sun to partial shade. This plant enjoys solar warmth but can also endure some afternoon shade. Appropriate light exposure supports its growth and flowering cycles.
Tools Required Before Relocating Fairy Duster?
Gardening Gloves
To safeguard your hands while handling soil and maneuvering the fairy Duster plant.
Garden Spade or Shovel
For cutting through earth and roots to extract the plant. Precision is vital to prevent plant damage.
Gardening Trowel
To excavate a hole in the new area where the fairy Duster plant will be placed.
Watering Can
Used to hydrate the plant both in its original spot before removal and in the new transplanted area.
Organic Compost
A natural soil enhancer, improving fertility and soil structure.
Mulch
To cover the ground around the plant post-transplant to retain soil moisture and suppress weed growth.
How to Extract Fairy Duster from the Ground?
How to Extract Fairy Duster from the Ground?
From Ground: Water the fairy Duster plant generously the day before relocation to moisten the soil, making removal easier. Dig a trench in a wide circle around the plant with a spade or shovel, ensuring the root system remains intact. Work beneath the root ball with your tool to safely lift the plant and its roots from the ground.From Pot: Before removing the fairy Duster plant, water it an hour prior. Turn the pot on its side, grasp the plant's stem, and tap the container's bottom until the plant slides out.From Seedling Tray: Dampen the soil in the tray. Carefully dig around the base of the fairy Duster seedling using a small trowel or your finger. Lift the seedling by its root ball, taking care to avoid harming the delicate root system.
Step-by-Step Guide for Relocating Fairy Duster
Excavating
Dig a hole in the new location using your gardening trowel that is twice as wide and nearly as deep as the fairy Duster plant's root system.
Preparation
Line the hole with organic compost to provide the newly relocated plant with a nutrient-rich growing environment.
Positioning
Carefully place the fairy Duster in the hole at the same depth it was in its previous spot. Spread the roots outwards.
Backfilling
Gently refill the hole, firming the soil as you proceed. This helps eliminate air pockets and provides plant stability.
Watering
Thoroughly water the plant after planting to settle the soil around the root ball.
Mulching
Apply mulch around the fairy Duster plant, leaving a small gap near the stem to prevent rot.
Post-Transplant Care for Fairy Duster
Immediate Watering
After relocation, give the fairy Duster plant a good watering to help settle the soil and lessen transplant shock. Keep the soil consistently moist for establishment in the new location.
Mulching
Apply mulch around the base to help the soil retain moisture and gradually release nutrients. Avoid piling it against the stem to prevent rot.
Pruning
Light trimming may be necessary to remove any damaged or diseased branches to encourage new growth. Be gentle as fairy Duster might be stressed after the relocation process.
Addressing Common Issues with Fairy Duster Relocation.
When is the best time to move fairy Duster?
The optimal period to move fairy Duster is during season 3 to 5. This corresponds to late summer through late fall, offering ideal environmental conditions for relocation.
What is the ideal spacing between fairy Duster when moving them?
When relocating fairy Duster, it's best to space them approximately 3-4 feet (about 0.9 to 1.2 meters) apart. This ensures each plant has sufficient root space to grow.
What if fairy Duster leaves turn yellow after relocation?
Yellow leaves might indicate overwatering or poor drainage. Reduce watering and ensure the plant is in a well-drained spot to improve its condition.
What soil type is best for relocating fairy Duster?
Fairy Duster prefers well-drained alkaline soil rich in organic matter. Before relocating, amend your soil if it doesn't naturally meet these requirements.
How do I prepare fairy Duster for relocation?
Before relocating fairy Duster, water it thoroughly, then gently extract it from its current spot. Be careful not to damage roots during the process.
Why is fairy Duster wilting after relocation?
Wilting after relocation could signal transplant shock. Keep the soil consistently moist and place the plant in a location with appropriate light conditions to aid recovery.
How should I water fairy Duster after relocation?
After relocating fairy Duster, water it deeply to initiate the growth process. However, avoid waterlogging the soil as it can lead to root rot.
What if fairy Duster isn't flowering after relocation?
Lack of blooms could be due to insufficient light or nutrients. Ensure fairy Duster receives ample light and consider a slow-release fertilizer to enhance flowering prospects.
What precautions should I take when relocating fairy Duster?
When relocating fairy Duster, avoid disturbing the roots, place it at a depth similar to its previous location, and ensure it's well-watered but not waterlogged.
Why are fairy Duster leaves falling off after relocation?
Leaf drop could be a reaction to a sudden environmental change or transplant shock. Keep the soil moist and light conditions consistent to help it adapt.


