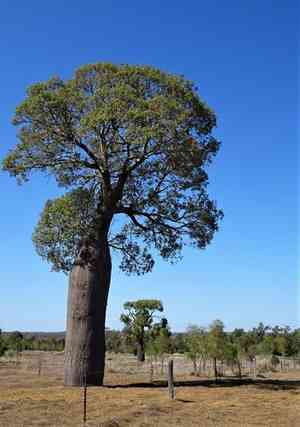
How to Transplant Queensland bottle tree?
To achieve the best growth, relocate queensland bottle tree between early spring and late summer, since the elevated temperatures foster root establishment. Select a site featuring soil that drains effectively and offers partial shade. Always manage queensland bottle tree gently to prevent harm to its roots and trunk.
What Preparations are Needed Before Transplanting Queensland Bottle Tree?
What is the Ideal Time for Transplanting Queensland Bottle Tree?
The best time to move queensland bottle tree is from early spring's onset until late summer's end. This period is vital because mild temperatures encourage immediate growth and quick root establishment. Transplanting during this season ensures queensland bottle tree firmly settles in its new spot, benefiting from the rich spring soil. Additionally, extended daylight hours provide ample time for photosynthesis, directly aiding growth and development. So, for a flourishing, healthy, and robust queensland bottle tree, begin digging when spring first welcomes blooming plants and continue until summer gracefully transitions to autumn.
How Much Space Should You Leave Between Queensland Bottle Tree Plants?
For relocating your queensland bottle tree, it's advisable to allow a generous spacing of approximately 30-40 feet (9-12 meters) between plants. This will provide your plant with sufficient room to expand and thrive!
What is the Best Soil Mix for Queensland Bottle Tree Transplanting?
To prepare the ground for your queensland bottle tree, select well-draining, slightly acidic soil enriched with a blend of sand and compost. Incorporate a foundational fertilizer, such as slow-release granular 10-10-10 (N-P-K), to supply essential nutrients.
Where Should You Relocate Your Queensland Bottle Tree?
Select a site for your queensland bottle tree that receives abundant sunlight, ideally 6-8 hours of direct sun daily. This will ensure your plant flourishes and develops its distinctive bottle-shaped trunk.
What Equipments Should You Prepare Before Transplantation Queensland Bottle Tree?
Gardening gloves
To safeguard your hands while handling soil and queensland bottle tree.
Shovel or garden spade
To excavate around and lift the queensland bottle tree without harming its roots.
Gardening hose or watering can
To hydrate the plant before and after its relocation.
Wheelbarrow
For safely and easily moving the plant from its original spot to its new home.
Trowel
To assist in positioning the queensland bottle tree into its new location.
Garden Prune
To trim any damaged roots or branches during the transplanting process.
How Do You Remove Queensland Bottle Tree from the Soil?
How Do You Remove Queensland Bottle Tree from the Soil?
From Ground: Master the technique of careful excavation. Pre-moisten the soil surrounding the base of the queensland bottle tree to facilitate digging. Using a spade or shovel, dig around the plant's base, ensuring the root ball remains as intact as possible. Then, create a trench beneath the root ball and gently lift the plant.From Pot: Before extracting queensland bottle tree from its container, water it thoroughly. Turn the pot on its side, gently hold the plant by its base, and tap the bottom of the container until the plant slides out. Avoid pulling the plant by its stem or trunk.From Seedling Tray: If cultivating queensland bottle tree from a tray, the procedure is similar. Water the tray well beforehand, then gently separate the seedlings from their growing spots, making sure to hold them by their leaves, not their stems.
Step-by-Step Guide for Transplanting Queensland Bottle Tree
Digging
Excavate a hole twice as wide and the same depth as the queensland bottle tree root ball, in the chosen spot.
Placing
Position the queensland bottle tree in the hole. The top of the root ball should be level with the ground surface.
Filling
Gently backfill the hole, compacting the soil around the root ball. Do not bury the plant deeper than its previous growing depth.
Watering
Water the plant thoroughly after planting. Saturate the area to settle the soil and minimize air pockets.
Mulching
Apply a layer of mulch around the base of the queensland bottle tree, keeping it clear of the stem. The mulch will help maintain soil moisture and temperature.
How Do You Care For Queensland Bottle Tree After Transplanting?
Watering
Ensure the queensland bottle tree receives regular watering, but be cautious not to overwater. Check the soil with your finger; it should be moist but not saturated.
Pruning
Trim any dead or dying branches to encourage new growth.
Protection
Utilize shade cloth to shield the newly planted queensland bottle tree from harsh weather conditions like intense sun or frost.
Monitoring
Keep an eye out for any indications of transplant shock, such as wilting, yellowing, or dropped leaves. If these occur, increase watering and consider applying a root stimulant.
Troubleshooting Common Issues with Queensland Bottle Tree Transplantation.
When is the ideal time to transplant queensland bottle tree?
Transplanting queensland bottle tree is best done between the budding season of early spring and the full bloom of late summer. This timing maximizes its potential for thriving.
What is the optimal spacing for queensland bottle tree when transplanting?
To provide queensland bottle tree ample room to grow, maintain a distance of 30-40 feet (9-12 meters). This spacing helps prevent future branch overlap.
Why is my queensland bottle tree wilting after transplant?
Wilting can indicate transplant shock. Ensure the root ball stays moist, provide shade, and avoid fertilizing for a period to allow queensland bottle tree to recover.
What is the recommended soil condition for transplanting queensland bottle tree?
Queensland bottle tree prefers well-draining soil. Incorporating organic compost can improve soil structure for better root development and nutrient uptake.
How deep should I dig the hole when transplanting queensland bottle tree?
The hole should be twice as wide and as deep as queensland bottle tree's root ball – this promotes broader root spread for stable anchoring.
What to do if the leaves of queensland bottle tree are turning yellow after transplant?
Yellowing leaves might signal overwatering or under-watering. Ensure queensland bottle tree is neither waterlogged nor excessively dry by regularly checking soil moisture.
How often should I water queensland bottle tree after transplanting?
Water queensland bottle tree immediately after transplanting, then regularly based on weather conditions. Hotter climates may require more frequent watering to maintain soil moisture.
Should I prune queensland bottle tree before or after transplant?
Before transplanting, prune queensland bottle tree, focusing on damaged or diseased branches. This reduces water loss through leaves and encourages healthier regrowth.
Why is the bark of my transplanted queensland bottle tree cracking?
Bark cracking may indicate sunscald. Initially, keep queensland bottle tree in a partially shaded spot and gradually expose it to more sunlight.
Should I fertilize queensland bottle tree immediately after transplant?
Wait a few weeks before applying fertilizer. This prevents root burn and allows queensland bottle tree to acclimate to its new environment.


