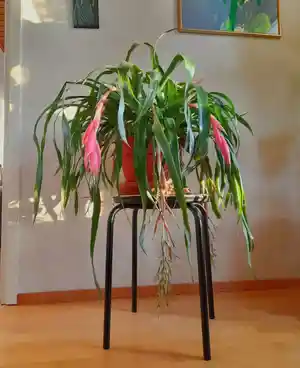
How to Transplant Queen's tears?
The optimal period for relocating queen's tears is in springtime, since the atmospheric conditions foster root growth. Position queen's tears where it receives ample, diffused illumination, guaranteeing effective water runoff. A careful approach is essential to safeguard its fragile root structure.
What Preparations are Needed Before Transplanting Queen's Tears?
What is the Ideal Time for Transplanting Queen's Tears?
The optimal period for relocating queen's tears is during the spring months. This is when the soil becomes active, providing perfect conditions for root establishment and development. Moving queen's tears at this time utilizes the soft earth and mild temperatures, which are perfect for root expansion and adaptation. This method ensures stronger plants, ready to flourish throughout the growing season. Replanting queen's tears in this season will yield the best results for resilience and vitality.
How Much Space Should You Leave Between Queen's Tears Plants?
To allow queen's tears sufficient room to grow, position your plants 1-2 feet (30-60 cm) apart. This will provide ample space for each plant to thrive without competing with one another. Remember, correct spacing is a crucial step for a successful transplant.
What is the Best Soil Mix for Queen's Tears Transplanting?
Prior to transplanting, prepare a soil mixture that drains effectively. You can create this by combining garden soil, compost, and perlite. Additionally, incorporate a slow-release fertilizer to supply nutrients to queen's tears during its active growth phase. This environment will support your plant's development.
Where Should You Relocate Your Queen's Tears?
Choose a spot that receives bright, but not direct sunlight for queen's tears to flourish. Consider areas in your garden that get morning sun and then become shaded later in the day. Appropriate sunlight is a vital component for queen's tears's healthy development.
What Equipments Should You Prepare Before Transplantation Queen's Tears?
Gardening Gloves
To safeguard your hands from any sharp or abrasive materials while handling the soil and queen's tears plant.
Trowel
You'll need this small hand tool to loosen the soil around the plant and scoop it up when moving it.
Spade
A larger implement useful for excavating the new hole where queen's tears will be moved.
Watering Can
Essential for ensuring the newly-transplanted queen's tears has adequate moisture to thrive.
Gardening Pruners
Useful for carefully trimming away any damaged or diseased parts of the queen's tears plant before relocation.
Wheelbarrow
Ideal for transporting the queen's tears plant from its original spot to the new location without strain.
How Do You Remove Queen's Tears from the Soil?
How Do You Remove Queen's Tears from the Soil?
From Ground: If your queen's tears plant is currently in the ground, first water the area to moisten the soil, making it easier to work with. Carefully dig a wide circle around the plant with your spade, aiming to keep the root ball intact. Then, gently work the spade beneath the root ball to lift the plant out of its original position.From Pot: If your queen's tears is in a container, water it thoroughly first. Then, tilt the pot sideways and gently tap it to loosen the root ball. It should eventually slide out when you lightly pull on the plant's base. If it's been in the same pot for a long time and is root-bound (roots circling at the bottom), use your fingers to gently separate the roots.From Seedling Tray: For queen's tears plants starting in a seedling tray, first water the tray to dampen the soil. Then, gently leverage the seedling out using a small trowel or even a spoon. Be careful not to harm the delicate roots.
Step-by-Step Guide for Transplanting Queen's Tears
Digging
Using the spade, excavate a hole that's twice as wide and just as deep as the root ball of your queen's tears plant. This provides the roots with ample loose soil to establish themselves.
Positioning
Place your queen's tears in the new hole, ensuring it's at the same soil level as before; avoid burying it too deeply or leaving it too exposed.
Backfilling
Refill the hole with the soil you initially removed. Gently press the soil down around the base of the queen's tears to eliminate any air pockets.
Watering
Water the newly transplanted queen's tears generously, making sure the water reaches the root zone.
Checking
Over the next few days, regularly inspect your queen's tears to ensure it's adapting well to its new environment. You can do this by observing the color and firmness of its leaves.
How Do You Care For Queen's Tears After Transplanting?
Watering
Aim to keep the soil around the queen's tears consistently moist, but not excessively saturated. Too much water can lead to root rot, while too little can cause the plant to dehydrate. Monitor the soil's moisture level regularly, especially during dry periods.
Pruning
In the weeks following transplantation, avoid extensive pruning of your queen's tears. This allows the plant to focus its energy on developing a robust root system. However, if you notice any yellowing or dying leaves, feel free to snip them off.
Protection
Keep an eye out for pests or diseases. If you notice anything unusual (like discolored leaves or a sticky residue), consult a local nursery or extension service for guidance.
Patience
Remember, it may take some time for your queen's tears to adjust to its new surroundings. But with proper care, it should flourish in its new home!
Troubleshooting Common Issues with Queen's Tears Transplantation.
What's the ideal season to transplant queen's tears?
The ideal time to transplant queen's tears is during S1-S3, when the weather is most favorable for it.
What should I keep in mind about spacing when transplanting queen's tears?
Ensure to provide ample room for queen's tears to grow by spacing them 1-2 feet (30-60 cm) apart during transplanting.
What's a common error when transplanting queen's tears?
A common mistake is not ensuring the pot or garden spot has good drainage - queen's tears dislikes waterlogged roots.
How deep should the hole be when transplanting queen's tears?
The transplant hole should be deep enough to accommodate the root ball of queen's tears, typically around 8-12 inches (20-30 cm).
Should I water queen's tears immediately after transplanting?
Yes! Make sure to provide a generous amount of water after transplanting queen's tears to help the plant settle in the new location.
Should I prune queen's tears before transplanting?
Pruning isn't required before transplanting, but it's a good practice to remove dead or diseased leaves to promote healthy growth post-transplant.
What kind of soil is best for transplanting queen's tears?
Queen's tears prefers well-draining soil. A mixture of sand, peat and a little bit of compost makes for the ideal transplanting medium.
Do I need to add any special fertilizers while transplanting queen's tears?
While fertilizers aren't necessary at the transplantation time, adding a slow-release fertilizer can give queen's tears an extra boost and help it establish quickly.
How much sunlight does queen's tears need after transplanting?
Queen's tears can thrive in a wide range of light conditions, but ideally, they prefer bright indirect light post-transplant.
How to handle the plant roots while transplanting queen's tears?
Handle queen's tears's roots gently during transplanting. Try not to damage them as this could hinder the plant's growth.


