How to Transplant British columbia wild ginger?
Relocate british columbia wild ginger during the pleasant period of late spring through early summer for robust development. Select a shaded, damp spot that mimics its natural forest habitat. Bear in mind, minimal disruption leads to more content specimens!
What Preparations are Needed Before Transplanting British Columbia Wild Ginger?
What is the Ideal Time for Transplanting British Columbia Wild Ginger?
The optimal period for relocating british columbia wild ginger is during the mild conditions of late spring to early summer. Moving british columbia wild ginger at this time allows its root system to establish before the intense heat of midsummer, ensuring better adaptation to its new site. This timing takes advantage of the gentle weather, improving soil moisture retention, which is vital for british columbia wild ginger's development. It also avoids stressing the plant during its active growth phase, giving it a head start for a vigorous, thriving season.
How Much Space Should You Leave Between British Columbia Wild Ginger Plants?
When preparing a location for british columbia wild ginger, ensure each plant is positioned approximately 6-12 inches (15-30 cm) apart. This provides your beautiful plants with ample room to expand and flourish.
What is the Best Soil Mix for British Columbia Wild Ginger Transplanting?
British columbia wild ginger prefers fertile soil rich in organic matter. Prior to planting, enrich the soil with well-decomposed compost or a slow-release granular fertilizer. This will keep british columbia wild ginger healthy and thriving.
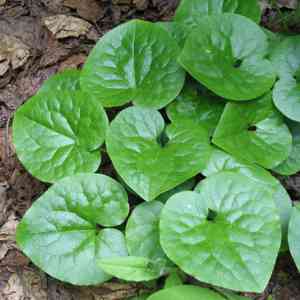
Where Should You Relocate Your British Columbia Wild Ginger?
British columbia wild ginger thrives in partial shade. Select a spot that receives ample morning sun but is protected from the intense afternoon sun. This will help british columbia wild ginger maintain its vibrant coloration and prevent sun damage.
What Equipments Should You Prepare Before Transplantation British Columbia Wild Ginger?
Gardening Gloves
To protect your hands from thorns and rough soil when handling the british columbia wild ginger plant.
Shovel or Spade
To assist in digging up the plant from its original spot without harming the roots.
Garden Trowel
To create precise holes for the new planting location.
Watering Can
To moisten the soil both before and after the plant is moved.
Gardening Scissors
For trimming any unhealthy roots or stems.
Wheelbarrow
To transport the plant from one area to another.
Compost
To enhance the soil's quality.
How Do You Remove British Columbia Wild Ginger from the Soil?
How Do You Remove British Columbia Wild Ginger from the Soil?
From Ground: Begin by thoroughly watering the british columbia wild ginger plant to soften the surrounding soil. This makes it easier to remove the plant without damaging its roots. Next, dig a wide trench around the plant using a shovel or spade, being careful not to disturb the plant's root ball. Gently lift the plant from its original position after successfully working the spade underneath it.From Pot: First, water the british columbia wild ginger plant so the soil is damp and more manageable. Slowly invert the pot and hold the plant stem at the base, applying gentle pressure. The plant should slide out or can be carefully eased out with your hands. Be very cautious to avoid root damage.From Seedling Tray: Lightly water the british columbia wild ginger plant to moisten the soil. Carefully loosen the soil around the roots using a small tool or your fingers, and gently lift the plant from its cell, taking care not to harm the roots during the process.
Step-by-Step Guide for Transplanting British Columbia Wild Ginger
Preparation
Begin by watering the new site for your british columbia wild ginger plant. This prepares the soil for easy digging.
Digging
Using a garden trowel, excavate a hole twice as wide as the root ball of your british columbia wild ginger plant and approximately the same depth.
Placing
Position the british columbia wild ginger plant in the hole, ensuring it is at the same depth as in its original location – it's important not to plant it too deeply.
Backfilling
Gently refill the hole with the displaced soil, making sure no air pockets are trapped. Compost can be mixed with the backfill dirt to boost nutrients.
Watering
Water the british columbia wild ginger plant once it is in place. This helps the soil settle around the roots and support the plant.
How Do You Care For British Columbia Wild Ginger After Transplanting?
Consistent Watering
It's vital to keep the soil moist but not waterlogged for the initial few weeks post-transplant. This will encourage root development and help your british columbia wild ginger plant adapt to its new surroundings.
Regular Monitoring
Watch for any indications of transplant shock, such as wilted or discolored leaves. If such symptoms appear, ensure the plant is receiving adequate water and shade.
Pruning
If necessary, trim the plant to maintain its form and remove any unhealthy or damaged sections. This can also help the british columbia wild ginger plant prioritize developing strong roots initially.
Pest Control
Be attentive to potential pest infestations or diseases, and address these issues promptly as they can easily spread when the plant is weakened after transplant.
Troubleshooting Common Issues with British Columbia Wild Ginger Transplantation.
When's the best time to transplant british columbia wild ginger?
The optimal period to transplant british columbia wild ginger is from early spring to mid-summer, as this allows the plant sufficient time to establish before colder weather arrives.
What spacing should I use when transplanting british columbia wild ginger?
When transplanting british columbia wild ginger, maintain a suitable distance of 6-12 inches (15-30 cm) between each plant. This provides each with proper growth space.
How much sunlight does british columbia wild ginger need after transplanting?
British columbia wild ginger thrives best in shade to partial sunlight after transplanting. Intense, direct sunlight might harm the plant's foliage.
What kind of soil is best for transplanting british columbia wild ginger?
British columbia wild ginger grows best in well-draining soil. Enrich it with organic matter to maintain healthy roots and promote growth after transplanting.
How often should I water british columbia wild ginger after transplanting?
Water british columbia wild ginger once a week post-transplant, but ensure you're not overwatering. The soil should be moist, not saturated.
What to do if british columbia wild ginger leaves start yellowing after transplanting?
If british columbia wild ginger's leaves yellow after transplanting, it might be receiving too much sunlight, or being over/under-watered. Adjust the conditions and observe changes.
Why are my transplanted british columbia wild ginger plants wilting?
Wilting of transplanted british columbia wild ginger can occur due to shock, excessive watering, or poor soil drainage. Adjust care gradually and look for improvements.
What's the impact of temperature on transplanting british columbia wild ginger?
British columbia wild ginger prefers moderate temperatures for transplanting. Extreme cold or heat may hinder growth or even kill the plant.
How can I minimize transplant shock for british columbia wild ginger?
To reduce transplant shock for british columbia wild ginger, water thoroughly before and after transplanting. Choose a cloudy day for transplanting to lessen sun stress.
Do I need to fertilize british columbia wild ginger after transplanting?
Yes, using a slow-release fertilizer can encourage root development in british columbia wild ginger after transplanting. Remember, too much fertilizer can cause damage!


