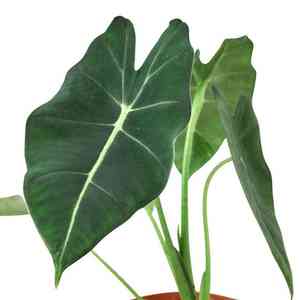
How to Transplant Elephant's ear?
The most favorable period for transplanting elephant's ear is in the spring, as moderate temperatures encourage root development without the strain of intense warmth. Choose a shaded spot with damp, permeable earth, and guarantee sufficient room for expansion. A delicate approach is essential to safeguard fragile roots.
Essential Preparations Before Relocating Elephant's Ear?
Optimal Timing for Elephant's Ear Relocation?
Springtime offers a blend of moderate temperatures and strong growth potential, making it ideal for settling elephant's ear into their new environment. Choosing this period for transplantation helps elephant's ear develop robust roots and thrive, thanks to spring's favorable conditions. With the soft, warming soil, elephant's ear finds the perfect setting to emerge from dormancy and encourage vigorous leaf development. It's a wonderful time that naturally stimulates elephant's ear, boosting its chances for success in a new spot.
Required Spacing Between Elephant's Ear Plants?
When moving your elephant's ear, each plant will require ample room to expand. Therefore, ensure you position them approximately 2-3 feet (60-90 cm) apart. This will provide each plant sufficient area to freely flourish and display its beauty.
Best Soil Blend for Elephant's Ear Relocation?
To prepare the soil for your elephant's ear, select a well-draining medium rich in organic matter, such as humus or compost. To enrich the ground, you can incorporate a balanced base fertilizer (like 10-10-10). This establishes an excellent foundation for growth!
Recommended Location for Your Elephant's Ear?
Select a site for your elephant's ear that receives filtered sunlight. While it enjoys light, direct sun can lead to scorched leaves. A spot with dappled light or morning sun with afternoon shade would be perfect. Happy gardening!
Necessary Equipment Before Transplanting Elephant's Ear?
Gardening Gloves
To protect your hands from harm while working with soil and elephant's ear.
Spade or Shovel
For excavating holes and carefully extracting elephant's ear from its original spot. Also useful for blending compost into the planting hole.
Garden Trowel
To manage smaller quantities of soil and perform precise digging for smaller plants.
Watering Can
To hydrate the elephant's ear immediately after transplanting and in the subsequent weeks.
Post Hole Digger
This can be beneficial if you need to create a deep and narrow hole for larger plants.
Garden Knife or Pruning Shears
To tidy up the roots, if needed, prior to transplanting.
Method for Extracting Elephant's Ear from Soil?
Method for Extracting Elephant's Ear from Soil?
From Ground: Start by thoroughly watering the elephant's ear a day before the planned move to facilitate removal. Using a spade or shovel, dig a wide trench around the plant. Ensure you dig deep enough to keep the plant's root ball intact. Carefully slide the spade beneath the root ball and gently lift it from the ground. Try to retain as much of the original soil around the roots as possible.From Pot: Water the elephant's ear thoroughly until the pot drains, which will help loosen the root ball. Gently roll the pot on its side to further loosen the soil. You should then be able to carefully slide the elephant's ear out of the pot with the root ball and soil intact.From Seedling Tray: For seedling trays, lightly moisten the soil. Then, use a small tool or your fingers to carefully push up from below to extract the elephant's ear seedling. Holding by the leaves, not the stem or roots, lift the seedling from the tray.
Step-by-Step Guide for Relocating Elephant's Ear
Site Preparation
Clear the transplant area of debris, rocks, or weeds. The space should be adequate for elephant's ear's mature size.
Digging a Hole
The hole should be twice the width and the same depth as the root ball. Place the excavated soil beside the hole for later use.
Placement
Position your elephant's ear in the hole. The top of the root ball should be level with the ground. Fill the hole halfway with the original soil. Before filling the rest of the hole, water it to eliminate air pockets.
Soil Replacement
After the water has drained, fill the remainder of the hole with the remaining soil. Firmly compact it so that the plant is stable.
Watering
Provide a generous amount of water to your newly transplanted elephant's ear. This aids in establishing strong roots and promotes acclimatization.
Post-Transplant Care for Elephant's Ear?
Watering
In the initial weeks following transplant, water your elephant's ear regularly to help establish its root system. The soil should remain consistently moist, but not waterlogged.
Trimming & Pruning
Remove any dead or dying leaves to encourage new growth and conserve the plant's energy. If the plant appears stressed, avoid fertilizing until it recovers.
Monitoring
Closely observe your elephant's ear for the first few weeks after transplanting. Look for signs of transplant shock such as wilting or yellowing leaves. If observed, reduce exposure to harsh elements and ensure adequate watering.
Positioning
Remember that elephant's ear typically prefers shade, and less direct sunlight exposure may help it adjust to the new location more quickly.
Resolving Common Issues with Elephant's Ear Transplantation.
When is the best time to transplant elephant's ear?
The ideal time to move elephant's ear is in early to mid-year, typically from late winter to early spring (S1-S3). This period allows the plant ample time to establish before high temperatures arrive.
How much space should each elephant's ear require?
Generally, aim for a spacing of 2-3 feet (0.6-0.9 meters) between each elephant's ear. This amount of space will ensure their large leaves have sufficient room to spread and grow.
What's essential to do before transplanting elephant's ear?
Before transplanting, ensure to water elephant's ear thoroughly a day prior. This helps to minimize transplant shock and makes it easier to remove the plant without harming its roots.
How deep should the new hole be for elephant's ear?
The new hole for elephant's ear should be roughly twice as wide and the same depth as the root ball. This gives the roots ample room to spread and establish properly.
Any special considerations when handling elephant's ear during transplant?
Handle elephant's ear gently during transplanting, particularly the root ball. Aim to preserve as much soil around the roots as possible to reduce shock.
What should the soil condition be like for transplanting elephant's ear?
Elephant's ear prefers a well-draining potting mix. Amend the soil with organic matter if necessary. The pH needs to be slightly acidic to neutral, in the range of 5.5-7.0.
How often should I water elephant's ear after transplanting?
Water elephant's ear immediately after transplanting and keep the soil consistently moist for the first few weeks. This helps roots establish while avoiding waterlogged conditions.
How to treat elephant's ear in the aftermath of transplant shock?
If elephant's ear shows signs of transplant shock, like wilting or leaf drop, maintain proper watering and limit sun exposure. Removal of damaged leaves can also be beneficial.
What to do if elephant's ear doesn't seem to be establishing well post-transplant?
If elephant's ear struggles to settle after transplanting, address any potential issues with watering, sunlight, or pest problems. A dose of balanced, slow-release fertilizer may also help.
How to handle rootbound elephant's ear during transplanting?
If elephant's ear is rootbound, gently tease apart the outer roots to encourage them to spread into the new soil. If the problem is severe, a careful trim might be necessary.


