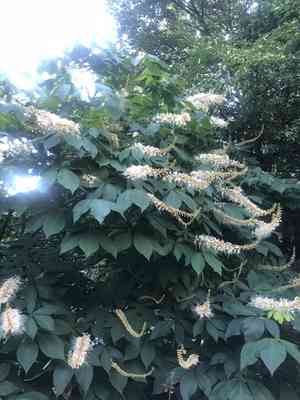
How to Transplant Bottlebrush buckeye?
The ideal period for relocating bottlebrush buckeye spans from late spring through mid-autumn, enabling the plant to develop robust root systems. Select a site offering partial shade and soil that drains effectively. Exercise care when manipulating the roots during the transfer to facilitate bottlebrush buckeye's thriving in its new environment.
What Preparations are Needed Before Transplanting Bottlebrush Buckeye?
What is the Ideal Time for Transplanting Bottlebrush Buckeye?
Carefully place bottlebrush buckeye into its new spot between early spring and mid-spring, or during the middle to late stages of autumn. This timing ensures bottlebrush buckeye experiences mild temperature shifts, allowing it to establish roots without harsh weather stress. Additionally, the soil's workability during these periods promotes easy transplantation. This gives bottlebrush buckeye the best chance to thrive in its new home.
How Much Space Should You Leave Between Bottlebrush Buckeye Plants?
When relocating bottlebrush buckeye, it's crucial to provide ample room for each plant to expand. Aim for a separation of approximately 20-40 feet (6-12 meters) to guarantee optimal development and a robust, flourishing specimen.
What is the Best Soil Mix for Bottlebrush Buckeye Transplanting?
For bottlebrush buckeye, it's best to prepare the soil with a well-draining loam or sandy loam mixture. Incorporating a base fertilizer, such as a slow-release granular formula, will provide essential nutrients for the plant to establish itself and thrive during the growing season.
Where Should You Relocate Your Bottlebrush Buckeye?
Select a site for your bottlebrush buckeye that will receive abundant sunlight, ideally full sun to partial shade. This will ensure the plant has the energy it needs to grow and produce beautiful blooms while also preventing issues with potential diseases from lack of sunlight.
What Equipments Should You Prepare Before Transplantation Bottlebrush Buckeye?
Gardening Gloves
To safeguard your hands while handling the plant and working with the soil.
Shovel or Spade
To excavate the bottlebrush buckeye from its original spot and to dig the hole in the new location.
Garden Trowel
For precise control during transplantation, especially if the plant is in a container or seedling tray.
Bucket or Wheelbarrow
For moving the plant from its initial position to the new site.
Garden Hose or Watering Can
To hydrate the plant before and after its relocation.
Pruning Shears
To trim any damaged or diseased branches prior to transplanting.
How Do You Remove Bottlebrush Buckeye from the Soil?
How Do You Remove Bottlebrush Buckeye from the Soil?
From Ground: First, thoroughly water the bottlebrush buckeye to make the soil more manageable. Then, carefully dig a wide circle around the plant with your shovel or spade, ensuring the root ball remains intact. Gently work your shovel beneath the root ball, and lift the plant from the ground, minimizing root damage.From Pot: Water the bottlebrush buckeye and turn the pot sideways, gently pulling the plant out while supporting the root ball. If it's stubborn, tap the edges of the pot to loosen it. Keep hold of the base of the plant and slide the pot off from the plant.From Seedling Tray: Fill a small pot with soil, then create a depression in the center. Carefully lift the seedling by its leaves, not the stem, then place it in the depression and lightly cover with soil. This can be done while the bottlebrush buckeye is still young, before moving it directly to the ground and skipping the pot stage.
Step-by-Step Guide for Transplanting Bottlebrush Buckeye
Preparation
Dig a hole at the new location that's twice as wide and the same depth as the root ball of the bottlebrush buckeye. Loosen the soil at the base and sides of the hole.
Transplanting
Place the bottlebrush buckeye into the hole, making sure it's at the same soil level as it was previously. Backfill the hole, firming the soil around the root ball.
Watering
Generously water the bottlebrush buckeye after planting, soaking the surrounding soil. This will help to settle the soil and reduce air pockets.
Mulching
Apply a layer of mulch around the base of the bottlebrush buckeye, but avoid touching the plant's stem. Mulch helps to conserve moisture and suppress weeds.
How Do You Care For Bottlebrush Buckeye After Transplanting?
Watering
Water the bottlebrush buckeye deeply and consistently for the initial weeks following transplantation. This will allow the roots to become well established. Reduce watering once the plant starts to grow new leaves.
Pruning
In the first year after transplanting, avoid heavy pruning. Just remove dead, diseased or damaged branches if present.
Monitoring
Keep an eye on the bottlebrush buckeye for any signs of distress, such as wilting or discolored leaves. If you notice these, check watering practices and potentially consult a gardening expert.
Troubleshooting Common Issues with Bottlebrush Buckeye Transplantation.
What is the suitable season for transplanting bottlebrush buckeye?
The ideal time to transplant bottlebrush buckeye is mid-spring to late spring or mid-fall to late fall. This allows the plant to establish its roots before extreme weather conditions.
How much space should I leave between each bottlebrush buckeye I transplant?
When planting bottlebrush buckeye, ensure you provide a distance of around 20-40 feet (6-12 meters). This will allow the plant enough space for growth and root expansion.
How deeply should I plant bottlebrush buckeye when transplanting?
When transplanting, the depth should be no more than the current depth of the root ball. This allows it to develop roots adequately.
What kind of soil is recommended for bottlebrush buckeye transplantation?
Bottlebrush buckeye generally thrives in well-drained soil. Avoid overly wet locations and make sure to amend the soil if it's too heavy or clayey.
What should I do if the bottlebrush buckeye isn't growing after transplantation?
Ensure bottlebrush buckeye is receiving the right amount of sunlight, nutrients and water. Amend your care if required and seek professional advice if the problem persists.
How should I water bottlebrush buckeye after transplanting?
Water bottlebrush buckeye thoroughly after transplanting. However, avoid overwatering. Wait until the topsoil feels dry to touch before the next watering to prevent waterlogging and root rot.
When should I add fertilizer after transplantation of bottlebrush buckeye?
Wait until new growth appears before applying any fertilizer. Use a slow-release type to support healthy root development and overall plant growth.
How do I protect bottlebrush buckeye from pests and diseases after transplantation?
Regularly check bottlebrush buckeye for any signs of pests or disease. Use relevant organic pesticides or fungicides if needed. For major issues, contact a local horticulturist or garden center.
Why are the leaves of my transplanted bottlebrush buckeye turning yellow?
Yellow leaves could be from overwatering or under-watering, poor nutrient intake, or a disease. Make sure bottlebrush buckeye isn't overwatered and the soil is nutrient-rich.
What to do if bottlebrush buckeye starts wilting after transplantation?
Wilting may be a sign of transplant shock. Keep the soil moist, shield the plant from harsh weather, and maintain moderate lighting. It should recover with appropriate care.


