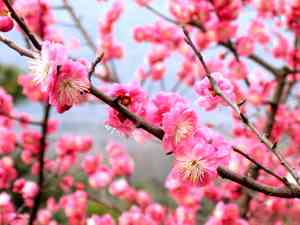
Boost Growth: How and When to Repot Your Japanese apricot Plant
1
Japanese apricot trees flourish in winter and spring if properly transplanted during their inactive phases.
2
Selecting the appropriate container size is vital; it needs to be at least 2.5 cm (1 inch) wider than the prior one.
3
A premium soil blend is critical for robust development, favoring well-draining and somewhat acidic earth.
Why Replant Your Japanese apricot?
Recognizing indicators that your tree requires a new container
Transplanting Japanese apricot trees is occasionally essential for their sustained health and vigor. Key indicators that your tree might need replanting include roots emerging from drainage openings, soil that dries out too rapidly post-watering, or inhibited development. Identifying these signs early can help you provide the necessary care to keep your tree thriving.
Advantages of replanting: improved growth and disease prevention
Replanting benefits the Japanese apricot by supplying fresh, nutrient-rich soil, which fosters healthier development. It also aids in managing and preventing ailments by removing old, potentially contaminated soil and giving roots more space to expand. This resets the plantâs environment, lessening the chances of root rot and other common problems.
When is the Optimal Time to Replant?
Ideal periods for transplanting your Japanese apricot
The best time to replant a Japanese apricot is during late winter or early spring. These periods align with the tree's dormant phase, reducing stress on the plant. Replanting during dormancy ensures minimal disruption to the plant's growth cycle, preparing it for the active growing season ahead.
Determining the correct moment within the plant's life cycle
Timing your replanting effort with the plant's growth cycle is vital. Replant when the tree is inactive but before new growth commences. This often means late winter, just as the cold season concludes and prior to warmer spring temperatures prompting a growth spurt. This timing helps the tree adapt to its new pot and soil before it begins to grow actively.
Choosing the Appropriate Container and Substrate
What to seek in a new container: dimensions, material, and style
Selecting the right container involves several considerations. First, choose a pot that is at least 2.5 cm (1 inch) larger in diameter than the current one to allow ample room for expansion. Materials can range from terracotta to plastic; terracotta is often favored because it breathes and helps prevent overwatering. Additionally, ensure the pot has sufficient drainage holes to avoid waterlogging.
Selecting the best soil mixture for Japanese apricot
The soil blend should be well-drained and slightly acidic, with a pH of approximately 6.0 to 6.5. A combination of peat moss, perlite, and pine bark can be ideal. This mix retains moisture effectively while providing excellent drainage and aeration, crucial for root health and preventing root rot.
Step-by-Step Guide to Replanting Japanese apricot
Preparing your plant and work area
Begin by gathering all necessary implements: a new container, fresh soil mix, gloves, and a small garden trowel. Water your Japanese apricot tree a day prior to make the soil easier to manage and minimize root disturbance. Select a workspace with ample room to maneuver and handle soil spillage.
Safely extracting the plant from its current container
To remove your tree, gently tap the sides of the current pot to loosen the soil. Carefully tilt it sideways while supporting the plant with your hand. Gently pull out the tree, trying not to harm the roots. If the tree is stuck, use a long, thin tool to run around the edges, separating the root ball from the pot.
Root trimming: essential information
Inspect the roots for any indications of decay or illness. Trim away any damaged or excessively long roots using sterilized shears. Root pruning encourages a more robust root system and prevents the plant from becoming root-bound, where the roots encircle themselves tightly.
Positioning the plant in its new environment
Place a layer of soil mix at the bottom of the new pot. Position the tree in the center, ensuring it stands upright. Fill in around the root ball with more soil, pressing gently to eliminate air pockets. Be careful not to bury the trunk base too deep; it should be at the same soil level as before.
Post-care: ensuring a smooth adjustment
Water the replanted tree thoroughly until water exits the bottom. Keep the plant in a shaded location for a few days to allow it to recover from the shock of replanting. Gradually introduce it to more light over the next week. Consistent, moderate watering is crucial in this period to help the roots establish.
Addressing Common Issues After Replanting
Managing post-transplant stress in Japanese apricot
It's typical for the Japanese apricot to experience some stress after replanting. Symptoms include wilting, leaf drop, or slow growth. Providing a stable environment and minimizing stress factors such as excessive sunlight or poor watering practices can help the plant adjust.
Typical signs of distress and how to resolve them
Signs of distress in a Japanese apricot after replanting include yellowing leaves, drooping stems, or a general lack of vitality. Address these by ensuring proper watering â neither too much nor too little â and verifying that the soil and pot provide adequate drainage. Monitor for pests and diseases, treating them promptly if found.


