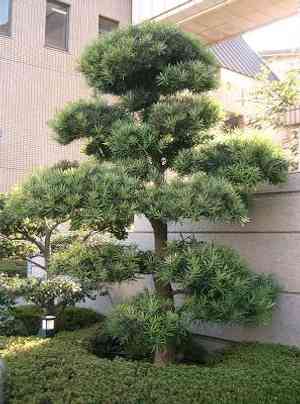
Boost Growth: How and When to Repot Your Buddhist pine Plant
1
Transplanting your Buddhist pine every two to three years promotes its best development.
2
The most suitable times to re-pot your Buddhist pine are in the Spring and Winter seasons.
3
Select a container that is 2-4 inches (5-10 cm) wider than the previous one to allow for greater root spread.
Why Relocating Buddhist Pine is Crucial?
Understanding the root structure and its spatial needs
The Buddhist pine possesses a relatively slow-growing root system, yet providing ample room is vital. Initially, young plants thrive in smaller containers, but as they mature, their roots require more space to expand. A constricted root system can lead to poor nutrient uptake and hindered development.
Indicators that your Buddhist pine requires a new container
If you observe roots emerging from drainage holes or coiling within the pot, it's a clear sign your Buddhist pine needs repotting. Other indicators include slower development, yellowing foliage, or water draining too rapidly through the substrate.
Advantages of regular repotting
Repotting your Buddhist pine offers several benefits. It replenishes soil nutrients, promotes improved root development, and prevents the accumulation of salts and old fertilizers. Furthermore, it allows for inspection and trimming of unhealthy roots, fostering a more robust and appealing plant.
Selecting the Optimal Time and Container
Best periods for repotting Buddhist pine
The ideal time to repot your Buddhist pine is during Spring or Winter. These seasons align with the plant's slower growth phases, reducing transplant-related stress. Spring, however, is generally preferred as it coincides with the start of a growth cycle, giving the plant ample time to acclimate.
Choosing the appropriate pot size and material
When selecting a new pot, opt for one that is 2-4 inches (5-10 cm) larger in diameter than the current container. This size provides sufficient room for root expansion without overwhelming the plant. Regarding material, terracotta pots are favored for their breathability, though plastic pots can also function well if they have adequate drainage openings.
Step-by-Step Guide to Repotting Buddhist Pine
Preparing your work area and gathering necessary implements
Before you start, ensure you have all required tools, including a new pot, fresh potting mix, a trowel, and pruning shears. Lay down newspapers or a tarp to keep your workspace tidy, and make sure to have water available to hydrate the plant immediately after repotting.
Safely extracting the plant from its old container
To remove your Buddhist pine from its old pot, gently tap the sides to loosen the soil and roots. Invert the pot while supporting the plant's base and carefully slide it out. If the plant is resistant, use a knife or trowel to separate the root ball from the pot's edges.
Inspecting and pruning roots if necessary
Examine the root system for any signs of disease or decay. Trim away dead or excessively long roots with clean pruning shears, which will encourage healthier, new growth. If the roots are tightly bound, you can gently loosen them to spread out in the new pot.
Adding fresh substrate and positioning Buddhist pine in the new pot
Fill the base of the new pot with fresh potting soil, creating a small mound in the center. Place your Buddhist pine atop this mound and fill in around the root ball with more soil. Ensure the plant is positioned at the same depth as it was in the old pot, and gently press the soil down to eliminate air pockets.
Post-repotting care: Watering and initial placement
After repotting, water the plant thoroughly to help settle the soil. Place the Buddhist pine in a location with indirect sunlight and maintain stable temperatures. Watch for signs of new growth, and avoid fertilizing for a few weeks to allow the roots to adapt to their new environment.
Addressing Common Issues After Repotting
Managing transplant shock
Transplant shock can cause your Buddhist pine to wilt or appear stressed. To alleviate this, keep the soil consistently moist but not waterlogged, and avoid exposing the plant to direct sunlight or extreme temperatures for the first few weeks.
Recognizing signs of distress and resolving them
If you notice yellowing leaves or stunted growth, check if the soil is too dry or too wet. Adjusting your watering schedule can often resolve these issues. Additionally, inspect the plant for pests and consider applying a gentle fertilizer after one month to provide an extra nutrient boost.


