Boost Growth: How and When to Repot Your Monstera obliqua Plant
1
Transplanting during Spring or Fall aids in reducing plant distress.
2
Select a container that is one size bigger to allow for expansion.
3
Confirm the potting medium contains perlite for superior water drainage.
The Importance of Repotting Your Monstera obliqua
Understanding the growth habits of Monstera obliqua
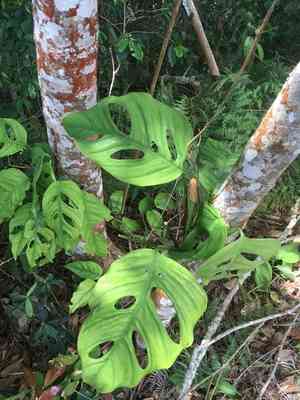
Monstera obliqua is recognized for its rapid development and distinctive foliage. This tropical plant produces elongated, perforated leaves that enlarge with age. Due to its vigorous growth, the root system of Monstera obliqua quickly fills its containers. Regular repotting ensures adequate room for expansion.
Recognizing indicators that it's time for a new pot
Observe roots emerging from drainage openings, soil that dries out too quickly post-watering, and stunted leaf development. These are clear signals your Monstera obliqua needs a larger home.
The advantages of timely transplantation
Repotting provides fresh substrate, boosting nutrient availability and encouraging healthier development. Furthermore, it prevents root-bound conditions, where roots encircle the pot's edges, causing stress to your plant.
Selecting the Appropriate Pot and Substrate for Monstera obliqua
Choosing the ideal container size and material
Select a pot that is 1-2 inches (2.5-5 cm) wider in diameter than the current one. A well-draining container made of ceramic or plastic with drainage holes is perfect to prevent waterlogging.
Optimal soil mixture for robust growth
A well-draining, nutrient-rich potting mix is crucial for Monstera obliqua. Combine equal parts of peat moss, perlite, and orchid bark to create the ideal blend. The perlite aids drainage, which is vital to prevent root rot.
Procedure for Successfully Repotting Your Monstera obliqua
Preparing your work area and gathering supplies
Before beginning, collect all necessary items: a new container, fresh potting mix, gardening gloves, a small shovel, and pruning shears. Spread newspaper or a tarp to contain any soil spills.
Carefully extracting the plant from its current container
Gently turn the pot on its side and tap the base to loosen the soil. Carefully slide the plant out, supporting the stem's base to avoid damage.
Inspecting and trimming the root system
Examine the roots and remove any that are brown, soft, or excessively long. This encourages new, healthy root development and prevents disease.
Placing in the new container
Fill the new pot with a layer of fresh soil. Position the Monstera obliqua in the center and fill around it with more soil, ensuring it is firmly but gently secured. Leave some space at the top for watering.
Post-care advice to ensure plant recovery and development
Water thoroughly after repotting and place the plant in a spot with bright, indirect light. Avoid fertilizing for a few weeks to allow the plant to adjust to its new surroundings.
Addressing Common Issues After Repotting Monstera obliqua
Managing post-transplantation stress in plants
It's normal for your Monstera obliqua to exhibit signs of stress such as drooping or yellowing leaves. Minimize stress by maintaining consistent moisture and avoiding direct sunlight.
Controlling pests and diseases in the new environment
Inspect the plant regularly for pests like spider mites and aphids. Use insecticidal soap or neem oil as a preventative measure. Ensure adequate airflow to prevent fungal issues.
Ensuring proper hydration and light after repotting
Keep the soil consistently moist but not waterlogged. Ensure the plant receives 6-8 hours of bright, indirect sunlight daily. Adjust watering frequency based on the plant's response.


