Boost Growth: How and When to Repot Your Polka dot plant Plant
1
The best times to transplant Polka dot plants are during spring and winter.
2
Transplanting aids in revitalizing the soil and offering additional space for development.
3
Verify that your new container allows for proper water drainage to avoid root decay.
Why Replant Your Polka Dot Plant?
Understanding the Polka Dot Plant's Growth Pattern
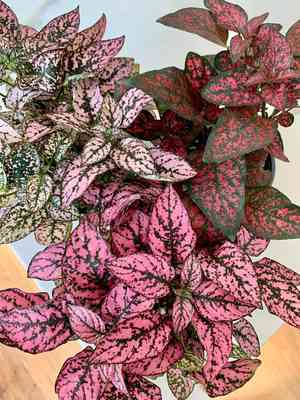
The Polka Dot Plant, recognized for its vivid, spotted foliage, typically experiences a phase of rapid development followed by dormancy. During its active growth period, usually in warmer months, the plant expands quickly and may outgrow its current container. Grasping this cycle helps you determine when to provide more space, ensuring optimal growth.
Identifying Indicators for Repotting
Several clear signs suggest your Polka Dot Plant requires repotting: roots emerging from drainage holes, soil drying out too rapidly, and noticeable wilting despite adequate watering. These signals indicate the plant has outgrown its pot, needing more room for roots to expand and efficiently absorb nutrients.
Advantages of Repotting for Plant Vitality and Appearance
Repotting offers multiple benefits. It revitalizes the soil, supplying crucial nutrients that might be depleted in older soil. It also grants roots additional space to grow, vital for overall plant health. A replanted specimen can achieve superior water distribution and drainage, lowering the risk of root rot. Aesthetically, a new pot and soil can enhance your Polka Dot Plant's beauty, highlighting its vibrant hues.
Selecting the Right Time and Container for Repotting
Optimal Season for Repotting the Polka Dot Plant
The best times to repot your Polka Dot Plant are during spring and winter. Spring is ideal as it marks the beginning of the plant's active growth, allowing it to quickly adapt to its new setting. Winter is also suitable since the plant is in a more dormant state, minimizing repotting shock.
Choosing an Appropriate Pot Size and Material
When selecting a new container, ensure it's slightly larger than the current one—typically 2.5 to 5 centimeters (1 to 2 inches) wider. This provides ample room for root expansion without overwhelming them. For materials, opt for terracotta or ceramic, which offer good aeration and moisture regulation, or plastic if you prefer a lighter option.
Significance of Drainage and Pot Features
Effective drainage is paramount when choosing a pot for your Polka Dot Plant. Confirm the pot has drainage holes at the base to allow excess water to escape, preventing root rot. Additionally, consider pots with a saucer to collect surplus water, simplifying management and maintaining plant health.
Step-by-Step Repotting Procedure
Preparing Your Work Area and Assembling Tools
Begin by setting up a clean workspace. Gather all necessary items, including your new pot, fresh potting mix, a small shovel, pruning shears, and water. Having everything prepared beforehand will streamline the repotting process and enhance efficiency.
Carefully Extracting the Polka Dot Plant from Its Current Pot
Gently remove your Polka Dot Plant from its existing pot by tilting it sideways and carefully sliding it out. If the plant is stuck, you can lightly tap the pot's bottom or run a knife along the edges to loosen the soil. Be cautious to avoid damaging the roots.
Inspecting the Root System and Trimming as Needed
Once the plant is out, examine its root structure. Healthy roots should appear white and firm. If you observe any brown or soft roots, trim them using pruning shears. If the roots are tightly matted, gently separate them to encourage new growth.
Placing the Plant in the New Pot and Adding Soil
Place a layer of fresh potting mix at the bottom of the new container. Position the Polka Dot Plant in the center and fill around the plant with more potting mix, pressing it down gently. Ensure the plant is at the same depth as it was in its previous pot. Leave some space at the top of the pot for watering.
Post-Repotting Care: Watering and Positioning Your Plant
After repotting, thoroughly water your Polka Dot Plant to help settle the soil. Place the replanted specimen in a location with bright, indirect light and monitor its recovery over the next few weeks. Avoid fertilizing immediately after repotting to allow the plant to adapt to its new environment first.
Tips for Ensuring the Health of Your Repotted Polka Dot Plant
Appropriate Watering Techniques After Repotting
Water your Polka Dot Plant thoroughly after repotting, then let the top 2.5 centimeters (1 inch) of soil dry before rewatering. Be careful not to overwater, as this can lead to root rot. Consistent, moderate irrigation is crucial for your plant's adjustment.
Monitoring Light Exposure and Environmental Changes
Keep your Polka Dot Plant in a spot with bright, indirect illumination. Excessive direct sunlight can cause leaf discoloration, while insufficient light can hinder growth. Maintaining stable room temperature and humidity, mimicking the plant's natural tropical habitat, is also vital.
Fertilization Schedule for a Flourishing Plant
After a few weeks post-repotting, you can resume regular fertilization. Use a balanced, water-soluble fertilizer every 4-6 weeks during the growing season to supply essential nutrients. Avoid over-fertilizing, as this can cause nutrient imbalances and harm your plant.


