Boost Growth: How and When to Repot Your Dieffenbachia Plant
1
Optimal times for repotting Dieffenbachia are Spring or Autumn, minimizing plant stress.
2
A successful Dieffenbachia transplant needs a soil blend that drains efficiently.
3
Selecting a pot excessively large can cause root rot; opt for one just marginally bigger than its present container.
Optimal Timing for Dieffenbachia Repotting
Understanding the Dieffenbachia's growth patterns
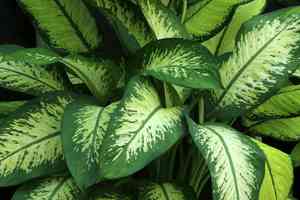
The Dieffenbachia plant, prized for its attractive foliage and air-purifying capabilities, actively develops during warmer periods. This tropical species flourishes in high humidity and moderate light, making it a popular choice for homes and offices. Grasping its growth cycle is vital when considering repotting, as disrupting the plant during its active phase can induce unnecessary stress.
Indicators that your Dieffenbachia requires a larger container
Several signals suggest it's time to rehouse your Dieffenbachia. If you observe roots protruding from the drainage holes or the plant becoming top-heavy and unstable, it likely needs a new home. Furthermore, if you notice slowed development or yellowing leaves, the plant might be root-bound, meaning its roots have filled the pot and have no room left to expand.
Ideal periods for repotting to minimize plant stress
The best times to transfer your Dieffenbachia are during Spring and Autumn. Spring is perfect as the plant is initiating its growth cycle and can readily adapt to a larger container. Autumn is also suitable, allowing the plant to acclimate before the inactive winter period. Repotting during these seasons reduces stress and shock, ensuring your plant remains vigorous and continues to prosper.
Selecting the Appropriate Pot and Growing Medium for Dieffenbachia
Choosing a container that suits the Dieffenbachia's size and development
When selecting a new container for your Dieffenbachia, opt for one that is only slightly larger, about 2.5 to 5 centimeters (1-2 inches) in diameter, than its current pot. This slightly increased size provides ample space for root expansion without overwhelming them with excessive room, which can lead to overwatering and root decay.
The perfect soil blend for proper drainage and nourishment
Dieffenbachia necessitates a well-draining soil mixture to thrive. A balanced potting medium containing peat, pine bark, and perlite will ensure adequate drainage and sufficient nutrients. The peat aids in moisture retention, while the pine bark and perlite promote aeration and prevent compaction.
Advice on ensuring adequate drainage in the new container
Proper drainage is essential for a healthy Dieffenbachia. Always ensure that the new pot features drainage holes to prevent waterlogging. Place a layer of pebbles or broken pottery pieces at the bottom of the pot before adding the soil mix. This extra measure improves drainage and lessens the risk of root rot.
A Comprehensive Guide to Repotting Dieffenbachia
Preparing your work area and gathering all necessary supplies
Begin by establishing a clean, flat work surface such as a gardening bench or a protective sheet or newspaper spread out in your living space. Collect all required tools, including the new pot, fresh potting substrate, gloves, a small hand trowel, and shears for trimming any damaged roots.
How to carefully extract Dieffenbachia from its current container
Gently tap around the edges of the existing pot to loosen the soil and root ball. Carefully tilt the pot and slowly slide the plant out, supporting the stem's base with your hand. If the plant is resistant, you can use a knife to trace around the pot's inner rim to aid in its release.
Methods for transferring and positioning the plant in its new container
Place the Dieffenbachia in the new pot, making sure it is centered and at the same planting depth as in the previous pot. Add the fresh potting mixture around the sides, pressing lightly to secure the plant. Avoid over-compacting the soil, as this could hinder drainage.
Post-repotting care: Hydrating and placing your Dieffenbachia
After repotting, thoroughly water the Dieffenbachia to help settle the soil and eliminate air pockets. Position the plant in an area with indirect light and consistent humidity. Steer clear of direct sunlight, as this can scorch the leaves and stress the recently repotted plant. Monitor the soil moisture over the subsequent weeks, watering when the top 2-3 centimeters (1 inch) feels dry to the touch.


