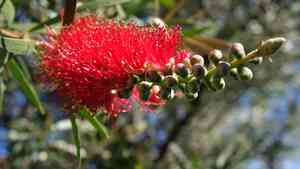
Boost Growth: How and When to Repot Your Crimson bottlebrush Plant
1
Transplanting your Crimson bottlebrush in spring or winter allows it to acclimate prior to its active growth period.
2
A soil blend that drains effectively is vital to avoid root decay in Crimson bottlebrush specimens.
3
Choosing an appropriate container size is key - one that's too big may cause excessive moisture, while one that's too small can impede development.
The Importance of Repotting Your Crimson Bottlebrush
Recognizing the need for increased space
As your Crimson bottlebrush matures, its root system expands, eventually filling its container. If not addressed, this can hinder growth because the roots lack sufficient room to spread. Therefore, understanding that your plant requires more space is crucial. Consider it like a growing family needing a larger residence â more room fosters greater comfort and improved well-being.
Indicators that suggest it's time for a new pot
Several clear signs indicate your Crimson bottlebrush requires repotting: roots emerging from drainage holes, soil that quickly dries after watering, or a plant that appears top-heavy and prone to toppling. Another indicator is if the plant seems dehydrated despite regular watering. These are definite signals that the plant needs more room and fresh substrate to continue flourishing.
The advantages of repotting for plant vitality
Repotting your Crimson bottlebrush offers numerous health benefits. It replenishes nutrient levels with new soil, aids in root aeration, and prevents diseases often associated with old, compacted growing medium. Most importantly, it provides ample space for expanding roots, promoting a healthier and more vigorous plant. By periodically repotting, you essentially grant your plant a renewed vitality.
Selecting the Appropriate Pot and Soil for Crimson Bottlebrush
Choosing the correct size and material for the new container
Selecting a suitable pot for your Crimson bottlebrush is essential. Opt for a container that is 5-10 centimeters (2-4 inches) wider in diameter than its current one. Materials such as terracotta or ceramic are excellent choices as they provide stability and good moisture regulation. Ensure the pot has drainage holes to allow excess water to escape, preventing root rot.
Optimal soil mixture for Crimson Bottlebrush
The soil mixture is another vital element. Crimson bottlebrush thrives best in a well-draining soil blend. A combination of potting soil with added sand or perlite often works effectively. The sandy component assists with drainage, mimicking the plant's natural bushland environment. Avoid dense, clay-based soils which can retain too much moisture and suffocate the roots.
The significance of proper drainage during repotting
Effective drainage is crucial for the successful growth of your Crimson bottlebrush. Without it, water can accumulate at the pot's base, leading to root rot. This is why ensuring your chosen pot has adequate drainage holes and utilizing a suitable soil mix is paramount. Additionally, placing a layer of small stones at the bottom before adding soil can further enhance drainage.
A Step-by-Step Guide to Repotting Crimson Bottlebrush
Preparing your workspace and gathering necessary equipment
Before commencing, assemble all required tools including a new pot, fresh soil mix, a small trowel, and possibly gloves. Preparing your work area is also important. Lay down newspaper or a plastic sheet to contain any spilled soil. Setting everything up beforehand makes the process smoother and less messy.
Safely extracting the plant from its current container
To remove your Crimson bottlebrush from its current pot, gently tap around the edges to loosen the soil. Carefully grasp the base of the stem and tilt the pot sideways. If the plant resists, use a trowel to assist its removal. The key is to be gentle and avoid pulling too forcefully, which can damage the roots.
Inspecting and pruning roots as needed
Once the plant is out, examine the root system. Healthy roots should appear white or light brown, firm, and well-structured. Trim away any dead, soft, or excessively long roots using sterilized scissors. This not only removes unwanted material but also encourages healthy new root development.
Positioning the plant in the new pot and adding growing medium
Place a layer of soil at the bottom of the new pot. Center your Crimson bottlebrush, holding it upright as you add soil around it. Fill the pot until the soil level is just below the rim, ensuring the plant sits at the same depth as in its previous pot. Gently press the soil to firm it.
Final actions: watering and placement after repotting
After repotting, thoroughly water your Crimson bottlebrush until water drains from the bottom. This helps to settle the soil around the roots. Place the pot in a location with sufficient indirect sunlight, ensuring good air circulation. Monitor it closely for the next few days to ensure it adapts well to its new environment.
Post-Repotting Care for Your Crimson Bottlebrush
Appropriate watering schedule for the initial weeks
For the first few weeks following repotting, observe your plant carefully to ensure proper adaptation. Water it moderately, allowing the top layer of soil to dry out between watering sessions. Overwatering can stress the plant, whereas consistent, light irrigation promotes recovery and new root growth.
Adjusting light and temperature for optimal development
After repotting, ensure your Crimson bottlebrush receives ample indirect sunlight. Keeping the plant away from direct, intense sun rays prevents scorching the newly transplanted specimen. Ideal temperatures range between 15-25°C (59-77°F), creating an environment similar to its native habitat.
Timing for fertilization after repotting
Wait for at least 4-6 weeks before fertilizing your Crimson bottlebrush. Repotting itself is a form of stress, and applying fertilizer too soon can overwhelm the plant. Once it has settled, a balanced, slow-release fertilizer can help stimulate new growth and maintain its health.


