Boost Growth: How and When to Repot Your Bird's-nest fern Plant
1
Optimal times for repotting: Spring and Winter.
2
Bird's-nest ferns thrive in a potting substrate that drains effectively to avoid root decay.
3
Confirm the updated container is approximately 2-3 cm (1 inch) wider across than its predecessor.
Why Replant Your Bird's-nest fern?
Understanding the growth pattern of Bird's-nest fern
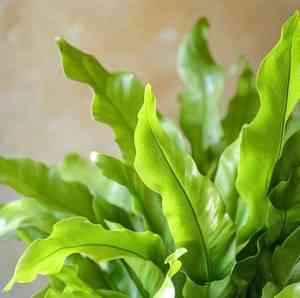
The Bird's-nest fern is a vibrant, exotic plant that flourishes in moist environments. Originating from rainforests, it naturally attaches to surfaces like tree trunks but adapts well to container cultivation. This fern's growth habit includes a central arrangement of arching leaves, forming a nest-like shape. Due to this distinct structure, the fern can quickly outgrow its container, necessitating replanting to guarantee ongoing development and vitality.
Indicators that suggest it's time for replanting
There are distinct clues to observe when your Bird's-nest fern needs a new home. If roots are encircling the pot's interior, or if you notice a deceleration in the plant's growth, these suggest the plant requires more room. Furthermore, discolored fronds or consistently parched soil can signal that it's time to relocate your fern to a larger container.
Advantages of timely replanting
Promptly moving your Bird's-nest fern to a new pot offers several benefits. It provides increased room for root expansion, resulting in a more thriving and sturdy plant. New growing medium can restore vital nutrients, and replanting can also help alleviate soil compaction, ensuring improved air circulation and water drainage.
Preparing to Replant Your Bird's-nest fern
Choosing the appropriate pot and growing medium
When selecting a new container for your Bird's-nest fern, opt for one that is roughly 2-3 cm (1 inch) wider in diameter than its current one. Verify the pot has drainage holes to prevent water retention and root decay. For the growing medium, a blend designed for tropical flora, which drains well yet retains moisture, is perfect. You can create your own mix by combining equal parts of sphagnum moss, perlite, and pine bark.
Tools and supplies required for replanting
To repot your Bird's-nest fern, you'll need several essential implements and materials: a new pot with drainage openings, fresh growing medium, a watering vessel, hand protection for plant handling, shears for root trimming, and a cover or newspapers to contain any soil spills. Having everything prepared will ensure a smooth and efficient replanting process.
Steps to Replant Your Bird's-nest fern
Gently extracting the plant from its current container
Begin by carefully loosening the substrate around the edges of the pot. You can achieve this by tapping the sides or utilizing a small implement. Carefully lift the fern from its container, supporting the plant's base to prevent harm to its delicate fronds.
Inspecting and pruning the roots if necessary
Once the plant is out of its pot, examine the root system. Healthy roots should appear pale and firm. Trim away any darkened, soft, or excessively long roots using clean cutting tools. This trimming aids in preventing disease and stimulates new root development.
Positioning the fern in the new container
Add a layer of new growing medium at the bottom of the new pot. Place your Bird's-nest fern in the center, ensuring it sits at the same depth as it did previously. Holding the plant steady, start adding growing medium around the sides, filling the pot uniformly.
Adding growing medium and adjusting the plant's placement
As you introduce the growing medium, gently press it down to eliminate air pockets and secure the plant. Adjust the fern's position if required to keep it upright and centered. Leave a small space (approximately 2 cm or 1 inch) from the pot's rim to the soil surface for easy irrigation.
Watering and post-replanting care advice
After replanting, irrigate the fern thoroughly to help settle the medium and reduce transplant shock. Ensure water flows freely from the pot's base. Place the plant in a low-light area for a few days to recuperate. Resume typical care, including appropriate watering and misting to maintain atmospheric moisture levels.
Maintaining Your Bird's-nest fern After Replanting
Illumination and warmth requirements
Following replanting, position your Bird's-nest fern in bright, indirect illumination. Avoid direct sun exposure as it can scorch the foliage. Maintain a moderately warm temperature between 18-24°C (65-75°F). These conditions mimic the fern's natural rainforest habitat, fostering robust development.
Irrigation and atmospheric moisture preferences
Bird's-nest ferns thrive in elevated humidity and consistently damp soil. Water your fern when the uppermost layer of the growing medium feels slightly dry. Ensure proper drainage to avoid water accumulation. To enhance humidity, regularly mist the fronds or use a pebble tray.
Typical issues to monitor after replanting
After replanting, be vigilant for common problems such as yellowing fronds, which might signal overwatering, or browned tips, an indication of insufficient humidity. Address these concerns promptly by modifying watering routines and increasing atmospheric moisture. Consistent observation ensures your Bird's-nest fern remains healthy and vibrant.


