Boost Growth: How and When to Repot Your Italian arum Plant
1
Italian arum is best transplanted in the spring or fall, outside its peak growth period.
2
Confirm the new container includes drainage openings to avoid excessive moisture.
3
A well-draining, balanced potting medium is ideal for the vitality of Italian arum.
Why Repot Your Italian Arum?
Understanding the Italian arum's growth pattern
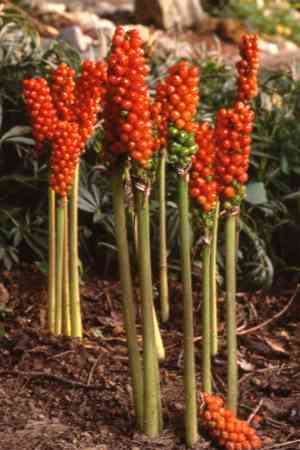
The Italian arum (Arum italicum) is a striking plant known for its arrow-shaped leaves and vibrant red berries. Like many plants, it experiences periods of active growth and dormancy. Repotting helps accommodate this growth surge, providing roots with more space to expand and the plant with additional nutrients to flourish.
Indicators your Italian arum needs a larger container
Several clear signs suggest your Italian arum might require a new pot. A primary indicator is roots emerging from the drainage holes. Additionally, if the soil dries out very quickly after watering, it may signify that the plant's roots have filled most of the pot, leaving little room for moisture retention.
Advantages of repotting for plant vitality and appearance
Repotting your Italian arum not only fosters superior root health but also enhances the plant's overall look. Fresh soil provides renewed nutrients, leading to robust and healthy growth. Moreover, a well-proportioned plant in an appropriate pot simply appears more attractive and makes a lovely addition to your garden or indoor setting.
Optimal Time for Repotting Italian Arum
Identifying the best season for transplanting
The most suitable times to repot your Italian arum are during spring and autumn. These seasons are ideal because the plant is either emerging from dormancy (in spring) or preparing for dormancy (in autumn). During these periods, the plant is not in its peak growth phase, making it easier to handle and less prone to shock from the disturbance.
Considering the plant's life cycle stages
Understanding your Italian arum's life cycle is essential. During its dormant phase, typically in summer, the plant expends less energy on growth and focuses more on maintaining its current structure. Repotting during dormancy minimizes stress on the plant, allowing it to adapt to its new environment without the demands of growth competition.
Selecting the Right Pot and Soil for Italian Arum
Choosing an appropriately sized container
When selecting a new pot for your Italian arum, ensure it is slightly larger than the current one, but not excessively so. A pot that is 5 to 8 cm (2 to 3 inches) wider in diameter should be sufficient. Containers with drainage holes are essential to prevent water from accumulating at the roots, which can lead to rot.
Ideal soil mixture for robust growth
A well-draining soil mix is crucial for Italian arum. A balanced blend containing equal parts perlite, peat moss, and potting soil works effectively. This combination ensures good aeration and prevents waterlogging while supplying the necessary nutrients for the plant's development.
Tips on drainage and placement
Proper drainage is vital, so lining the pot's bottom with pebbles or using a potting mix that includes coarse materials like orchid bark can be beneficial. Position your newly repotted Italian arum in a location with indirect sunlight to prevent scorching its delicate leaves, ensuring a stable, moderately lit environment.
Step-by-Step Guide to Repotting Italian Arum
Preparing your work area and tools
Begin by gathering your supplies: a new pot, fresh potting mix, gloves, a trowel, and a watering can. Prepare your workspace by spreading newspaper or a plastic sheet to catch any loose soil and maintain cleanliness.
Carefully removing the plant from its current container
Gently tilt the pot on its side and ease the plant out by tapping the sides. If the plant resists, run a knife or a flat tool around the soil's edge to loosen it. Be careful not to harm the roots during this process.
The best method to untangle root bound roots
Once the plant is out, examine the roots. Use your fingers to gently separate any tangled roots. This step helps the roots spread more effectively in the new pot. If you find any dead or damaged roots, trim them off with sterilized scissors to prevent disease.
Adding soil and positioning the plant
Fill the bottom of the new pot with a layer of fresh soil. Place your Italian arum in the center and fill around it with the remaining soil, ensuring the roots are fully covered. Press the soil down gently but firmly to eliminate air pockets.
Aftercare: Watering and acclimatization to the new pot
Water the plant thoroughly after repotting to help settle the soil. Ensure excess water drains from the bottom. Return the pot to its usual spot but avoid bright, direct sunlight. Monitor the plant over the next few weeks as it adjusts, making sure it remains hydrated but not waterlogged.
Common Repotting Errors to Avoid with Italian Arum
Excessive watering after repotting
After repotting, it's crucial to find a balance with watering. Overwatering can lead to root rot, especially since the plant is already coping with the stress of being moved. Water sparingly and ensure the soil dries out slightly between waterings.
Using an unsuitable soil mixture
Avoid soil mixes that retain too much water. Heavy clay or garden soil is not appropriate for your Italian arum. Stick to well-draining, balanced potting mixes that allow for good air circulation around the roots.
Ignoring root health during the process
Do not overlook root health when repotting. Failing to check for damaged or diseased roots can cause problems later on. Always inspect and trim any unhealthy roots to promote better overall plant vitality.


