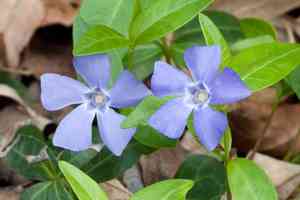
How to Prune Common periwinkle?
This perennial groundcover flourishes in areas with moderate to complete shade, featuring lustrous foliage and star-shaped blossoms. For Vinca minor, trim to manage its expansion and revitalize its development by shortening elongated stems in early spring prior to the emergence of new shoots. Consistent trimming from early spring through late autumn fosters a more compact form and deters excessive growth. Pruning additionally facilitates the elimination of any ailing or lifeless matter, thereby enhancing the plant's general well-being and aesthetic.
Advantages of Trimming Common Periwinkle
Advantages of Trimming Common Periwinkle
Trimming common periwinkle promotes robust development and maintains its form. It helps stimulate new growth while managing its spread, keeping the garden tidy.
Optimal Period for Trimming Common Periwinkle
Optimal Period for Trimming Common Periwinkle
In early spring, common periwinkle is in its initial growth phase, allowing for shaping the plant and encouraging a more compact and healthier growth pattern. Performing pruning before the onset of new growth helps the plant direct its energy into producing new, desired shoots. Late fall timing is advantageous because common periwinkle has completed its growth cycle for the year and is entering dormancy. Pruning at this time minimizes stress on the plant and reduces the risk of disease and pests that are attracted to fresh cuts during the active growing season. Moreover, since common periwinkle typically flowers in spring, pruning in late fall ensures that flowering is not affected. These seasons are considered optimal to ensure the plant maintains vigor, displays healthy foliage, and achieves a desirable shape without compromising its flowering potential.
Required Tools for Trimming Common Periwinkle
Hand Pruners
Perfect for making precise cuts on common periwinkle, especially when thinning or shaping the plant.
Shears
Useful for efficiently trimming and shaping larger sections of common periwinkle; good for controlling its expansion.
Gloves
Essential for protecting the gardener's hands from sap and any sharp edges during the trimming process.
Garden Scissors
Well-suited for snipping smaller, more delicate stems of common periwinkle without causing harm to the plant.
Pruning Saw
Appropriate for cutting through any older, thicker stems of common periwinkle that hand pruners cannot manage.
How to Trim Common Periwinkle
Step1: Evaluate Plant Condition
Assess the overall health and growth habit of common periwinkle before beginning the trimming process. Remove any debris or dead leaves around the plant to get a clear view of its structure.
Step2: Timing Pruning After Blooming
Start trimming after flowering has concluded, typically in late winter or early spring. This timing prevents disrupting the blooming cycle of common periwinkle and encourages new growth for the upcoming season.
Step3: Deadhead Spent Flowers
Using clean, sharp pruning shears, snip off old flowers at their base to promote a tidy appearance and discourage the plant from putting energy into seed production.
Step4: Cut Back Damaged Stems
Identify damaged stems which may appear broken, discolored, or diseased. Prune these stems back to the point of healthy tissue, making the cut just above a leaf node at a 45-degree angle to foster quick healing.
Step5: Shape and Control Growth
To manage overgrown shoots and maintain the desired shape of common periwinkle, prune them back by one-third their length. Make the cuts above a leaf node to encourage branching and denser growth. Ensure cuts are clean and avoid tearing the delicate stems.
Step6: Thin Dense Foliage
If common periwinkle has become excessively dense and tangled, thin out some of the stems to improve air circulation and reduce the risk of fungal diseases. Selectively remove older, woody stems by cutting them at the base of the plant.
Step7: Cleanup Pruning Debris
After pruning, clean up all pruning debris to minimize the chance of pests or diseases spreading. Clear away any fallen leaves or cuttings from the soil surface around common periwinkle.
Step8: Water After Pruning
Water common periwinkle thoroughly after pruning to help it recover and encourage new growth. Avoid overwatering, as common periwinkle prefers well-drained soil and is relatively drought-tolerant.
Step9: Monitor Post-Pruning Health
Monitor common periwinkle for new growth and any signs of pests or disease following pruning. Implement appropriate care routines such as mulching or applying a balanced, slow-release fertilizer if needed to support healthy growth.
After-Pruning Care for Common Periwinkle
After-Pruning Care for Common Periwinkle
Immediately after pruning common periwinkle, water thoroughly to alleviate stress. Ensure it is situated in partial shade to prevent direct sunlight damage while recovering. Maintain moderate humidity and a steady temperature between 60-75°F. Apply a balanced, slow-release fertilizer to nourish common periwinkle, promoting vigorous regrowth. Monitor common periwinkle for wilted leaves, discoloration, or signs of infection, promptly removing affected areas and adjusting care. Consistent observation and gentle care are crucial for common periwinkle's post-pruning recovery.
Common Trimming Errors with Common Periwinkle
Excessive Pruning Hinders Recovery
Trimming too aggressively can harm common periwinkle, cutting back more than one-third of the plant at once can hinder its ability to recover and regrow.
Ignoring Dead or Diseased Parts Causes Decay
Neglecting to remove dead or diseased parts, which can lead to further decay and inhibit the growth of healthy parts of common periwinkle.
Dull Tools Lead to Jagged Cuts and Disease
Using dull or unclean cutting tools, which can cause jagged cuts that are susceptible to disease and may damage common periwinkle's delicate stems.
General Trimming Advice for Common Periwinkle
Sharp Shears for Clean, Healthy Cuts
Utilize sharp, clean pruning shears to make clean cuts on common periwinkle that will heal quickly and reduce the chance of disease.
Thinning for Better Airflow and Light
Focus on thinning out crowded areas to improve air circulation and light penetration, which are crucial for the health and flowering of common periwinkle.
Trimming After Flowering Encourages Growth
Trim the tips of common periwinkle's stems after flowering to maintain its shape and encourage new growth, being careful not to cut back to woody stems with no leaves as this can prevent regrowth.


