How to Prune Eastern hemlock?
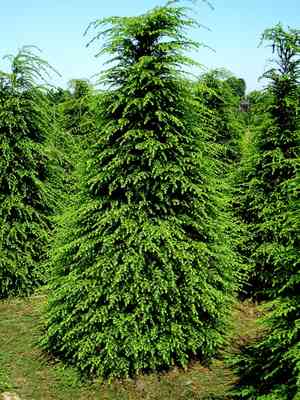
This evergreen conifer is valued for its conical structure and slender foliage. For Tsuga canadensis, perform yearly pruning in winter to preserve its compact appearance. Cut back recent shoots, but refrain from cutting into mature wood since it does not readily regrow. Eliminate any dead or ailing limbs to foster vitality and deter infestations. Pruning benefits Tsuga canadensis by fostering a robust framework and elevating its inherent attractiveness, which is crucial in decorative garden design.
What Are the Benefits of Pruning Eastern Hemlock?
What Are the Benefits of Pruning Eastern Hemlock?
Trimming eastern hemlock promotes robust development and helps maintain its desired form. By eliminating dead or diseased limbs, the plant can direct energy towards building a strong structure and foliage. Regular trimming also improves air circulation, crucial for minimizing disease risks.
What Is the Best Time for Pruning Eastern Hemlock?
What Is the Best Time for Pruning Eastern Hemlock?
Winter is the ideal period to prune eastern hemlock as the plant is dormant, reducing stress and the chance of disease spread. Furthermore, the absence of leaves allows for a clearer view of the plant's structure, enabling more precise cuts. Pruning during this season aligns with eastern hemlock's natural rest cycle and encourages vigorous growth in the subsequent spring by removing any dead or damaged branches. Pruning outside of dormancy can lead to undesirable new growth that may not be resilient enough to endure winter conditions.
What Tools Do I Need to Prune Eastern Hemlock?
Hand Pruners
Perfect for making clean cuts on small branches of eastern hemlock, allowing for accuracy without harming surrounding foliage.
Loppers
Capable of cutting thicker branches of eastern hemlock that are too large for hand pruners, providing leverage and reach.
Pruning Saw
Essential for trimming branches exceeding 1.5 inches in diameter, offering the necessary cutting power while minimizing damage to eastern hemlock.
Hedge Shears
Useful for shaping eastern hemlock when creating hedges or ensuring a neat appearance, allowing for quick, even trimming of foliage.
Pole Pruner
Offers extended reach for higher branches of eastern hemlock, ensuring safe trimming without needing a ladder.
How to Prune Eastern Hemlock
Step1: Assessment for Pruning
Sanitize your pruning tools with a solution of 1 part bleach to 9 parts water to prevent disease transmission. Clean the tools again between cuts if removing diseased wood.
Step2: Tool Sterilization
Begin with dead branches. Identify branches lacking green needles or having brittle, dry wood. Make cuts on dead branches just outside the collar at the branch's base, which is the swollen area where the branch connects to the trunk or a larger branch.
Step3: Dead Branch Removal
Proceed to diseased limbs. Look for disease indicators, such as discoloration, cankers, or unusual growth patterns. Trim these limbs back to healthy wood, typically indicated by living needles and green, moist wood. Make the cut at a healthy node or intersection where lateral branches emerge.
Step4: Diseased Limb Pruning
Address damaged wood, including limbs that are broken, split, or have been harmed by weather or physical impact. Cut the damaged sections back to a point of healthy, undamaged wood, ensuring no jagged edges remain as they can invite disease and decay.
Step5: Damaged Wood Cutting
For thick branches, employ the three-cut method to prevent bark tearing. Make a notch on the underside of the branch a few inches from the trunk, then make a second cut from the top down a little further out to remove the majority of the limb. Finally, make the third cut to remove the stump, cleanly cutting just outside the branch collar.
Step6: Three-Cut Method for Thick Branches
Evaluate the overall form of the eastern hemlock. Thin out the canopy by removing some excess growth to improve light penetration and air circulation. Selectively prune branches that rub against each other or are too densely packed.
Step7: Canopy Thinning and Shaping
Ensure all cuts are smooth and clean to promote rapid healing. Do not apply wound paint or sealant, as eastern hemlock can naturally seal its own wounds.
Step8: Clean Cuts for Healing
Dispose of all pruned material, especially diseased limbs and branches, properly to reduce the likelihood of spreading disease or pests. Do not compost diseased plant material.
Step9: Pruned Material Disposal
Monitor the eastern hemlock after pruning for signs of new growth and vigor. Ensure the tree is adequately watered, especially if pruning occurred during a dry period.
Post-Pruning Care for Eastern Hemlock
Post-Pruning Care for Eastern Hemlock
Immediately after trimming eastern hemlock, ensure clean cuts for quick recovery. Maintain moderate soil moisture, avoiding oversaturation. Provide dappled sunlight; too much can stress eastern hemlock, while too little hinders recovery. Adjust ambient humidity and temperature to mimic eastern hemlock's natural environment. Fertilize with a balanced, slow-release formula in spring to encourage growth without forcing rapid shoots. Regularly inspect pruned areas for abnormal discoloration or oozing, indicating stress or infection. For concerns, consult an arborist to prevent further damage.
Common Pruning Mistakes with Eastern Hemlock
Over-pruning
Removing too much at once, which can shock eastern hemlock and potentially lead to poor health or growth.
Using Dull or Dirty Tools
Employing dull or unclean pruning tools, which can cause damage and introduce diseases to eastern hemlock.
Pruning Without a Plan
Trimming without a clear objective or strategy, which can result in an unbalanced shape and weakened structural integrity for eastern hemlock.
Damaging Bark during Pruning
Tearing or stripping the bark while cutting, which can create wounds on eastern hemlock susceptible to infection.
Incorrect Stub Length
Leaving too short or too long a stub when removing branches, which can hinder proper healing and attract pests.
Common Pruning Tips for Eastern Hemlock
Clean, Sharp Cut Technique
Use sharp, clean pruning shears or saws to make precise cuts that eastern hemlock can heal from more quickly.
Remove Dead or Diseased Branches
Identify and eliminate any dead, diseased, or damaged branches first to maintain the health and appearance of eastern hemlock.
Selective Thinning Over Shearing
When reducing size or shaping eastern hemlock, make selective cuts to thin out overgrown areas rather than shearing the outer edge, as this will preserve its natural form.
Angle Cuts for Water Runoff
Make cuts at a slight angle away from the bud to promote proper water drainage and prevent disease in eastern hemlock.
Proper Placement of Cuts
Cut branches just above a lateral bud or branch to encourage growth in a desired direction without leaving unnecessarily long stubs on eastern hemlock.
Three-Cut Technique for Large Branches
For larger branches, use the three-cut technique to prevent bark tearing: first, an undercut away from the trunk; second, a cut further out to remove the weight; finally, a cut close to the trunk following the branch collar.


