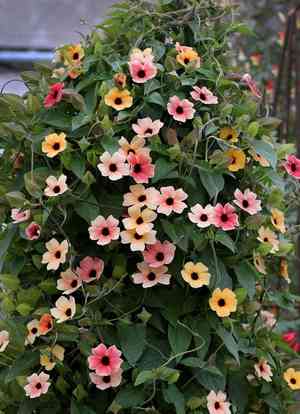
How to Prune Black-eyed susan vine?
This climbing plant, recognized for its coiling tendrils and vivid blossoms featuring dark cores, thrives with consistent trimming. Cut back black-eyed susan vine to preserve its form, foster a denser appearance, and eliminate any deceased or feeble sections. Optimal periods for pruning extend throughout the year, adapting to the plant's reactions and periods of rapid development. Pruning encourages more robust flowering and deters excessive expansion. Make cuts just above leaf junctions to stimulate fresh sprouts, consistently employing sanitized, keen implements for accurate incisions.
Advantages of Trimming Black-eyed Susan Vine
Advantages of Trimming Black-eyed Susan Vine
Trimming black-eyed susan vine promotes more blossoms, fosters robust development, and maintains a desired form. It's crucial for enhancing black-eyed susan vine's decorative appeal and vigor.
Optimal Period for Pruning Black-eyed Susan Vine
Optimal Period for Pruning Black-eyed Susan Vine
Black-eyed susan vine begins active development in spring and continues through summer. Pruning in late winter or early spring, just before this growth surge, helps energize the plant for producing new shoots and supports a lush, full display. Additionally, it eliminates any frost damage from the winter. This timing avoids cutting the plant during its blooming phase, which occurs in warmer months, ensuring flowers are not negatively affected. Pruning outside the active growing season can lead to less vigorous growth and reduce the seasonal flower display.
Required Tools for Pruning Black-eyed Susan Vine
Hand Pruners
Perfect for making precise cuts on black-eyed susan vine's slender stems during routine trimming to shape the plant and remove dead or diseased foliage. Anvil or bypass pruners offer accuracy and minimize plant harm.
Gardening Gloves
Shield hands from thorns and sap while trimming black-eyed susan vine, ensuring safety and comfort during the task.
Pruning Saw
Useful for removing thicker, woody stems if black-eyed susan vine has been allowed to grow unchecked for several seasons, ensuring cleaner and healthier growth.
Loppers
Provide extended reach and leverage for cutting through stems too thick for hand pruners, suitable for managing black-eyed susan vine's growth in hard-to-reach areas.
Pruning Shears
Ideal for snipping off spent flowers and light shaping of black-eyed susan vine, allowing more meticulous and detailed work to encourage blooming and growth.
How to Prune Black-eyed Susan Vine
Step1: Optimizing Pruning Timing
Start pruning black-eyed susan vine during its active growth period to encourage bushier development and more flowers. The best time for pruning is late winter or early spring before new growth begins.
Step2: Sanitizing Pruning Tools
Sanitize your pruning shears to prevent disease spread. Wipe blades with rubbing alcohol or a solution of one part bleach to nine parts water.
Step3: Deadheading Spent Blooms
Identify dead flowers, also known as spent blooms or seed heads, to prolong flowering and enhance overall appearance. Deadheading redirects the plant's energy into producing more flowers instead of seeds.
Step4: Angled Cuts Above Leaf Nodes
Cut dead flowers back to the first set of leaves using an angled cut with your shears. Make cuts just above leaf nodes, as this is where new growth will emerge.
Step5: Removing Withered Foliage
Locate brown or withered leaves and remove them. Prune back to healthy green growth or to the main stem, ensuring cuts are clean to promote rapid healing.
Step6: Correcting Spindly or Leggy Growth
Assess the plant for spindly or leggy stems, indicating insufficient light or overcrowding. Trim these back to a main stem or a strong side shoot to encourage denser, healthier growth.
Step7: Shaping the Plant
After pruning for dead flowers, brown leaves, and spindly stems, lightly shape the vine by trimming back overgrown areas to maintain the desired structure. Focus on creating an even and aesthetically pleasing form.
Step8: Disposing of Pruned Material
Collect all removed plant material and dispose of it away from black-eyed susan vine to prevent any potential fungal or insect problems from developing.
Step9: Post-Pruning Care and Fertilization
Water the plant thoroughly after pruning and apply a balanced, slow-release fertilizer to support new growth and recovery.
Step10: Ongoing Pruning and Monitoring
Monitor black-eyed susan vine for additional dead flowers, brown leaves, and spindly growth throughout the growing season, repeating these pruning steps as necessary to maintain plant health and vigor.
Post-Pruning Care for Black-eyed Susan Vine
Post-Pruning Care for Black-eyed Susan Vine
After pruning black-eyed susan vine, immediate care involves gentle watering to lessen transplant shock. Maintain optimal environmental conditions: bright, indirect light, high humidity, and warm temperatures. Adjust irrigation based on the season and reduced foliage. Fertilize with a balanced, diluted solution to encourage growth. Monitor black-eyed susan vine for drooping leaves or discoloration, indicating stress or infection. If signs are evident, adjust care and consult a plant health guide. Consistent post-pruning care ensures black-eyed susan vine's robust recovery.
Common Pruning Errors with Black-eyed Susan Vine
Excessive Pruning Reduces Photosynthesis
Pruning too aggressively can shock black-eyed susan vine and hinder its growth. Removing too much foliage at once can diminish the plant's ability to photosynthesize and grow.
Damaging Cuts to Old Woody Stems
Cutting into old, woody stems that no longer produce flowers or leaves can harm black-eyed susan vine. It's crucial to focus on trimming back overgrowth and spent flowers to encourage new growth.
Spreading Disease with Unclean Tools
Failing to sterilize pruning tools before use can spread diseases between plants. Clean cuts are vital for the health of black-eyed susan vine.
Ignoring Plant's Natural Growth Pattern
Pruning without considering the plant's natural growth habit can result in an unbalanced or unnatural shape. Black-eyed susan vine has a twining and spreading growth pattern that should be considered when shaping.
Overlooking Dying or Diseased Stems
Ignoring dying or diseased stems can allow problems to persist or worsen. Removing unhealthy growth promotes the overall well-being of black-eyed susan vine.
General Pruning Advice for Black-eyed Susan Vine
Clean Cuts with Sterilized Shears
Use sharp and sterilized pruning shears to make clean cuts that will heal quickly, preventing disease and promoting healthy growth in black-eyed susan vine.
Pruning Above Leaves Stimulates Growth
Prune just above a set of leaves or buds to stimulate new growth in the desired direction. This will encourage black-eyed susan vine to become more bushy and full.
Deadheading for Prolific Blooms
Remove spent flowers regularly to encourage continuous blooming throughout the growing season, as black-eyed susan vine can produce flowers prolifically when well-maintained.
Thinning Stems for Better Air and Light
Thin out congested stems to improve air circulation and light penetration, which are critical for the prevention of fungal diseases in black-eyed susan vine.
Selective Pruning for Attractive Vine Training
Guide the growth of black-eyed susan vine by selectively pruning to shape the vine according to the support structure it grows on, such as trellises or arbors, to create an attractive display.


