How to Prune Mealycup sage?
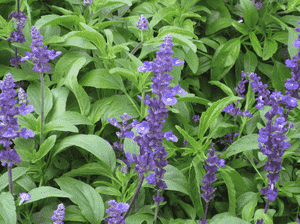
This enduring herb showcases blue flower spikes, flourishing in diverse soil types. Cut back mealycup sage to soil level in early spring to foster dense development and eliminate faded flower stalks to stimulate ongoing blossoms. Removing spent blooms contributes to a neater look and stops self-propagation. Since it flowers from spring until the first frost, pruning in late autumn readies mealycup sage for the colder months. Trimming boosts vitality and bloom capacity, crucial for the garden's visual appeal and well-being.
What Are the Benefits of Pruning Mealycup Sage?
What Are the Benefits of Pruning Mealycup Sage?
Trimming mealycup sage encourages new development, leading to abundant blooms. It helps maintain a compact shape and prevents legginess, ensuring the plant remains visually appealing and grows vigorously.
What Is the Best Time for Pruning Mealycup Sage?
What Is the Best Time for Pruning Mealycup Sage?
In early spring, pruning mealycup sage stimulates fresh growth, as this marks the start of its active growing period. It's the perfect time to remove any branches damaged by winter to allow for new foliage. Additionally, deadheading, or the removal of faded flowers, can be done throughout summer to promote continuous blooming. As mealycup sage continues to grow in warmer months, light trimming helps maintain its form and encourages denser foliage. Pruning in late fall prepares mealycup sage for dormancy and can lessen the risk of disease and pest infestation during winter. However, extensive pruning should be avoided as the plant needs time to recover and store energy for the next growing season.
What Tools Do I Need to Prune Mealycup Sage?
Bypass Hand Pruners
Excellent for making clean cuts through green, living stems of mealycup sage. The sharp, scissor-like action allows for precise snips which can help maintain the plantâs shape and encourage new growth.
Floral Snips
Ideal for removing spent blooms of mealycup sage without harming new buds. The short blades and fine tips reach into tight spaces within the foliage, promoting continuous flowering.
Pruning Shears
Suitable for cutting back mealycup sage at the end of the season or for shaping the plant. They provide the leverage needed for cutting through the plant's woody stems.
Garden Gloves
Protects hands from thorns and plant sap while pruning mealycup sage. Gloves will improve grip on tools and protect from possible skin irritation.
Garden Sanitizer
Ensuring all tools are sanitized before and after use will prevent the spread of disease among mealycup sage plants. Clean cuts will also help the plant heal faster.
How to Prune Mealycup Sage
Step1: Tool Preparation
Gather the appropriate pruning tools for mealycup sage, including sharp bypass pruners or scissors, and gloves for protection.
Step2: Tool Sanitization
Sanitize the pruning tools with rubbing alcohol or a bleach solution to prevent the spread of diseases.
Step3: Deadheading Spent Blooms
Identify the dead flowers on mealycup sage. Deadheading, or removing the spent blooms, will encourage re-blooming.
Step4: Cutting Above Leaf Node
Cut the dead flowers back to the first set of full and healthy leaves. Make the cuts at a 45-degree angle, 1/4 inch above the leaf node to promote new growth.
Step5: Shaping Long Stems
Examine mealycup sage for long stems that have stretched out or are affecting the shape of the plant.
Step6: Encouraging Bushier Growth
Trim the long stems by cutting them back to a lateral growth or bud to maintain the preferred shape and size of mealycup sage. This will also help to encourage bushier growth.
Step7: Removing Damage
Remove any damaged or diseased stems by cutting them back to healthy tissue, ensuring a clean cut to prevent further infection.
Step8: Debris Clearing
Clear away all cuttings from around mealycup sage to deter pests and diseases.
Step9: Post-Prune Watering
Water mealycup sage after pruning to help reduce stress on the plant and aid in recovery.
Step10: Replenishing Nutrients
Fertilize mealycup sage appropriately after pruning to replenish nutrients and promote vigorous growth. Use a balanced, slow-release fertilizer according to package instructions.
Post-Pruning Care for Mealycup Sage
Post-Pruning Care for Mealycup Sage
Immediately after pruning mealycup sage, irrigate the soil to encourage recovery, but avoid waterlogging. Provide bright, indirect sunlight and maintain a temperature between 60-70°F with moderate humidity levels to prevent stress. To aid growth, apply a balanced, slow-release fertilizer. Monitor the plant for wilting or discolored foliage, indicating stress or infection. If such symptoms present, adjust care and consult a horticulture expert for potential disease management.
Common Pruning Mistakes with Mealycup Sage
Over-pruning Reduces Flowering
Cutting back mealycup sage too severely can stress the plants and reduce flowering. It's important to avoid removing more than a third of the plant at any one time.
Improper Deadheading Can Decrease Blooms
Neglecting to remove dead or faded flowers (a practice known as deadheading) on mealycup sage can decrease blooming as the plant focuses energy on seed production.
Damaged Stems from Dull Tools Spread Disease
Using dull or dirty pruning tools can damage stems, inhibit quick healing, and introduce diseases to mealycup sage.
Common Pruning Tips for Mealycup Sage
Cut Above Leaf Node for Bushier Growth
When pruning mealycup sage, make selective cuts using sharp, clean shears to just above a leaf node or a set of leaves to encourage bushier growth and more blooms.
Deadhead Spent Flowers to Boost Blooming
Regularly deadhead mealycup sage by snipping off the spent flower spikes to encourage repeated blooming throughout the growing season.
Thin Crowded Stems for Better Airflow and Health
Thin out any crowded stems on mealycup sage to increase air circulation, which can help prevent fungal diseases and promote healthier plant growth.


