How to Prune Pin oak?
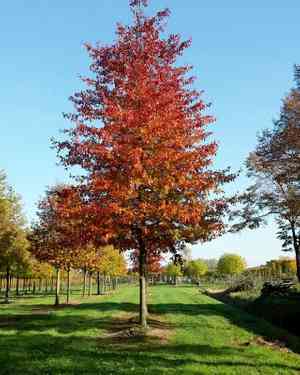
This magnificent deciduous tree flourishes in moisture-rich ground and exhibits a prominent pyramidal to oval canopy. For pin oak, trimming should focus on eliminating low-hanging branches to preserve clearance, reduce thick foliage, and excise any lifeless or ailing boughs. The optimal period for pruning is from late winter to early spring, to prevent interference with sap circulation. Pruning not only cultivates a robust tree framework but also accentuates its decorative outline, guaranteeing pin oak continues as a lively landscape element.
What Are the Benefits of Pruning Pin Oak?
What Are the Benefits of Pruning Pin Oak?
Trimming pin oak promotes robust development and preserves its form. By carefully removing limbs, pin oak can direct energy into strengthening its framework and extending its longevity, resulting in a more resilient tree that meets landscape aesthetic objectives.
What Is the Best Time for Pruning Pin Oak?
What Is the Best Time for Pruning Pin Oak?
Pruning in late winter or early spring enables pin oak to recover quickly from cuts as its active growth period approaches. This timing also reduces the risk of infection and pest infestation, as many pathogens and pests are less active during colder seasons. Furthermore, the absence of leaves offers a clearer view of the plant's structure, simplifying strategic cuts that foster the plant's natural shape and health. Pruning before sap flow begins prevents excessive bleeding, which can stress pin oak. Avoiding flowering and fruiting periods ensures the plant's energy is focused on healing and new growth rather than reproduction.
What Tools Do I Need to Prune Pin Oak?
Hand Pruners
Essential for making clean cuts on smaller branches of pin oak, typically under 3/4 inch in diameter. Opt for bypass pruners over anvil pruners for a clean cut that promotes better healing.
Loppers
Ideal for trimming branches too thick for hand pruners but not excessively large, usually up to 1 1/2 to 2 inches in diameter. The long handles provide leverage for easier cutting.
Pruning Saw
Necessary for larger branches exceeding 2 inches in diameter, common in a mature pin oak. A curved blade saw is recommended for its efficiency in cutting through thick wood.
Pole Pruner
Useful for reaching higher branches without a ladder, enhancing safety. A pole pruner with both a saw and clippers will accommodate various branch sizes.
Hedge Shears
Appropriate for shaping hedges made from pin oak, especially for a formal appearance. The long, straight blades allow for even trimming of small branches and foliage.
Chainsaw
To be used by experienced individuals for removing very large branches or for major pruning tasks on pin oak, such as deadwood removal or preparation for transplanting.
How to Prune Pin Oak
Step1: Inspect Plant for Trimming
Gather the appropriate tools for pruning pin oak, including sharp bypass pruners, loppers, and a pruning saw for larger branches. Ensure tools are clean to minimize disease spread.
Step2: Gather Proper Pruning Tools
Remove dead branches with pruning shears or a saw, cutting close to the trunk or main branch without harming the branch collar. This encourages proper healing.
Step3: Prune Dead Branches
Prune diseased limbs by making cuts at least 6-12 inches below affected areas. If the entire limb is diseased, remove it at its point of origin.
Step4: Remove Diseased Limbs
Address broken boughs by cutting them back to the nearest lateral branch or to the trunk, following pin oak's natural contour to promote healing and maintain its shape.
Step5: Cut Back Broken Boughs
Trim lower limbs that are sagging or obstructing foot traffic or mowing. Remove them by cutting back to the trunk, being careful not to damage the branch collar.
Step6: Trim Obstructive Lower Limbs
Remove suckers, which are small shoots growing from the base or roots of pin oak, by cutting them flush with the trunk or root surface.
Step7: Eliminate Suckers
Create clean and angled cuts that slope away from the bud or branch to prevent water accumulation and promote healing.
Step8: Make Clean, Angled Cuts
Seal any wound larger than an inch in diameter with tree-wound paint to protect pin oak from pests and diseases.
Step9: Seal Large Wounds
Dispose of trimmed material properly, especially if diseased, to prevent pathogen spread.
Step10: Dispose of Trimmings Safely
Sanitize tools after use with a 10% bleach solution or rubbing alcohol to avoid potential cross-contamination between plants.
Step11: Sanitize Tools After Use
Evaluate pin oak after pruning for overall balance and structure, ensuring a central leader is maintained for strength and vertical growth.
Post-Pruning Care for Pin Oak
Post-Pruning Care for Pin Oak
Immediately after pruning, pin oak requires sufficient watering to reduce stress and aid healing. Ensure the tree receives full sunlight and maintain consistent soil moisture without waterlogging. Adjust protection if extreme temperatures are anticipated. Fertilization should be delayed until active growth resumes to avoid stressing the tree. Regularly inspect pruning sites for signs of disease or pests, and if found, treat promptly with recommended horticultural methods. Proper care ensures pin oak recovers well and continues healthy growth.
Common Pruning Mistakes with Pin Oak
Over-pruning and plant health risks
Pruning excessively at once, which can stress pin oak and make it susceptible to disease or pests.
Improper branch removal techniques
Removing branches incorrectly, such as making flush cuts against the trunk, which can create wounds and hinder pin oak's natural healing process.
Unsterilized tools spreading disease
Failing to sterilize pruning tools before use, potentially spreading diseases from infected plants to healthy ones, including pin oak.
Pruning without specific goals
Pruning without a clear objective, leading to an unbalanced shape and compromising pin oak's structural integrity.
Overlooking necessary branch removal
Ignoring dead, diseased, or crossing branches that need removal to maintain pin oak's health and aesthetics.
Leaving harmful stubs post-pruning
Leaving too long a stub when cutting branches, which can delay healing and provide entry points for pests and diseases.
Common Pruning Tips for Pin Oak
Proper cut placement near the branch collar
Identify the branch collar on pin oak before making a cut, and always cut just outside the collar to promote quicker healing.
Using sharp, well-maintained tools
Use sharp and properly maintained pruning tools to make clean cuts, which help pin oak recover more efficiently.
Prioritizing dead or diseased branches
Focus on removing dead, dying, or diseased branches first to improve pin oak's health and appearance.
Thinning branches for better air and light
For a strong, well-shaped pin oak, selectively thin out crowded branches to ensure good air circulation and light penetration.
Cutting to lateral branches for dense growth
When shortening branches, cut back to a lateral branch or bud to encourage pin oak to grow more densely and maintain a natural shape.
Regular inspection to remove crossing branches
Regularly inspect pin oak for rubbing or crossing branches and prune them to prevent wounds that can be entry points for disease.
Adhering to the one-third pruning rule
Follow the one-third rule where no more than one-third of pin oak's overall canopy should be removed in a single pruning session.
Tool sterilization to prevent disease spread
Sterilize your pruning tools before and after working on pin oak to prevent the spread of plant diseases.
Developing a gradual pruning strategy
Develop a long-term pruning strategy for pin oak instead of making drastic changes in a single session, which ensures gradual and healthy growth.


