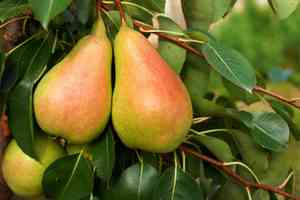
How to Prune Common pear?
The common pear, valued for its delectable produce and decorative flowers, thrives with regular trimming to boost its well-being and productivity. Conduct pruning in late winter prior to bud emergence, concentrating on excising deceased, ailing, or excessively dense branches to optimize light exposure and air movement. Reducing the canopy and cutting back to buds oriented outwards encourages robust, fruit-producing development. For the common pear specifically, meticulous elimination of rootstock shoots is crucial for the tree's vigor. Pruning not only sculpts the common pear but also fosters superior fruit characteristics.
What Are the Benefits of Pruning Common Pear?
What Are the Benefits of Pruning Common Pear?
Trimming common pear promotes a more plentiful harvest by enhancing light exposure and air movement, which can boost fruit size and quality. It also sustains vitality, ensuring common pear's robust growth and optimal fruit yield. Regular trimming helps keep common pear well-formed, manageable, and visually appealing.
What Is the Best Time for Pruning Common Pear?
What Is the Best Time for Pruning Common Pear?
During late winter, common pear is dormant, a period of minimal growth and metabolic activity. Pruning at this time reduces the risk of stress and disease spread, as the plant isn't actively producing new shoots, and cuts can heal more effectively without diverting energy from growth processes. Furthermore, the absence of leaves allows for clearer visibility of the plant's structure, enabling more precise cuts. Pruning before spring growth also ensures resources are directed towards producing healthy new growth and facilitates a stronger flower and fruit set for the upcoming season.
What Tools Do I Need to Prune Common Pear?
Hand Pruners
Perfect for making precise cuts on young wood and slender branches, hand pruners are vital for shaping common pear and removing diseased or dead wood. Opt for bypass pruners for clean cuts that encourage healthy regrowth.
Lopping Shears
Common pear often has thicker branches that require the added leverage provided by lopping shears. These tools can typically cut through branches up to 2 inches thick and are essential for intermediate pruning tasks.
Pruning Saw
For the mature and thicker branches of common pear, a pruning saw is indispensable. These saws can handle branches over 2 inches thick, ensuring clean cuts without damaging the surrounding wood.
Pole Pruner
Common pear trees can grow quite tall, necessitating a pole pruner for reaching high branches without the use of a ladder. This tool contributes to the safety and efficiency of the pruning process.
Hedge Shears
While not typically associated with tree pruning, hedge shears can be used on common pear for shaping and trimming the outermost foliage, especially in younger trees or for maintaining a formal appearance.
How to Prune Common Pear
Step1: Timing for Pruning
Select the appropriate time to prune common pear, which is late winter or early spring before bud break. This timing helps prevent the spread of pests and diseases and ensures that wounds heal quickly in the growing season.
Step2: Sanitization of Tools
Begin by sanitizing your pruning tools with a 10% bleach solution or alcohol to prevent the spread of disease.
Step3: Identifying Old Wood
Identify old wood on common pear by looking for branches that are thicker, have darker bark, and less vigorous growth. These branches often produce less fruit and can be pruned to rejuvenate the tree.
Step4: Cutting Technique for Old Wood
To remove old wood, make cuts just above outward-facing buds or lateral branches. The cuts should be angled downwards away from the bud to allow water to run off and reduce the risk of disease.
Step5: Identifying and Pruning Diseased Branches
Look for diseased branches, which may have discoloration, unusual growths, or signs of insect damage. Prune these branches immediately to prevent the spread of disease, cutting them back to healthy tissue.
Step6: Removal Technique for Diseased Branches
When pruning diseased branches, make the cut at least several inches into the healthy wood to ensure all affected areas are removed. Disinfect the pruning tools after each cut on a diseased branch.
Step7: Sucker Identification and Removal
Inspect the base of common pear for suckers, which are vigorous shoots growing from the roots or the base of the trunk. These can drain energy from the desired parts of the tree and should be removed.
Step8: Pruning Suckers at the Base
Prune suckers as close to the base as possible, making clean cuts with a sharp pair of pruning shears. Avoid tearing the bark, which can be an entry point for disease.
Step9: Canopy Shaping for Sunlight Penetration
After removing old wood, diseased branches, and suckers, step back to examine the shape of common pear. Aim for an open-centered shape, which allows sunlight to penetrate the canopy and air to circulate, reducing disease pressure.
Step10: Final Shaping and Avoiding Over-Pruning
Make any final shaping cuts to maintain an evenly balanced framework of primary branches, taking care not to over-prune. A good rule of thumb is not to remove more than about a third of the canopy in any given year.
Step11: Disposal of Pruning Debris
Clean up all the removed material by either burning, disposing of it far from the orchard, or through proper composting methods to minimize the potential for disease to spread.
Step12: Post-Pruning Tree Care
After the pruning session, provide common pear with adequate water and consider a balanced fertilizer to support healthy growth during the recovery and forthcoming growing seasons.
Post-Pruning Care for Common Pear
Post-Pruning Care for Common Pear
Immediately after pruning common pear, ensure clean cuts to prevent disease. Maintain a well-lit environment, moderate humidity, and stable temperatures for recovery. Promptly apply a balanced fertilizer to replenish nutrients. Observe common pear frequently for wilting or discoloration, indicative of stress or infection. If symptoms appear, treat with appropriate fungicides or pesticides and adjust care as necessary.
Common Pruning Mistakes with Common Pear
Over or Under Pruning Shock and Shaping Issues
Cutting too much or too little, which can either shock the plant or lead to inadequate shaping and fruiting.
Jagged Cuts from Dull or Dirty Tools
Using dull or unclean tools, which can result in jagged cuts that are susceptible to pests and diseases.
Unplanned Pruning Causes Imbalance and Low Fruit Yield
Pruning without a clear plan, leading to an imbalanced tree structure and potentially reducing fruit production.
Excessive Old Branch Removal Reduces Fruiting
Removing too many older branches, which might diminish the amount of fruit-bearing wood.
Energy Loss by Ignoring Water Sprouts and Suckers
Neglecting to remove water sprouts and suckers, which can divert energy from productive branches.
Common Pruning Tips for Common Pear
Use Sharp, Sanitized Tools for Healthy Cuts
Ensure that all pruning tools are sharp and sanitized before starting to avoid spreading diseases and to make clean cuts.
Remove Dead or Damaged Limbs for Plant Health
Start by removing any dead, damaged, or diseased branches to promote common pear's health and vigor.
Thin Canopy for Better Air and Sunlight Exposure
Thin out the canopy to improve air circulation and sunlight penetration, which is crucial for healthy growth and abundant fruiting.
Prune to Preserve Natural Shape and Strong Structure
Maintain the natural shape of common pear while pruning, focusing on developing a strong, well-spaced branch structure.
Delete Water Sprouts and Suckers to Focus Energy
Regularly inspect for and promptly remove any water sprouts (vigorous vertical shoots) and suckers (shoots from the base) to direct the plant's energy into its primary branches.


