How to Prune New zealand flax?
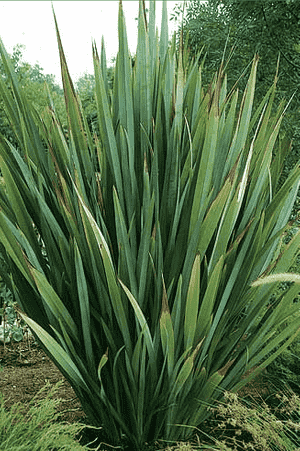
Hailing from New Zealand, new zealand flax is a resilient perennial distinguished by its blade-like foliage and striking floral stalks. To preserve its form and vitality, detach any impaired or faded leaves by severing them near the base. Trim spent flower stalks once blossoms diminish to stimulate further development. The ideal period for trimming is in early spring or late winter, steering clear of the plant's vigorous growth stage. Consistent trimming enhances robustness and boosts air movement, thereby reducing susceptibility to ailments.
What Are the Benefits of Pruning New Zealand Flax?
What Are the Benefits of Pruning New Zealand Flax?
Trimming new zealand flax promotes robust development and maintains its form. Strategic cuts aid in revitalizing the plant by eliminating old foliage, thereby directing energy towards new growth. This process ensures new zealand flax stays neat and visually appealing.
What Is the Best Time for Pruning New Zealand Flax?
What Is the Best Time for Pruning New Zealand Flax?
During late winter, new zealand flax is typically in a dormant state, meaning the plant's energy is conserved, and it is less vulnerable to pruning stress. This timing prevents sap loss that can occur in actively growing plants and lowers the risk of disease transmission through fresh cuts. Furthermore, pruning before spring growth allows gardeners to shape the plant and remove any damaged or diseased foliage, which can encourage healthier and more vigorous growth in the spring. Early spring pruning is also beneficial as it clears out dead leaves and allows sunlight to reach the plant's center, stimulating new growth. It is important to avoid pruning new zealand flax during its active growth period, especially in late spring and summer, as this can disrupt its natural growth cycle and reduce its overall health and vitality.
What Tools Do I Need to Prune New Zealand Flax?
Sharp Hand Pruners
Perfect for precise trimming and cutting of new zealand flax's smaller, more manageable leaves and stems. They ensure clean cuts that encourage healthy regrowth.
Long-Handled Loppers
Best for reaching into new zealand flax's dense foliage to remove larger stems or for cutting tougher, thicker leaves that hand pruners cannot handle.
Heavy-Duty Garden Shears
Useful for shaping new zealand flax and cutting back large sections of leaves in one motion. Their longer blades make them suitable for efficiently trimming vast clumps.
Pruning Saw
Recommended for cutting through the thickest parts of new zealand flax's foliage or when dealing with old, tough stems that other tools cannot manage.
Gloves
An essential accessory to protect the gardener's hands from the rough edges of new zealand flax's leaves.
How to Prune New Zealand Flax
Step1: Identifying Dead or Unhealthy Plant Parts
Examine new zealand flax closely to identify dead foliage, brown leaf tips, and old flowering stems that require trimming. Pruning is best performed in the spring or early summer when the plant is actively growing.
Step2: Tool Preparation and Sanitization
Prepare sharp and clean pruning tools such as secateurs or a sharp knife. Disinfect the tools beforehand to prevent the spread of disease.
Step3: Dead Foliage Removal at Base
To remove dead foliage, trace the dead leaf back to the base of new zealand flax where it emerges from the main clump. Cut the leaf as close to the base as possible without harming nearby healthy foliage.
Step4: Trimming Brown Leaf Tips
For brown leaf tips, carefully snip the tips back to the green, living tissue. Ensure not to cut into the healthy part of the leaf as it may cause additional damage or stress to new zealand flax.
Step5: Cutting Back Dried Flowering Stems
Prune old flowering stems once they have dried out and turned brown. Cut these stems at the base, near where they emerge from the foliage clump, to keep new zealand flax looking neat and to encourage new growth.
Step6: Cleanup and Disposal of Prunings
After trimming, clean up and dispose of all prunings to prevent any potential disease spread and to maintain a tidy growing space for new zealand flax.
Step7: Post-Pruning Watering
Water new zealand flax well after pruning to help it recover from the stress of trimming and to promote healthy new growth.
Step8: Post-Pruning Monitoring and Care
Monitor new zealand flax over the following weeks for any signs of stress or disease, and ensure that it is adequately cared for with appropriate water and fertilizer to encourage robust growth.
Post-Pruning Care for New Zealand Flax
Post-Pruning Care for New Zealand Flax
After pruning new zealand flax, immediately water to aid in stress recovery. Maintain moderate humidity and indirect sunlight to prevent leaf scorch. Avoid extreme temperatures. Apply a balanced, slow-release fertilizer to support new growth. Monitor for wilting, discoloration, and signs of pests, as these indicate stress or infection. Water regularly, but allow the soil to dry slightly between waterings. If infection signs are present, apply appropriate fungicide or insecticide.
Common Pruning Mistakes with New Zealand Flax
Avoid Cutting Green Leaf Parts
Cutting into the green part of the leaves can cause new zealand flax to appear ragged and may affect the plant's health by creating entry points for disease.
Don't Over-Prune Leaves at Once
Removing too many leaves at once can stress new zealand flax, potentially stunting its growth or leading to poor plant health.
Remove Damaged or Diseased Leaves
Ignoring damaged or diseased leaves when pruning can lead to further deterioration of new zealand flax's condition as these issues can spread if not addressed.
Do Not Prematurely Cut Flower Stalks
Snipping off flower stalks too early deprives new zealand flax of its natural life cycle and potential to set seeds if propagation is desired.
Use Clean, Sharp Pruning Tools
Using dull or dirty pruning tools can lead to imprecise cuts and introduce diseases to new zealand flax.
Common Pruning Tips for New Zealand Flax
Prune with Clean and Sharp Tools
Always use clean, sharp tools when pruning new zealand flax to make clean cuts and reduce the risk of infecting the plant.
Remove Dead/Damaged Leaves Carefully
Focus on removing only dead or damaged leaves from the base of new zealand flax, employing a downward pull if they come away easily to avoid harming the plant.
Prevent Rubbing Leaves, Improve Circulation
Prune out any leaves that are crossing or rubbing against each other to prevent damage and improve air circulation for new zealand flax.
Gradual Pruning Over Seasons
If you need to reduce the size of new zealand flax, do so gradually over several seasons to avoid shocking the plant and to maintain its shape.
Cut Back Flower Stalks Post-Flowering
After flowering, cut the flower stalks of new zealand flax back to the base to encourage new growth and maintain a tidy appearance.
Inspect for Pests and Diseases Regularly
Regularly inspect new zealand flax for signs of pests or diseases during pruning activities and take appropriate action if any are found.


